• Book
    • Watercolor with Brush Pens
    • Watercolor Flowers Using Markers
    • Paint a Watercolor Galaxy Butterfly with Markers
    • Paint Watercolor Galaxy Bookmarks using Markers
    • Timelapse Video for Artists
  • Shop
  • Society6 Store
  • Blog
  • Portfolio
  • About
  • Contact
Menu

Brown Paper Bunny Studio

Art & Fashion Illustration
  • Book
  • Classes
    • Watercolor with Brush Pens
    • Watercolor Flowers Using Markers
    • Paint a Watercolor Galaxy Butterfly with Markers
    • Paint Watercolor Galaxy Bookmarks using Markers
    • Timelapse Video for Artists
  • Shop
  • Society6 Store
  • Blog
  • Portfolio
  • About
  • Contact
How to Make an Abstract Collage by Jessica Mack of BrownPaperBunny

How to Make an Abstract Collage

April 10, 2019

Please note: This blog post contains affiliate links, which help pay for the upkeep of this site. That being said, I will never, ever promote anything I am not 100% in love with!

----------

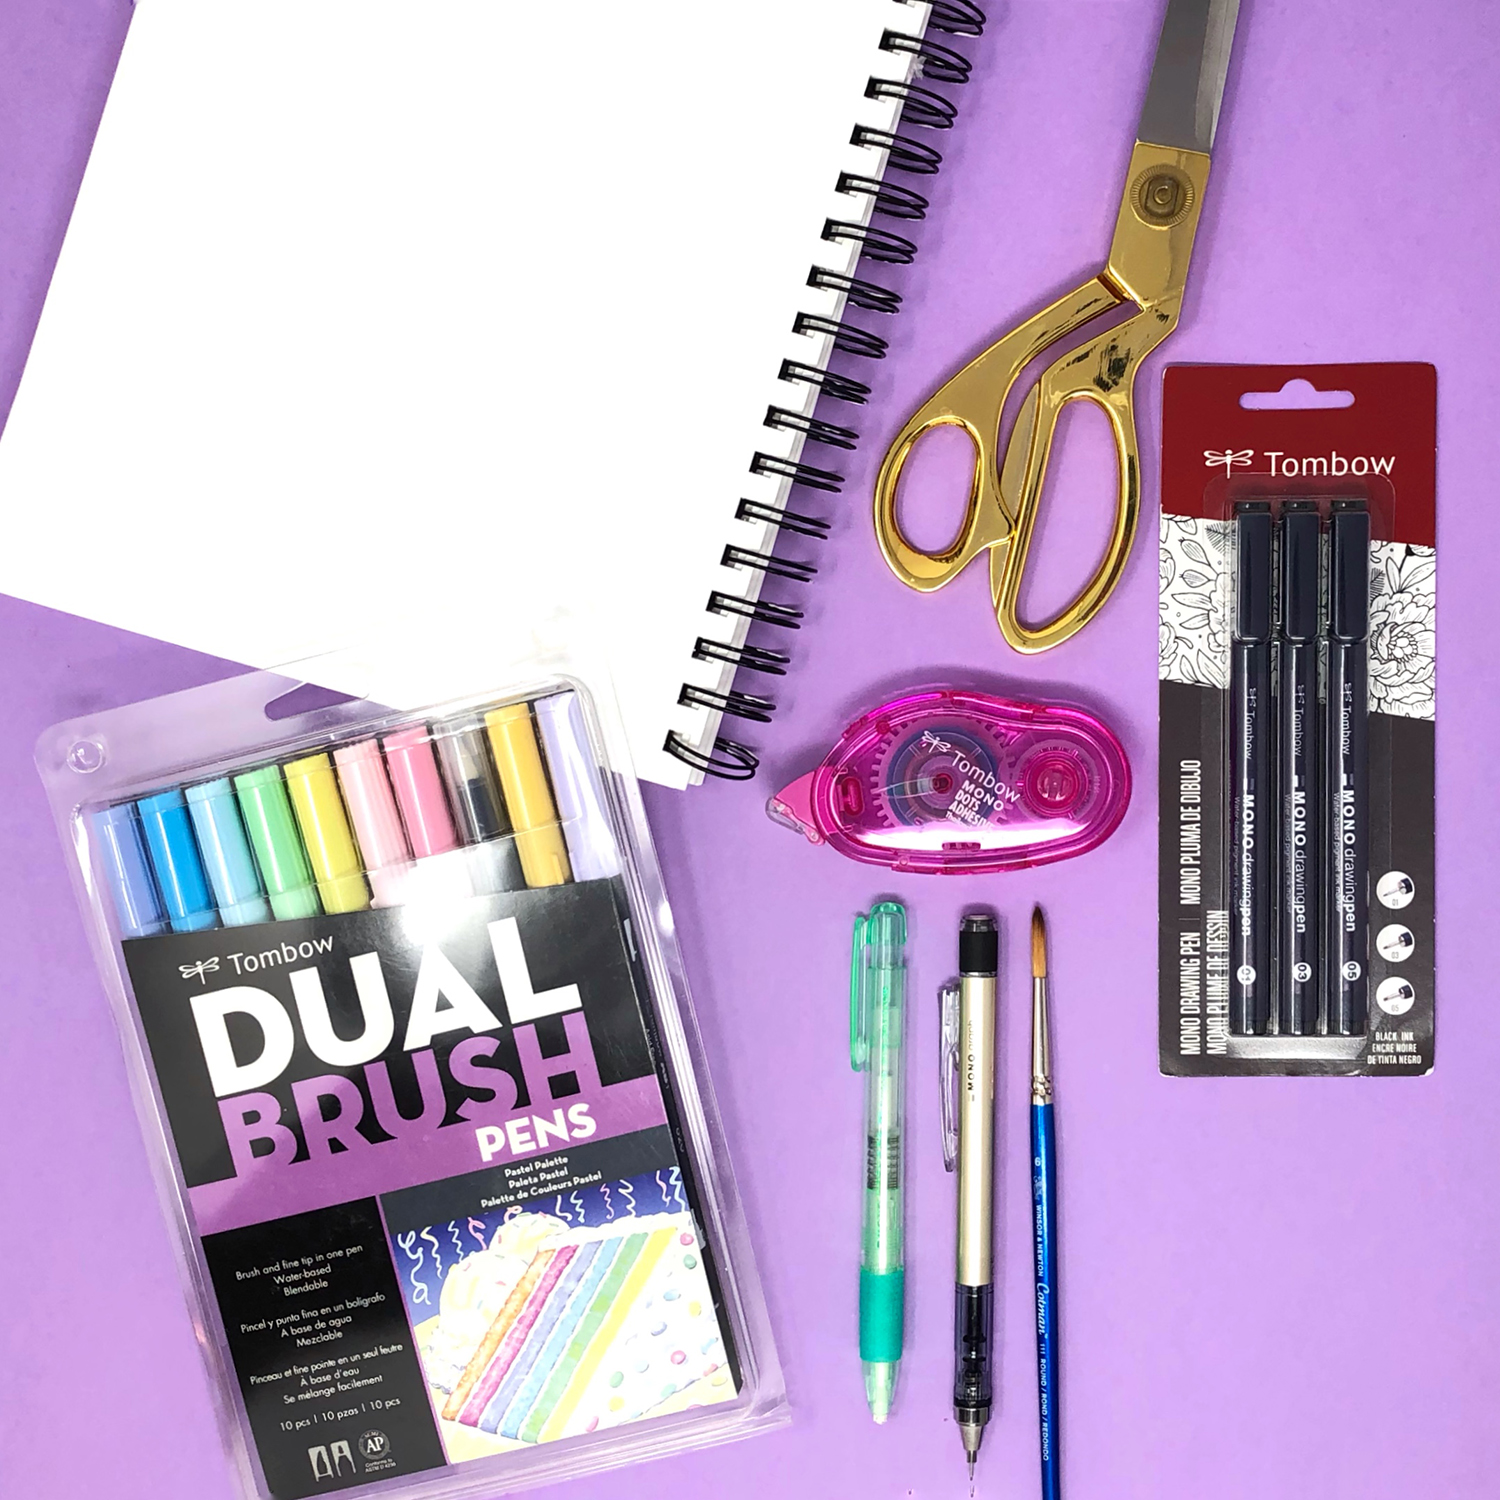
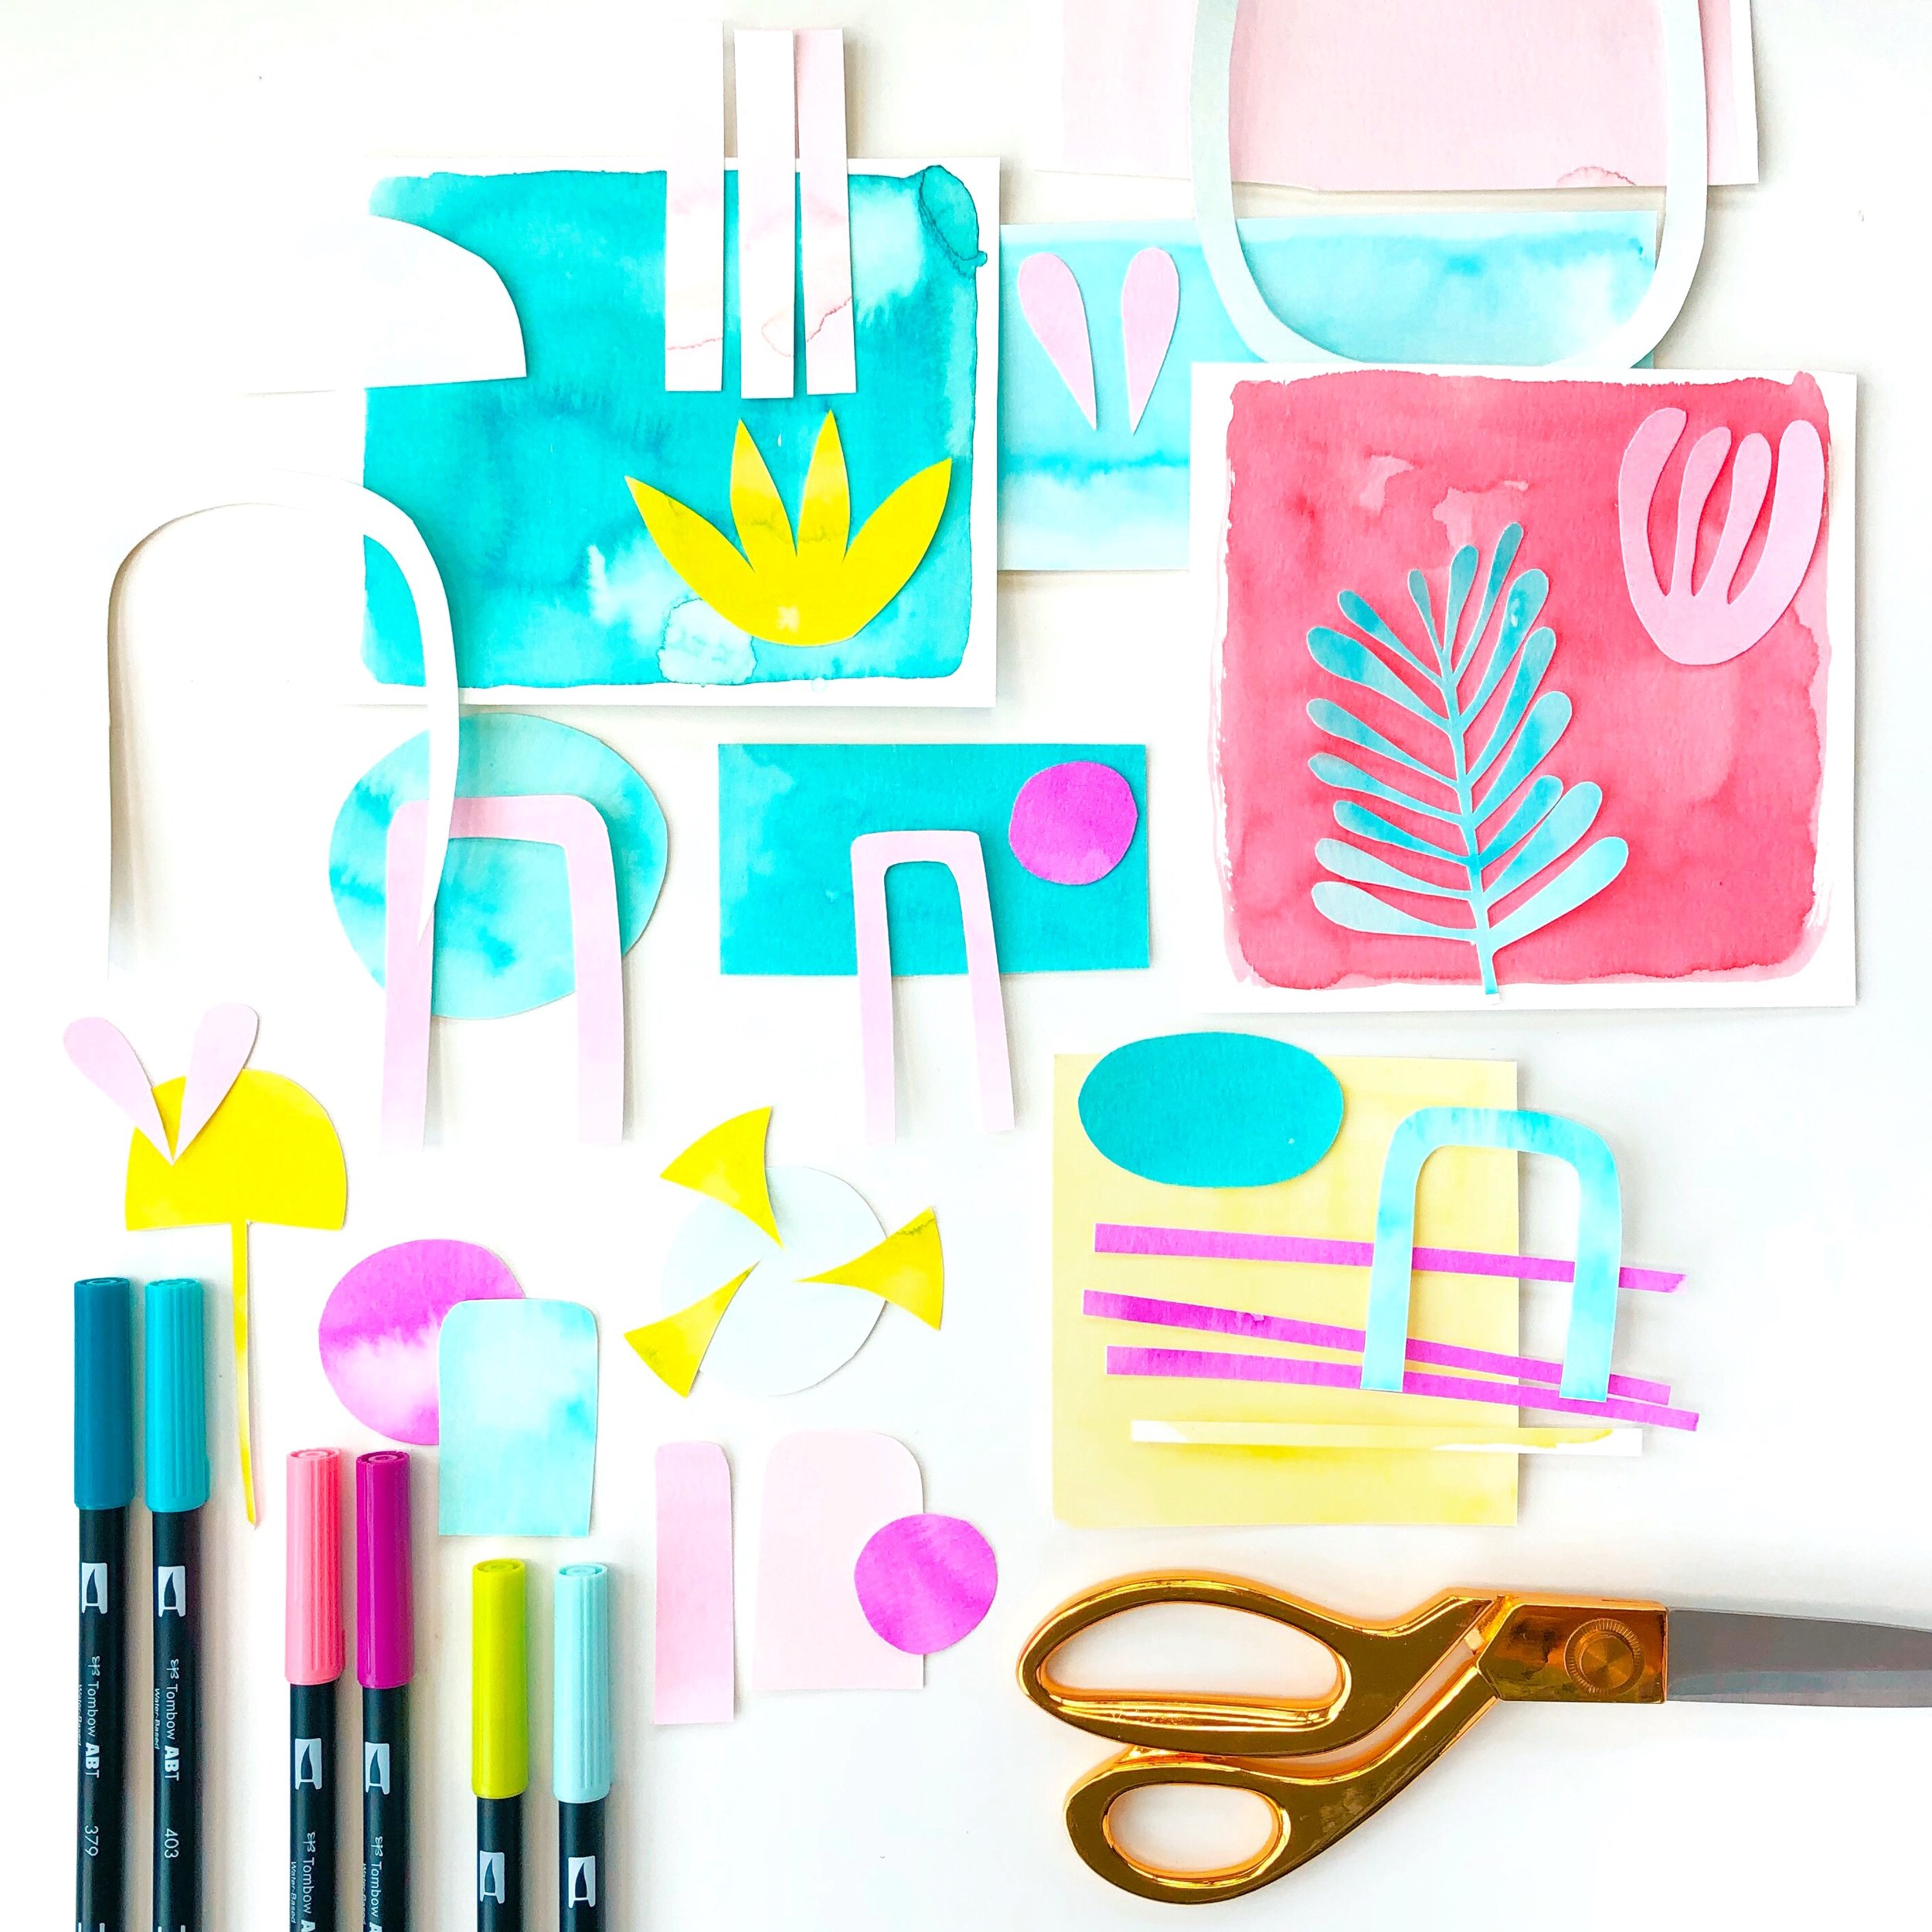
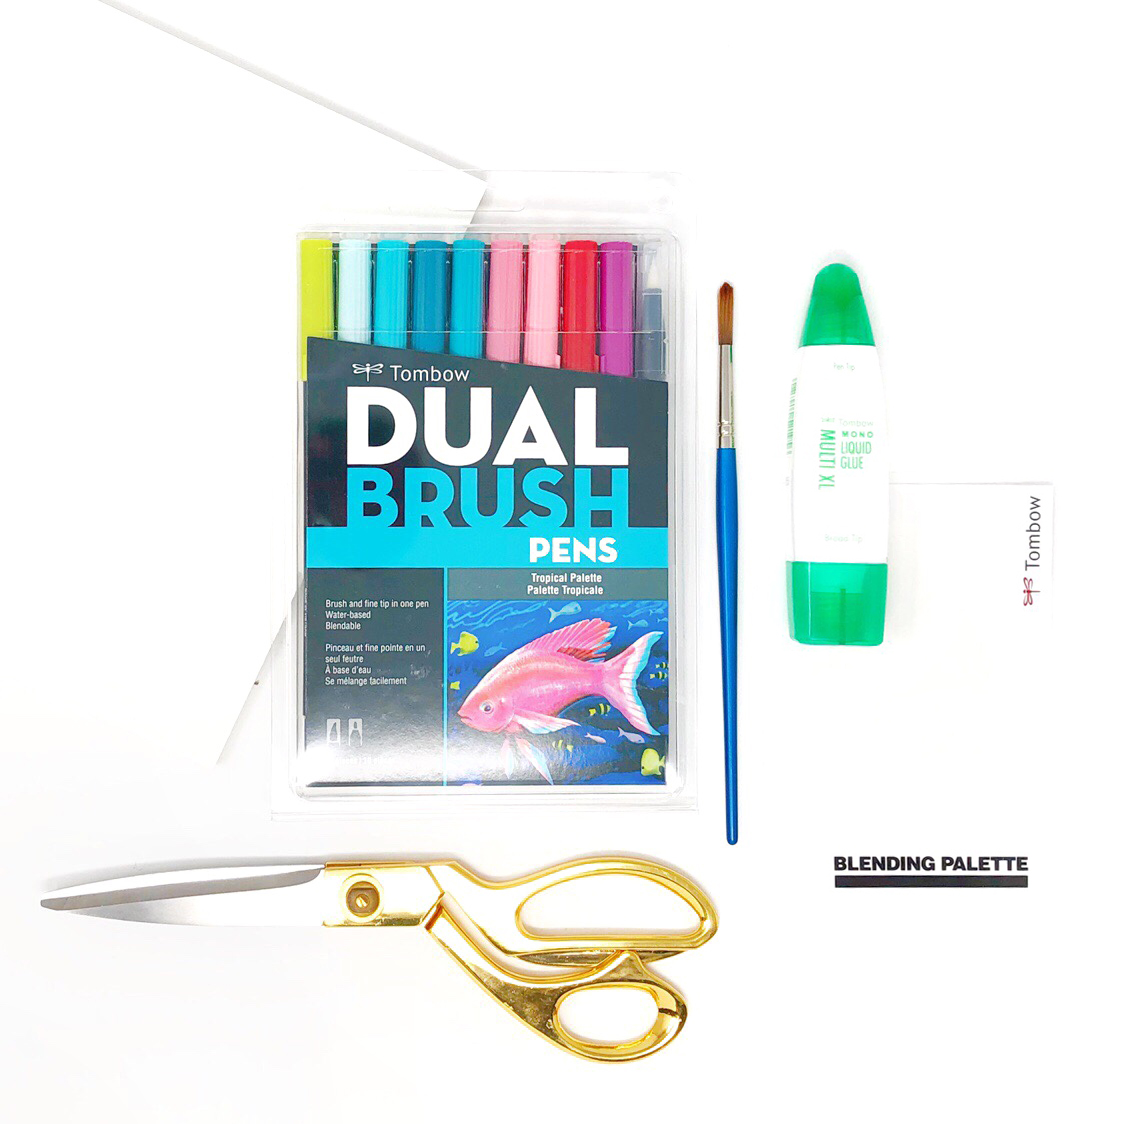
World Art Day is coming up (April 15) so I’m going to show you an easy and fun way to make some abstract art for your walls. Here’s what you’ll need to get started:
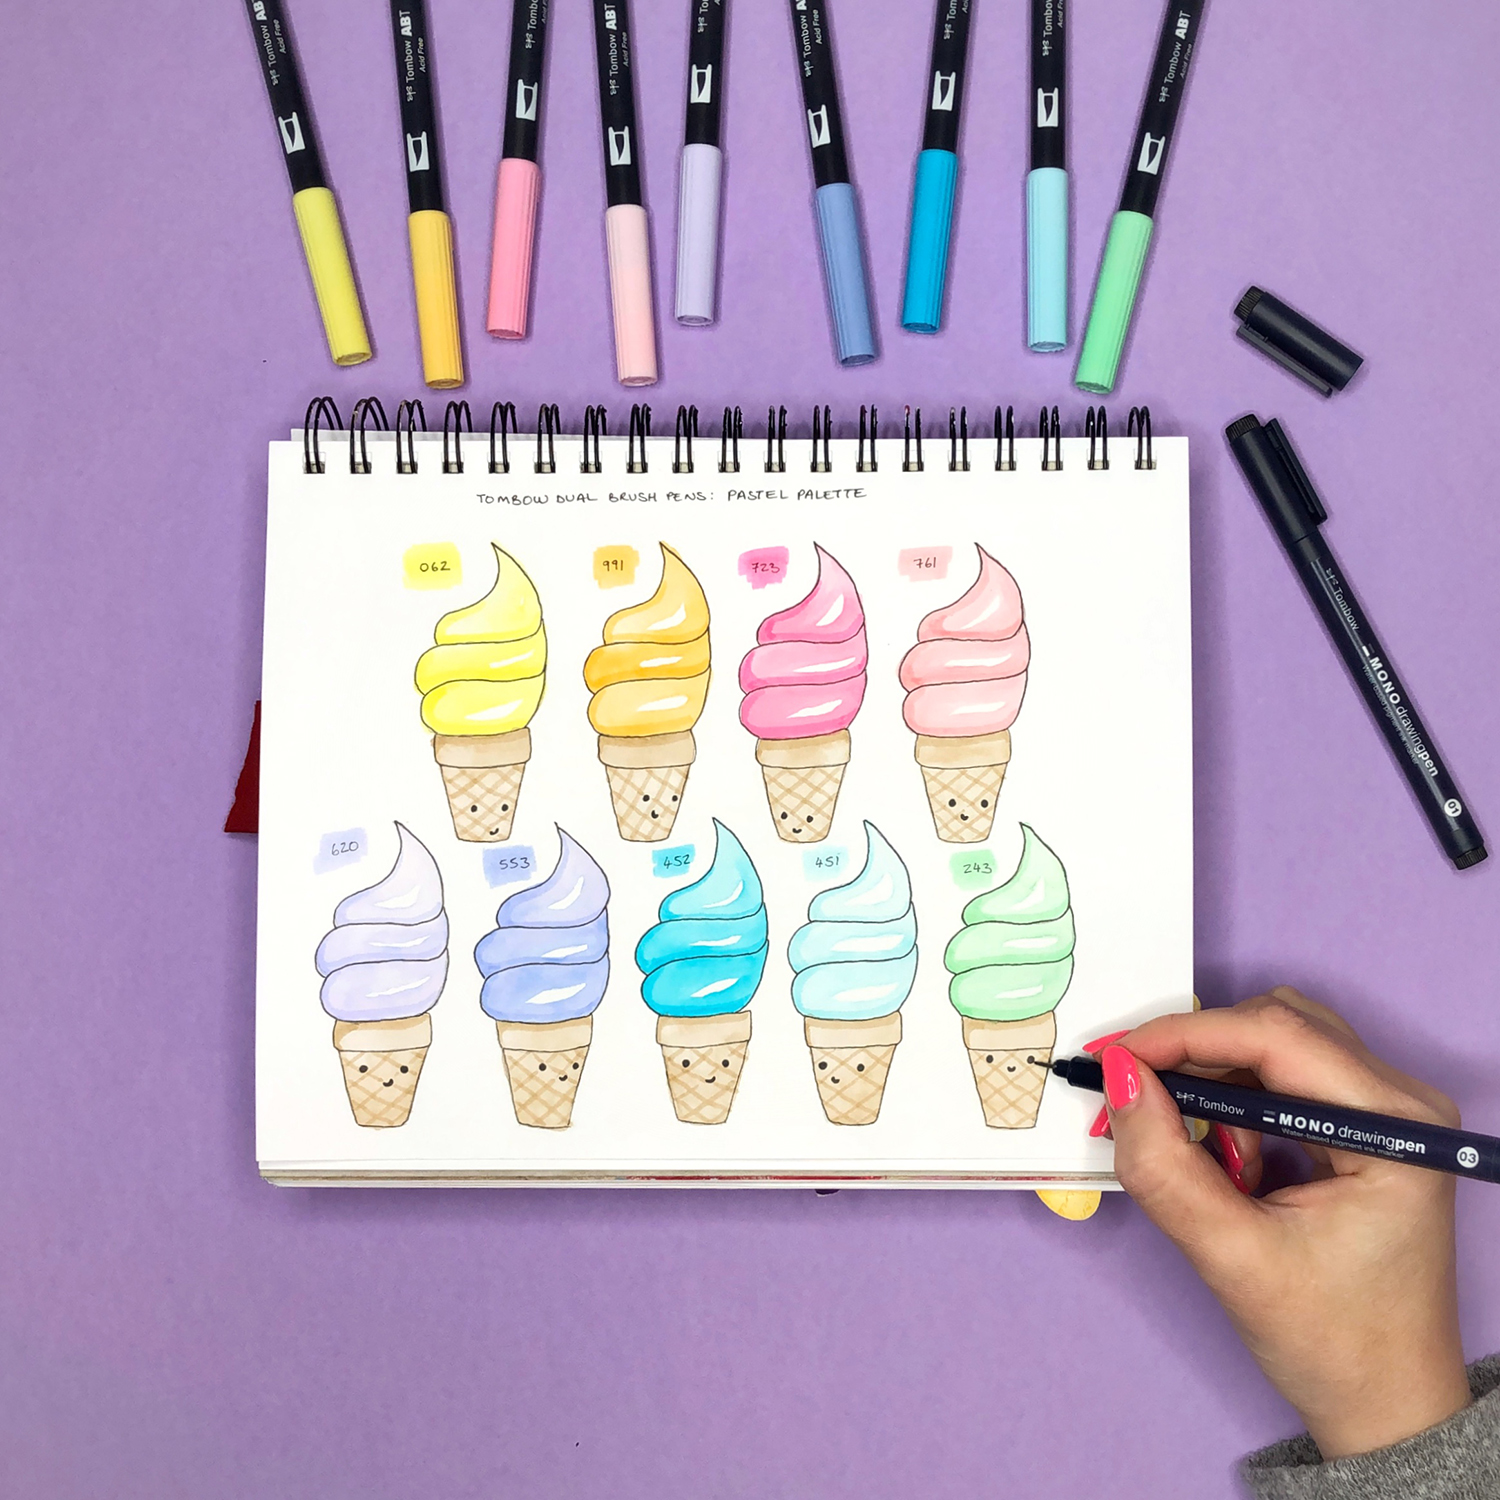
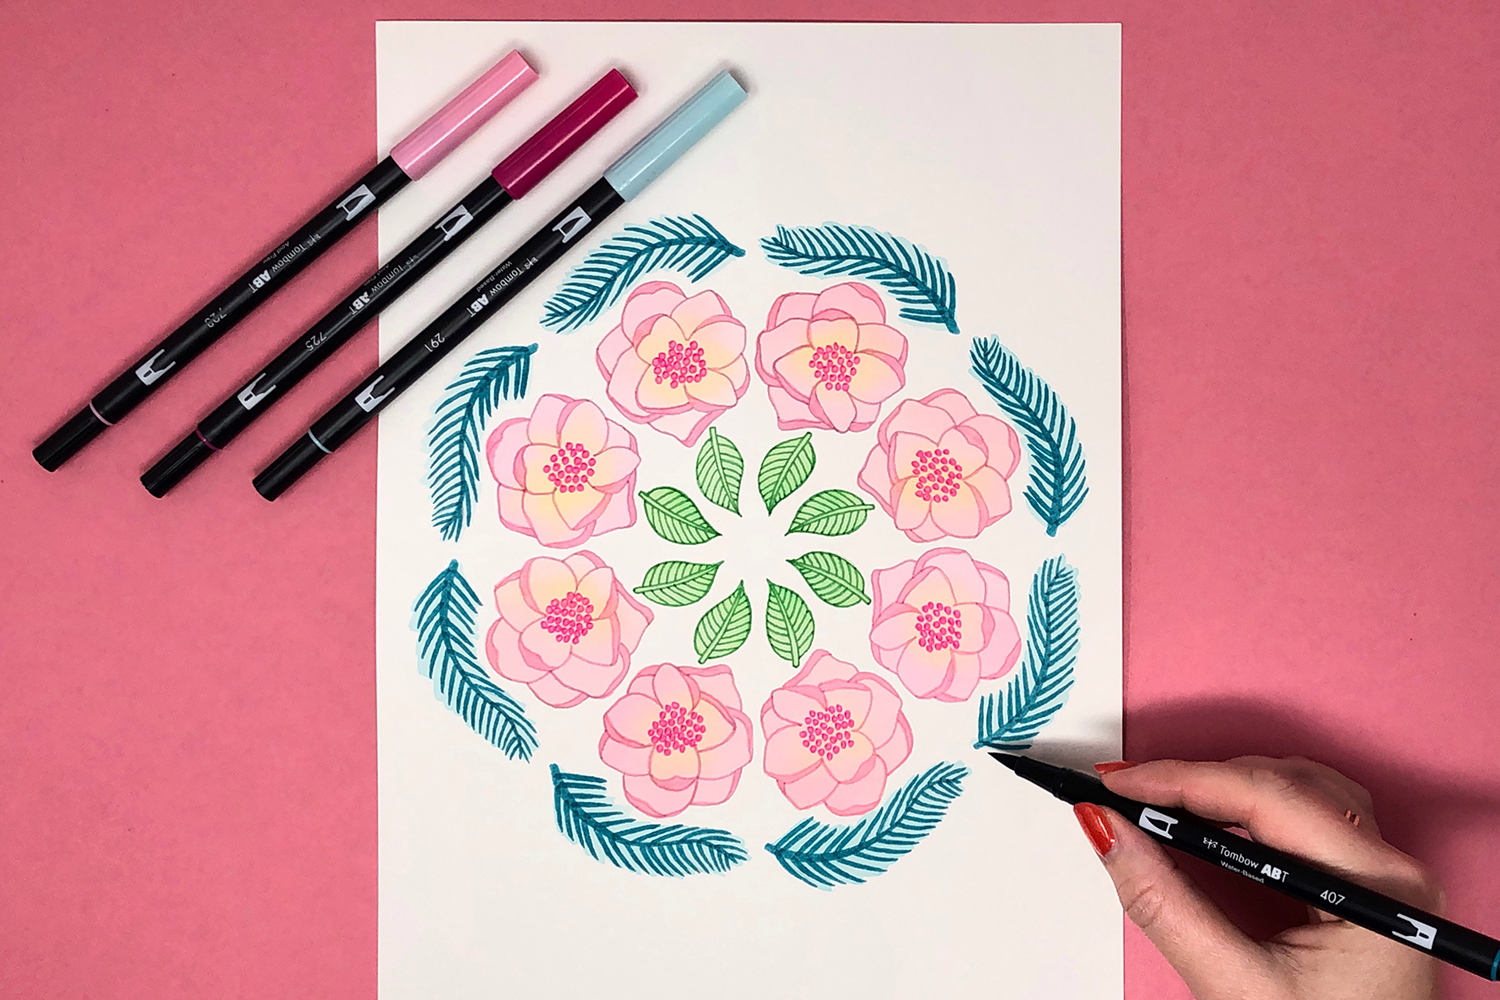
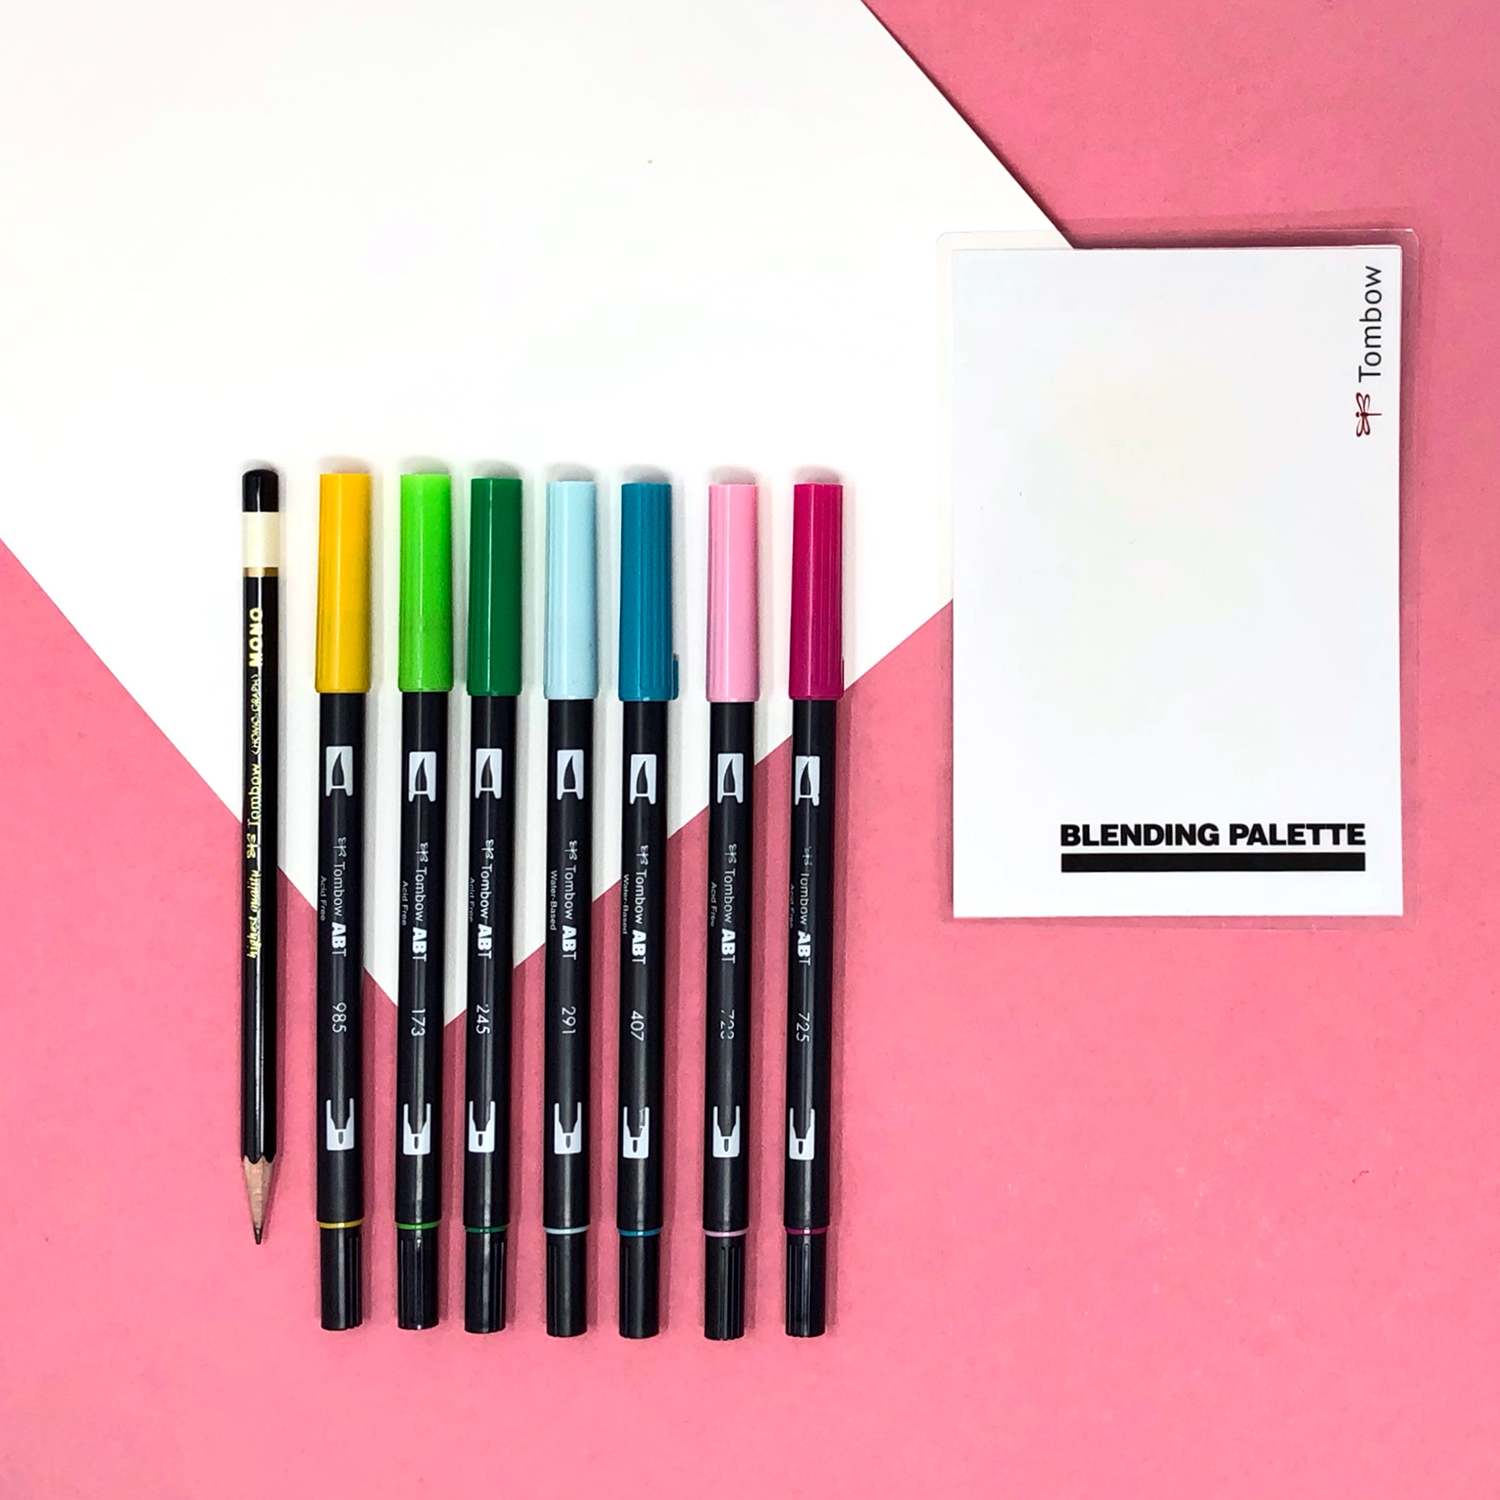
Supplies:

  • Tombow Dual Brush Pens

  • Watercolor Paper

  • Paintbrush

  • Blending Palette

  • Scissors

  • MONO Multi XL Liquid Glue

How to Make an Abstract Collage by Jessica Mack of BrownPaperBunny

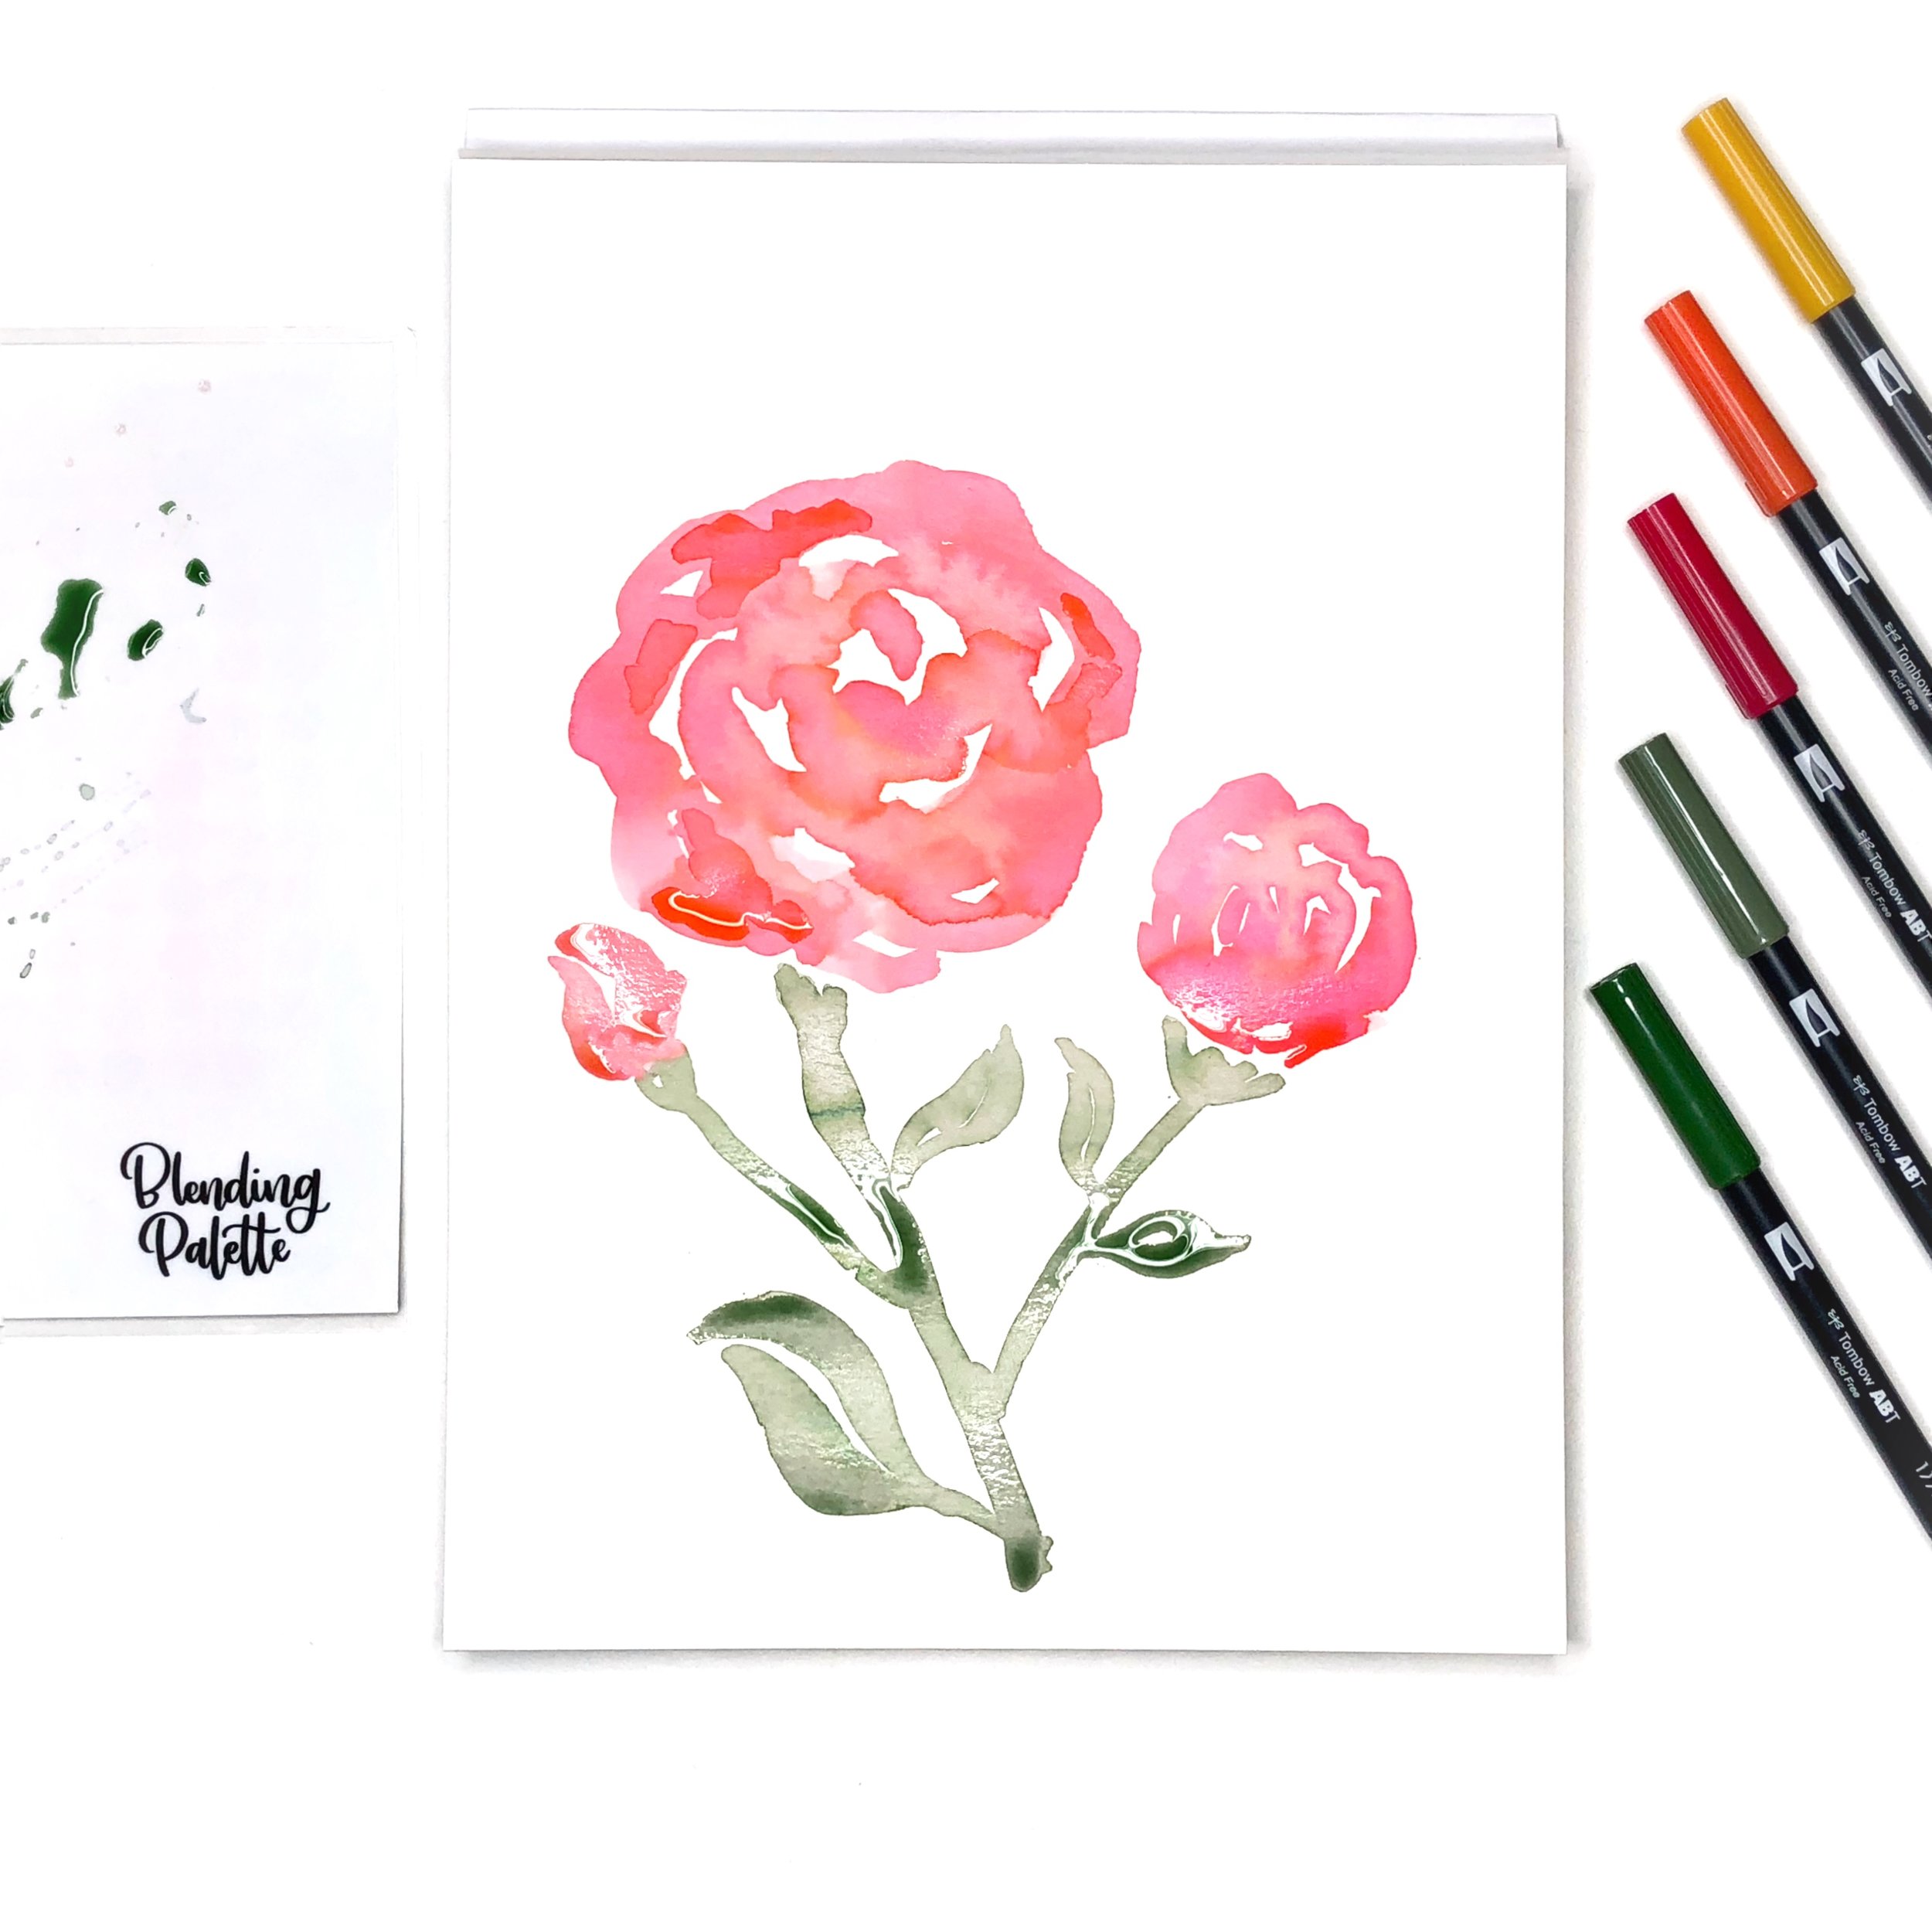
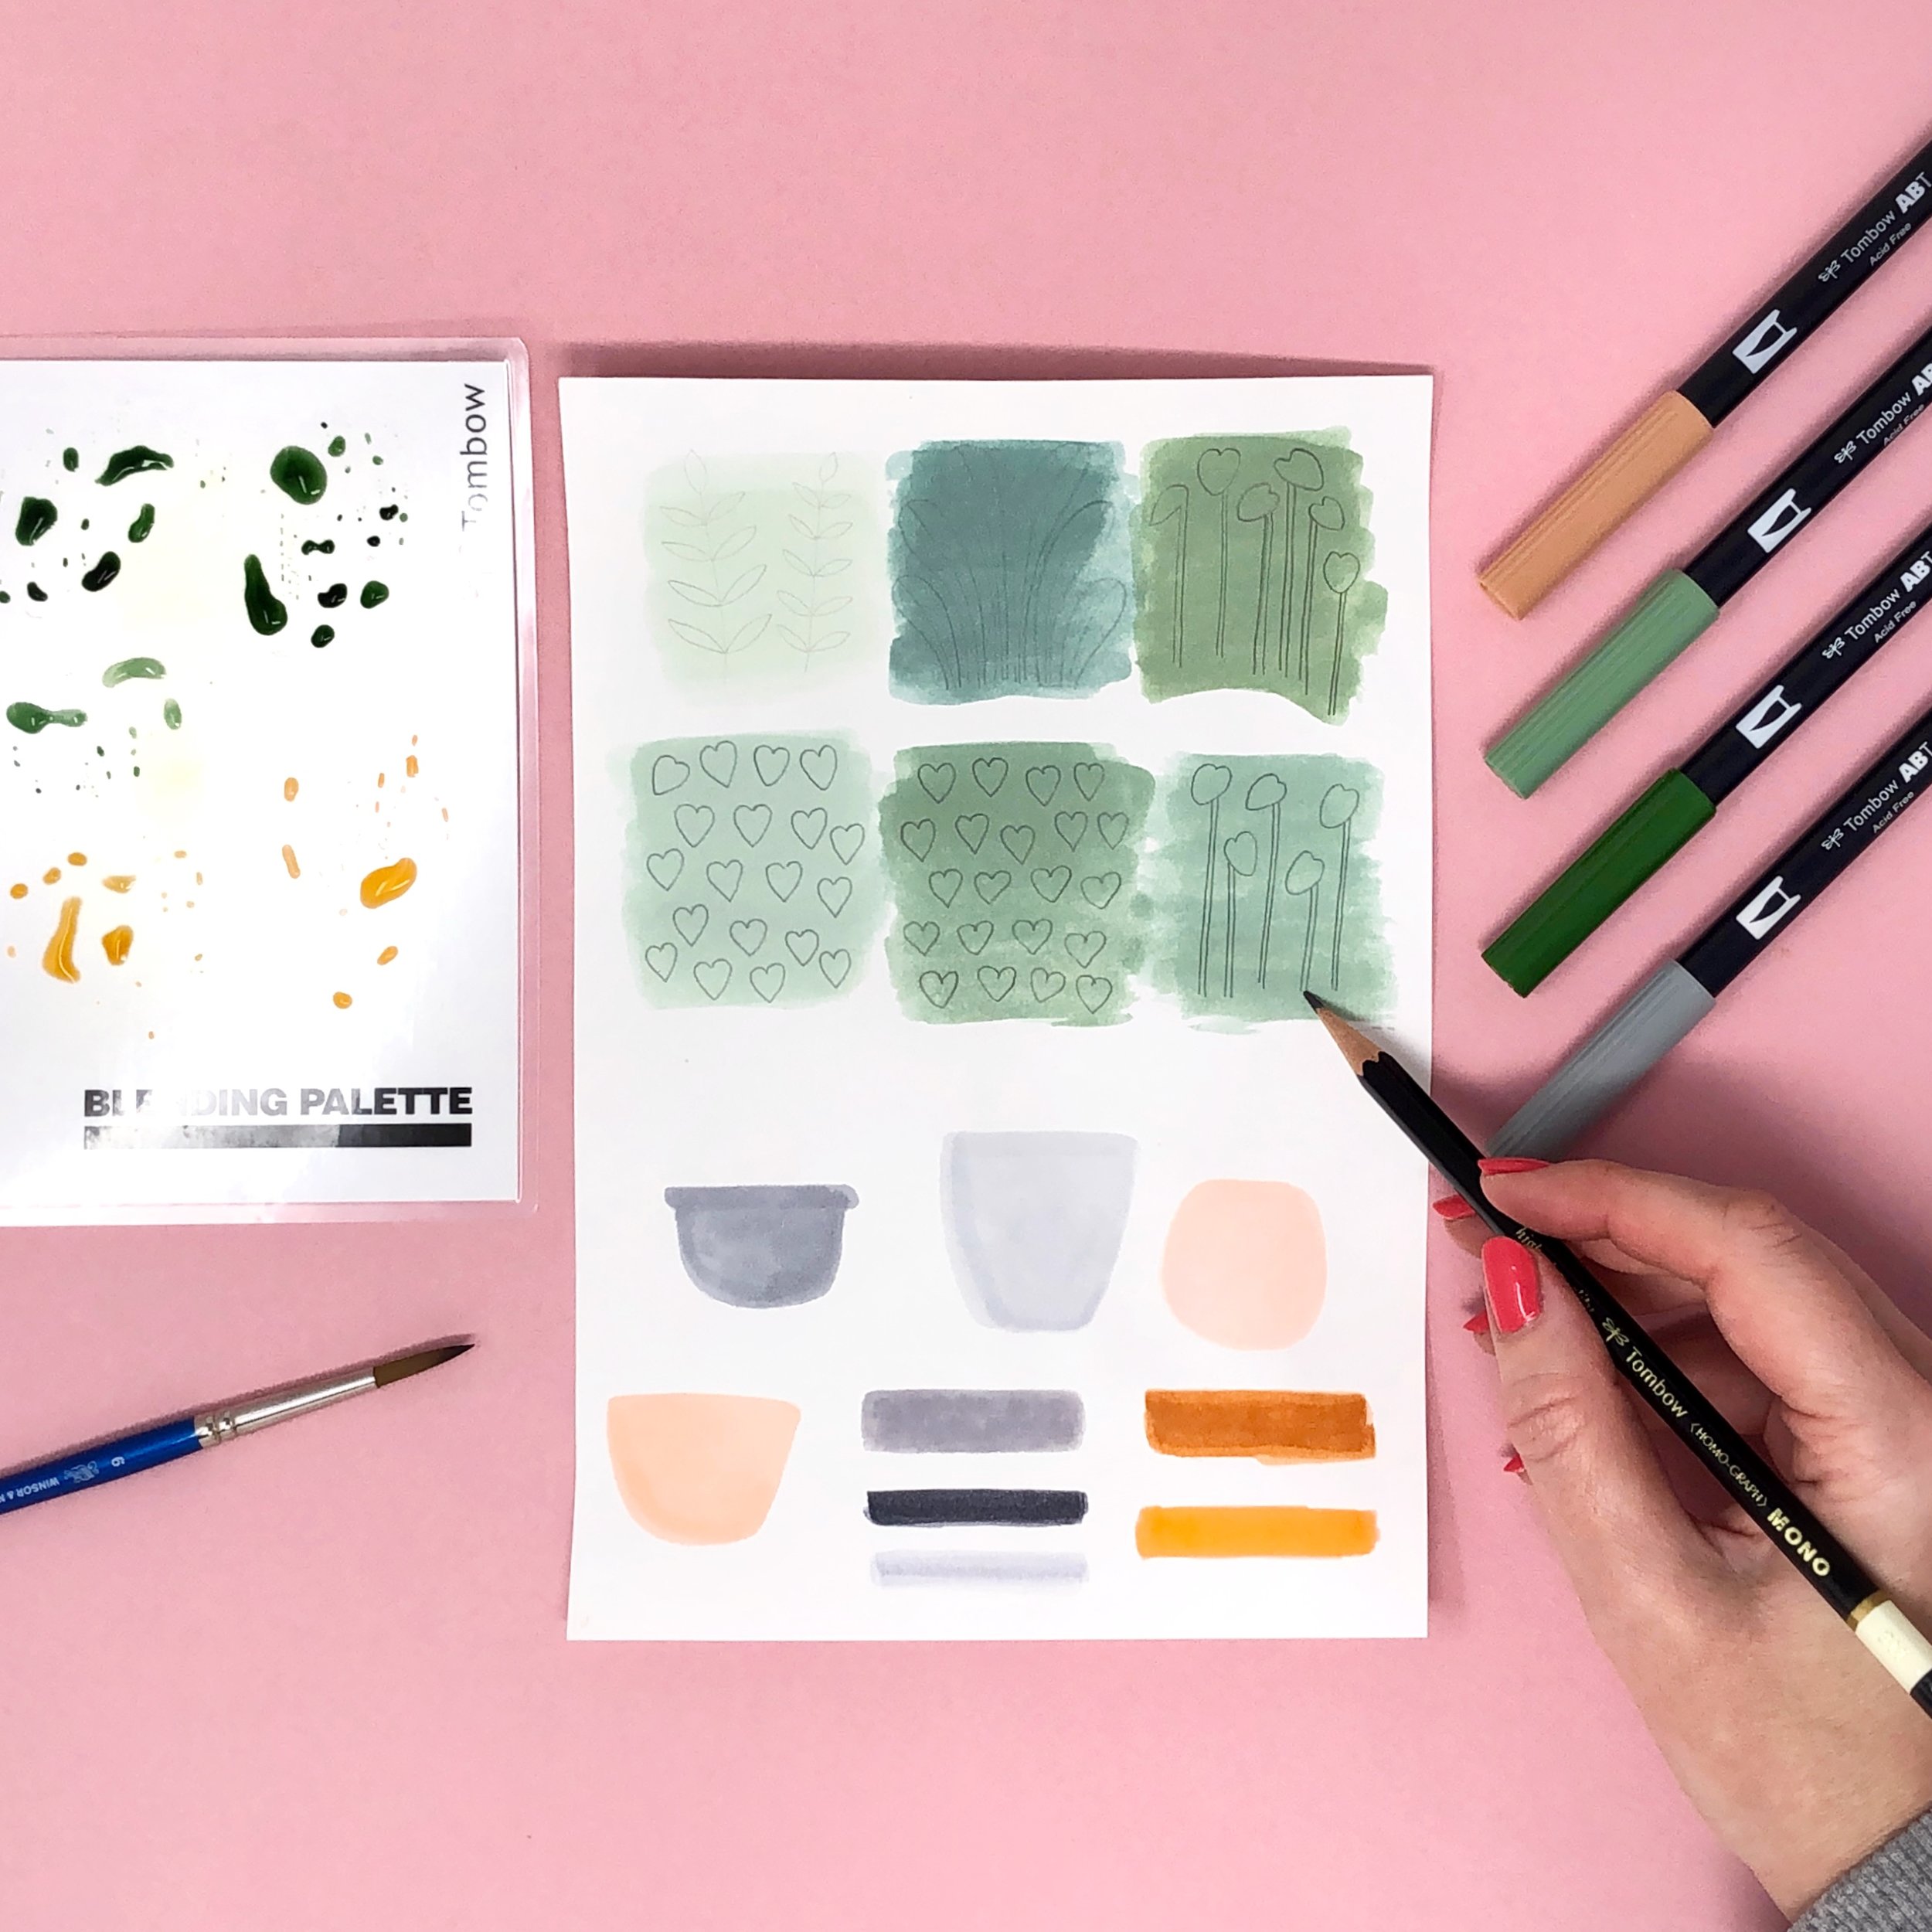
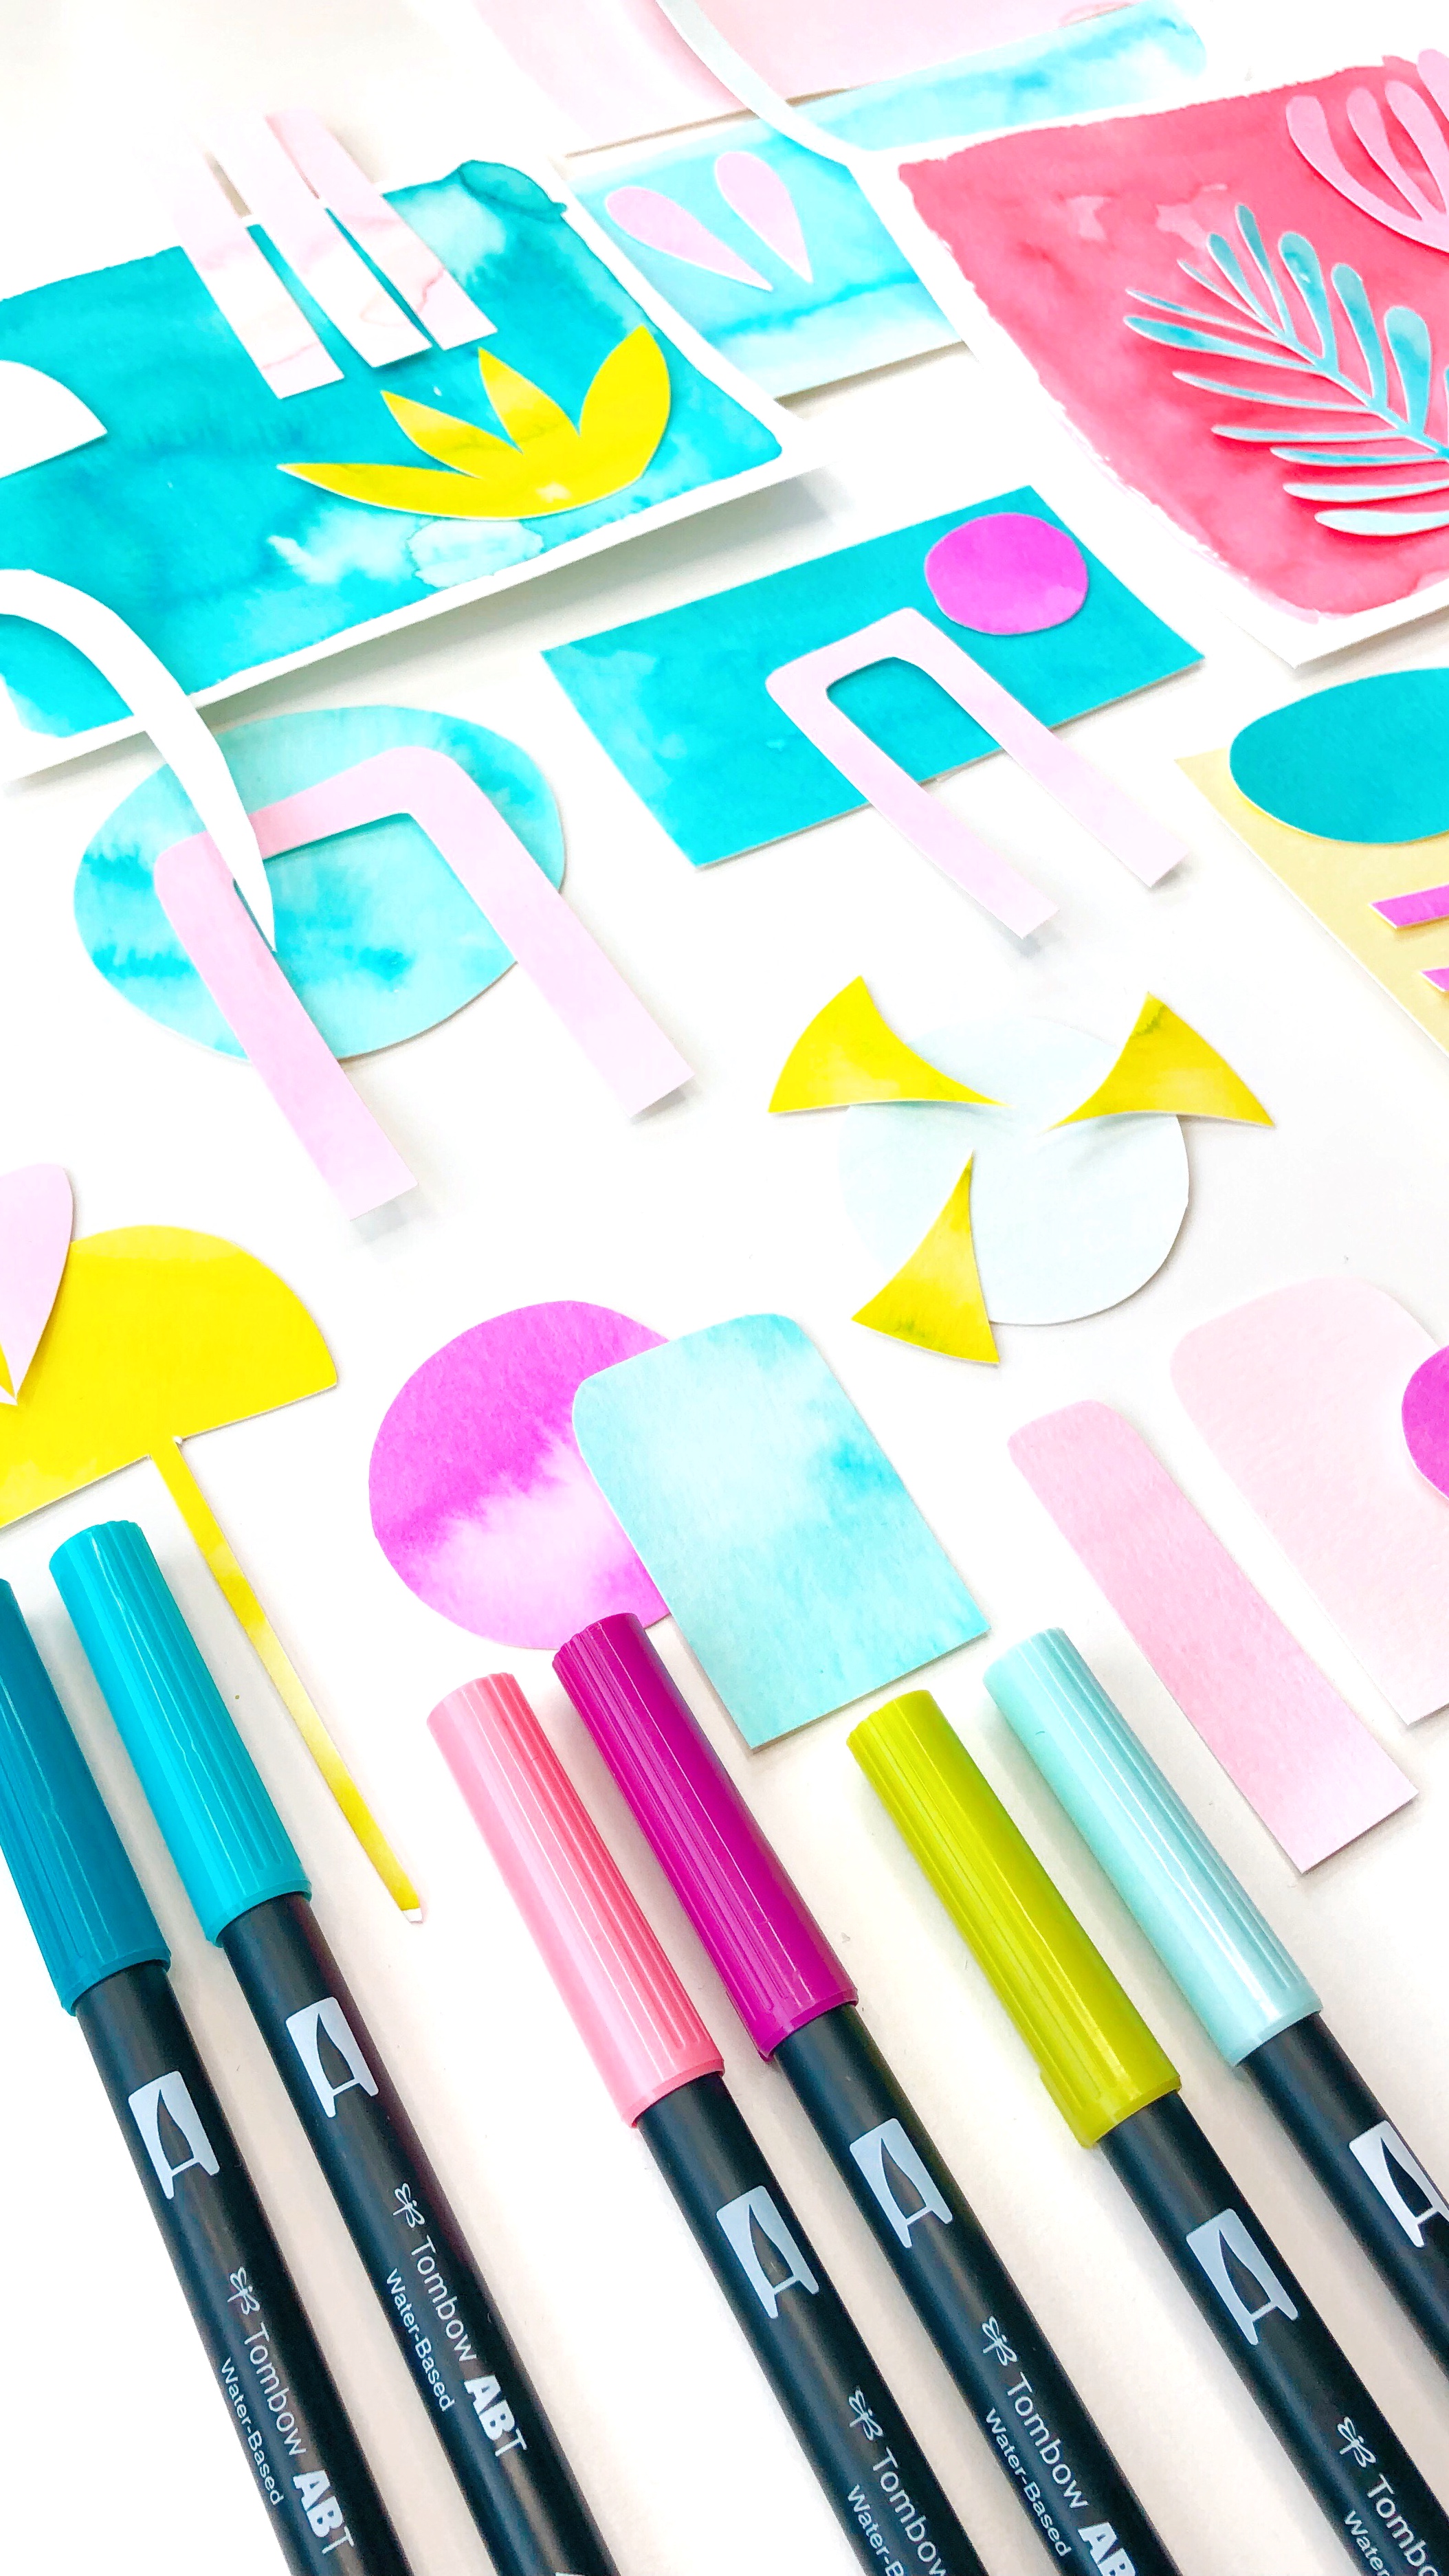
Step 1: Make Color Blocks

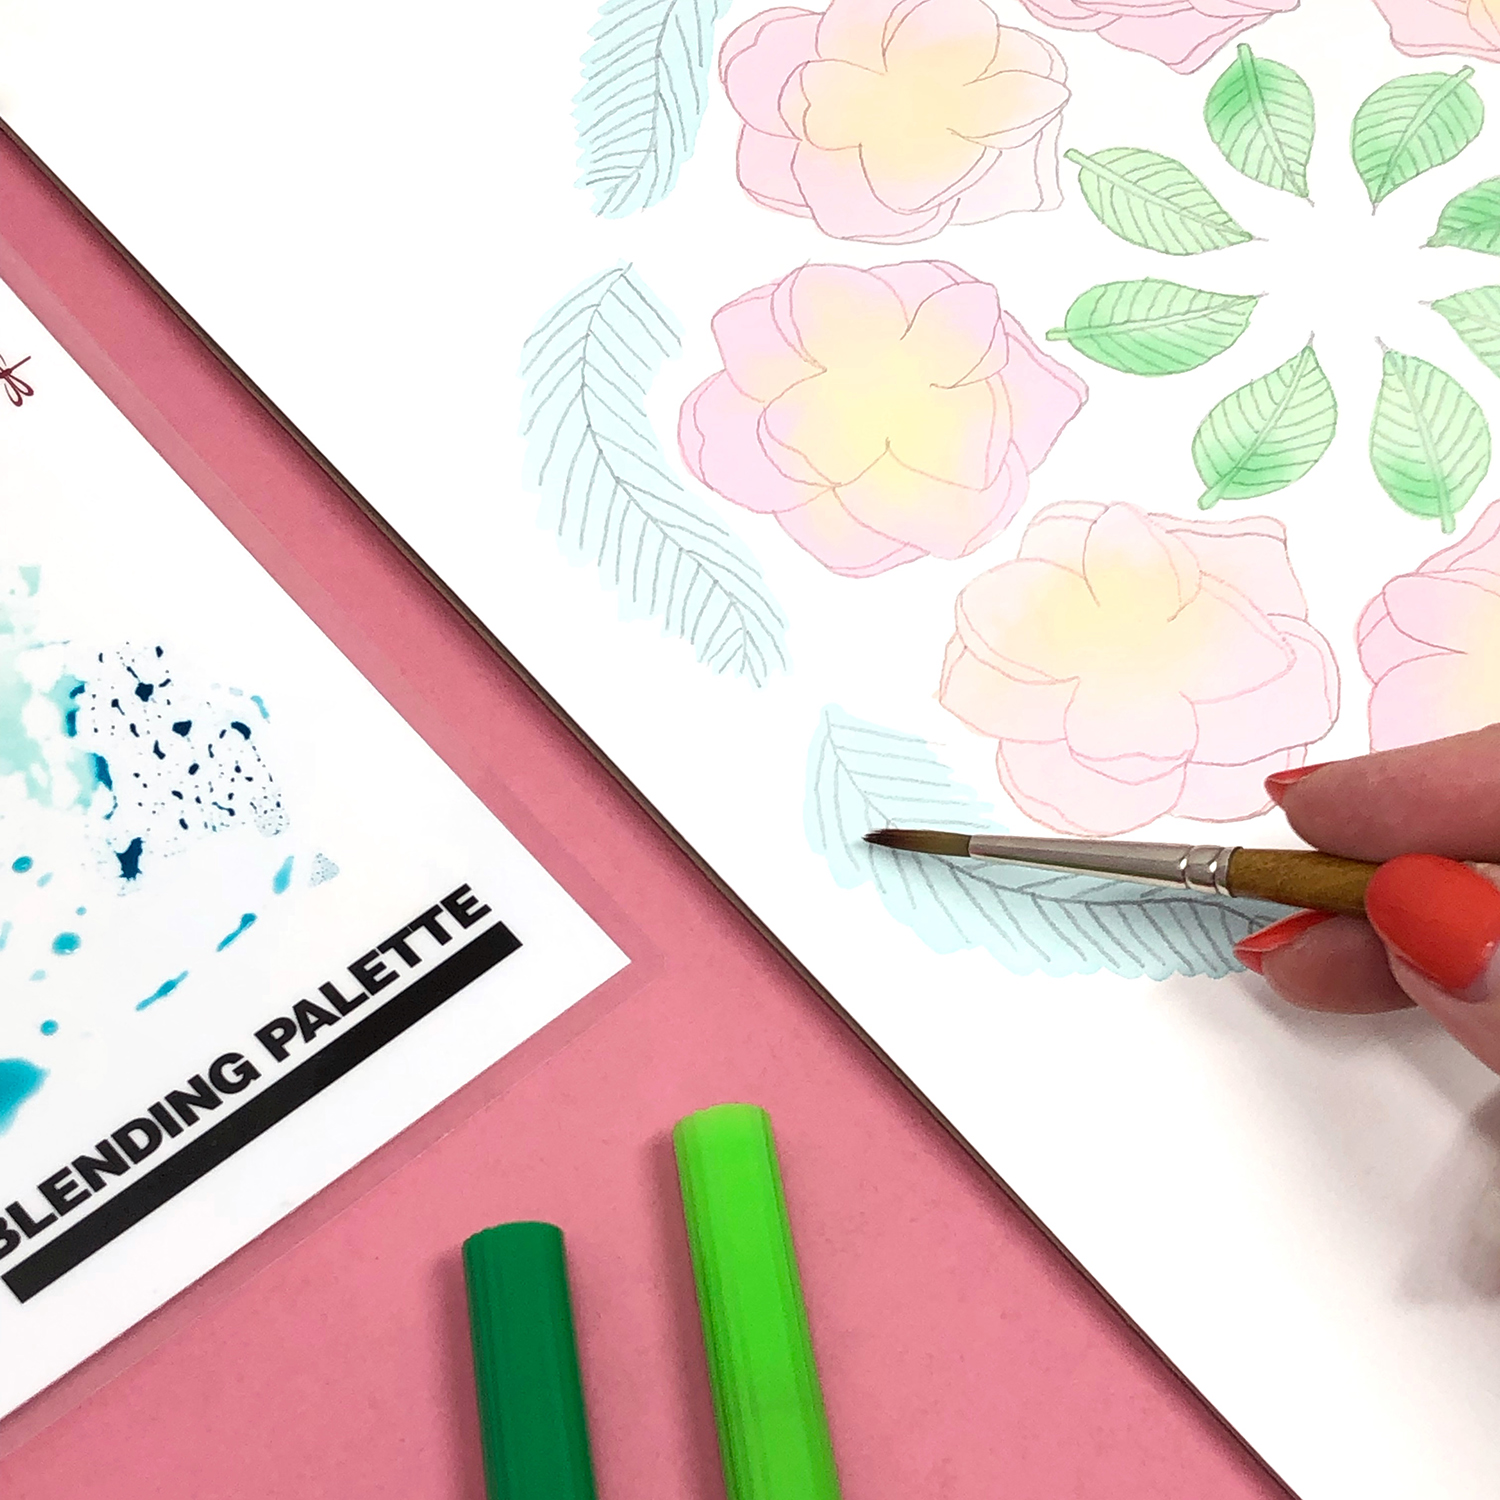
The first step for making your abstract art is to use the Blending Palette and a wet paintbrush to transfer Dual Brush Pen ink onto your watercolor paper (watch the video below to see how I do it).

Step 2: Cut Out Shapes

Once all of your color blocks are dry, start cutting out shapes. Try geometric shapes, some squiggles, flowers etc. Go with your first instincts...do you find yourself gravitating towards circles? Maybe triangles are more your thing?

How to Make an Abstract Collage by Jessica Mack of BrownPaperBunny

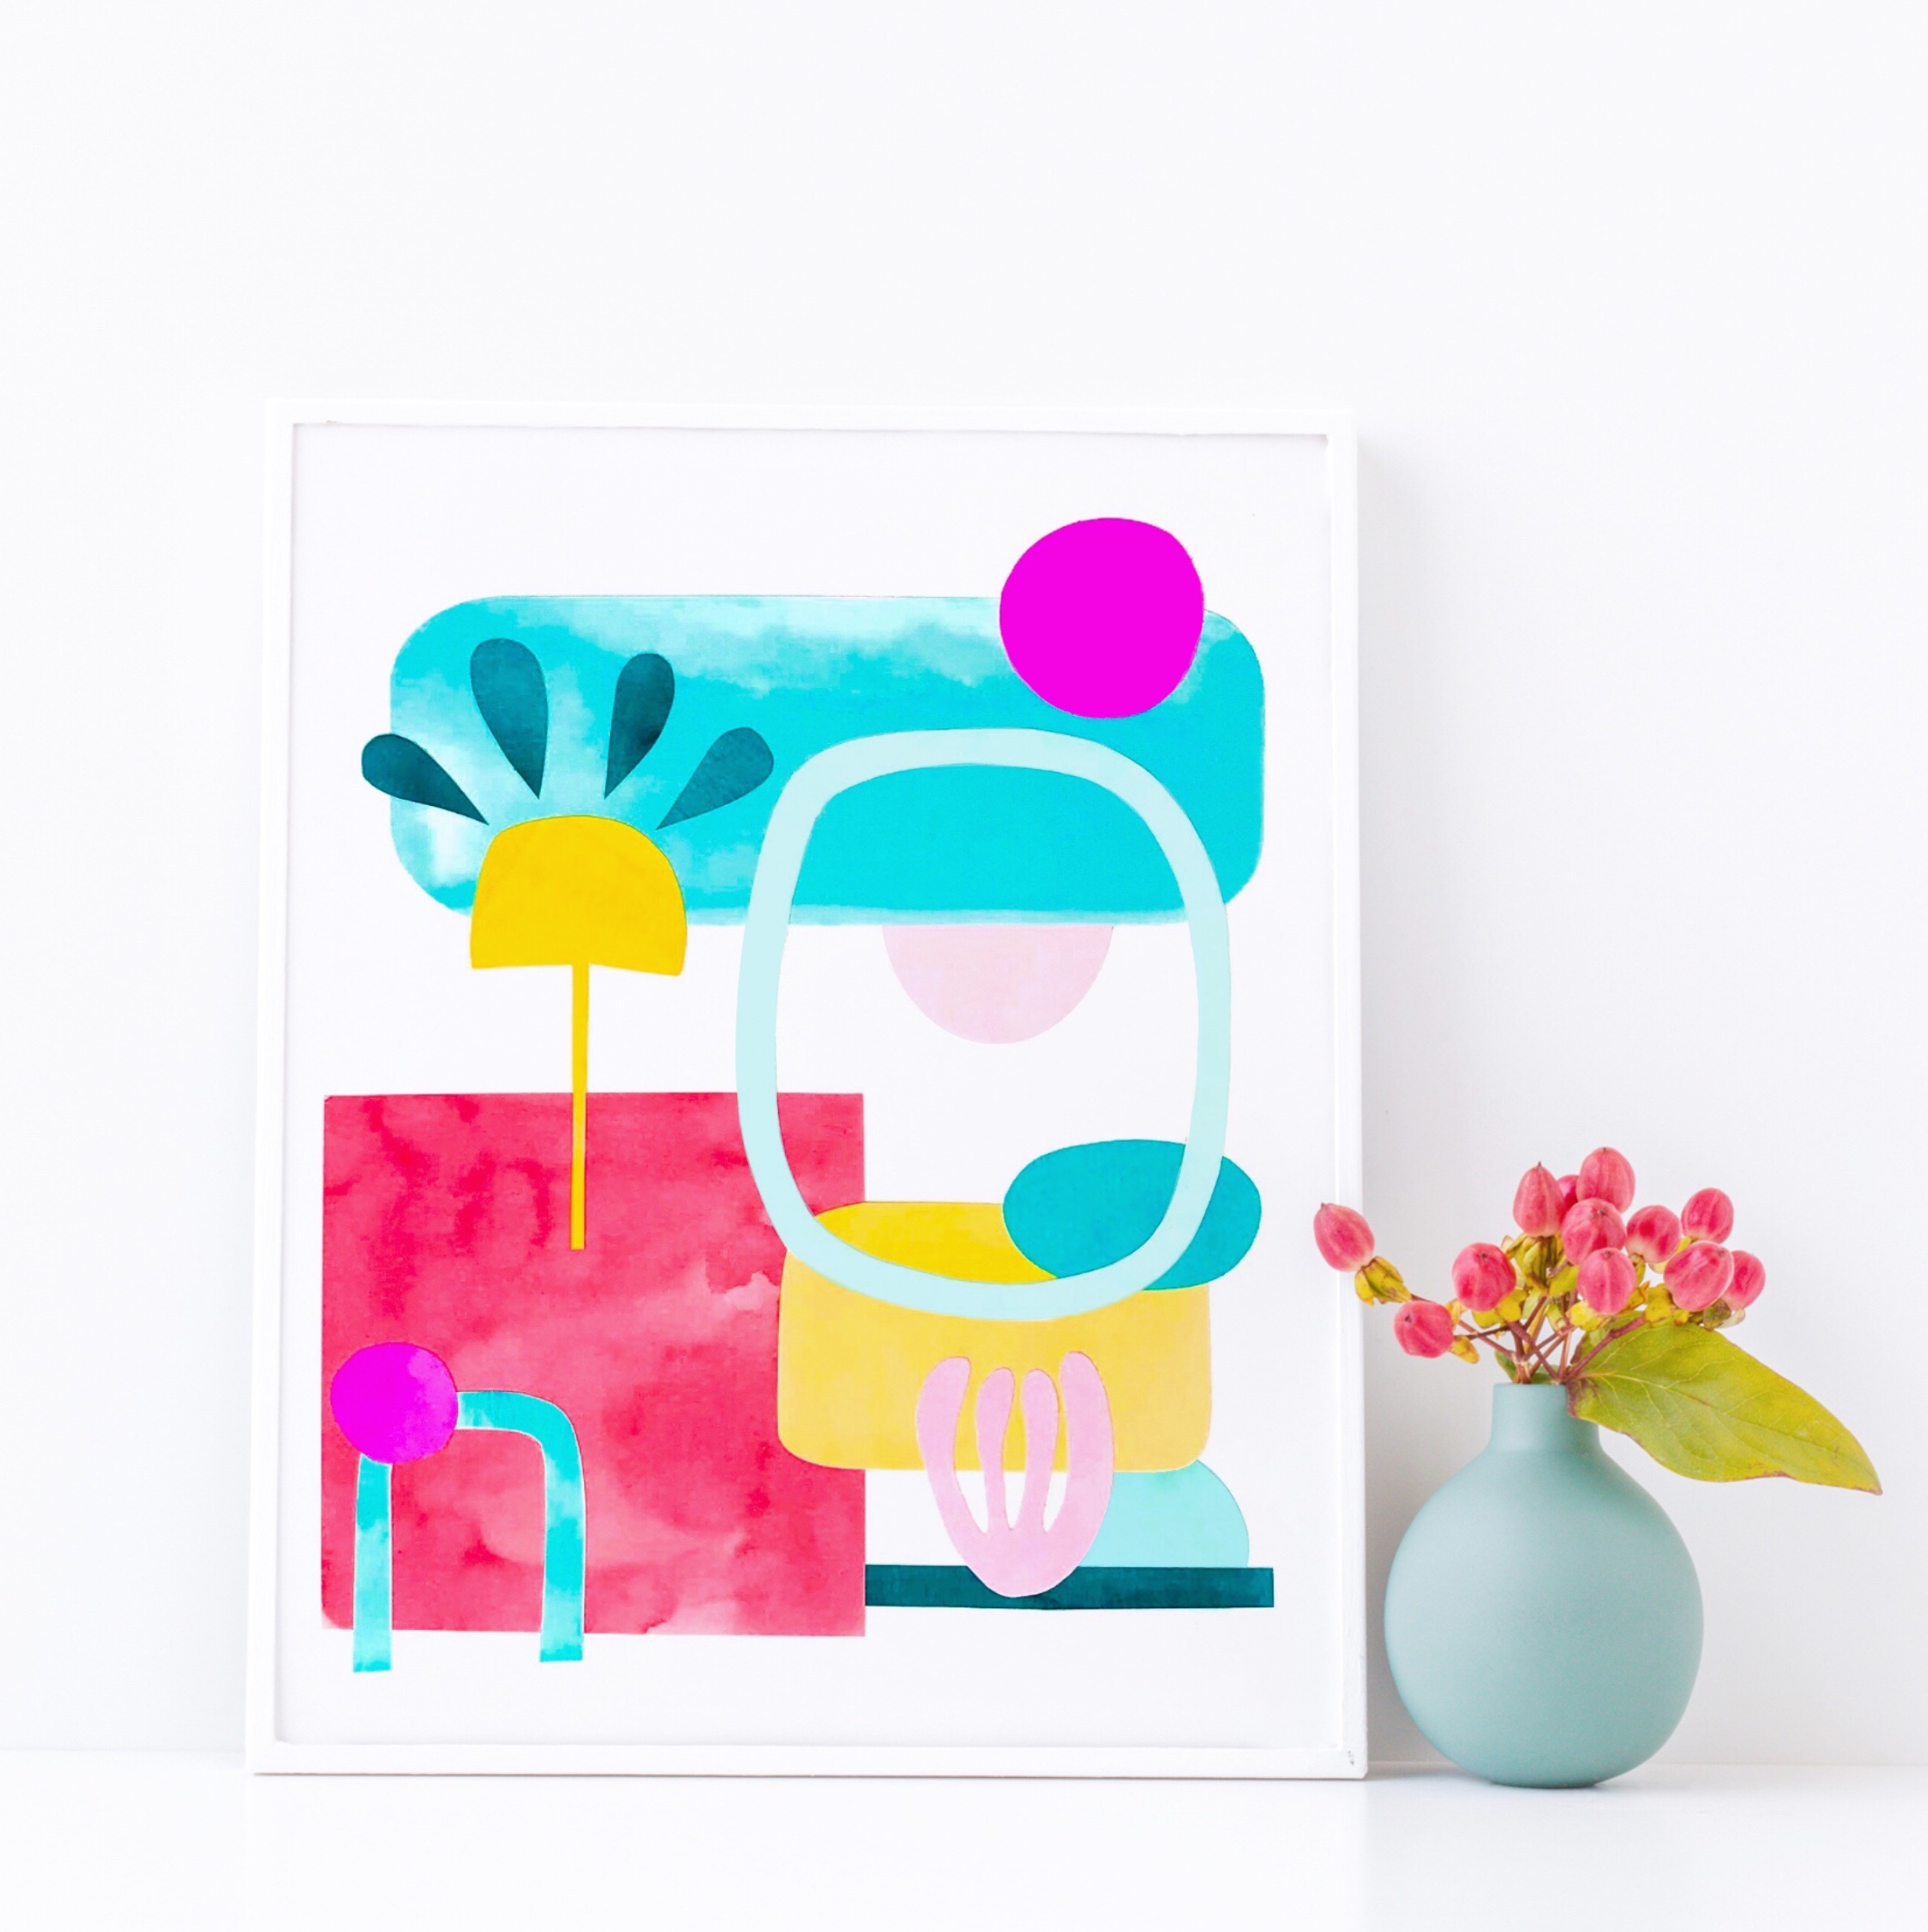
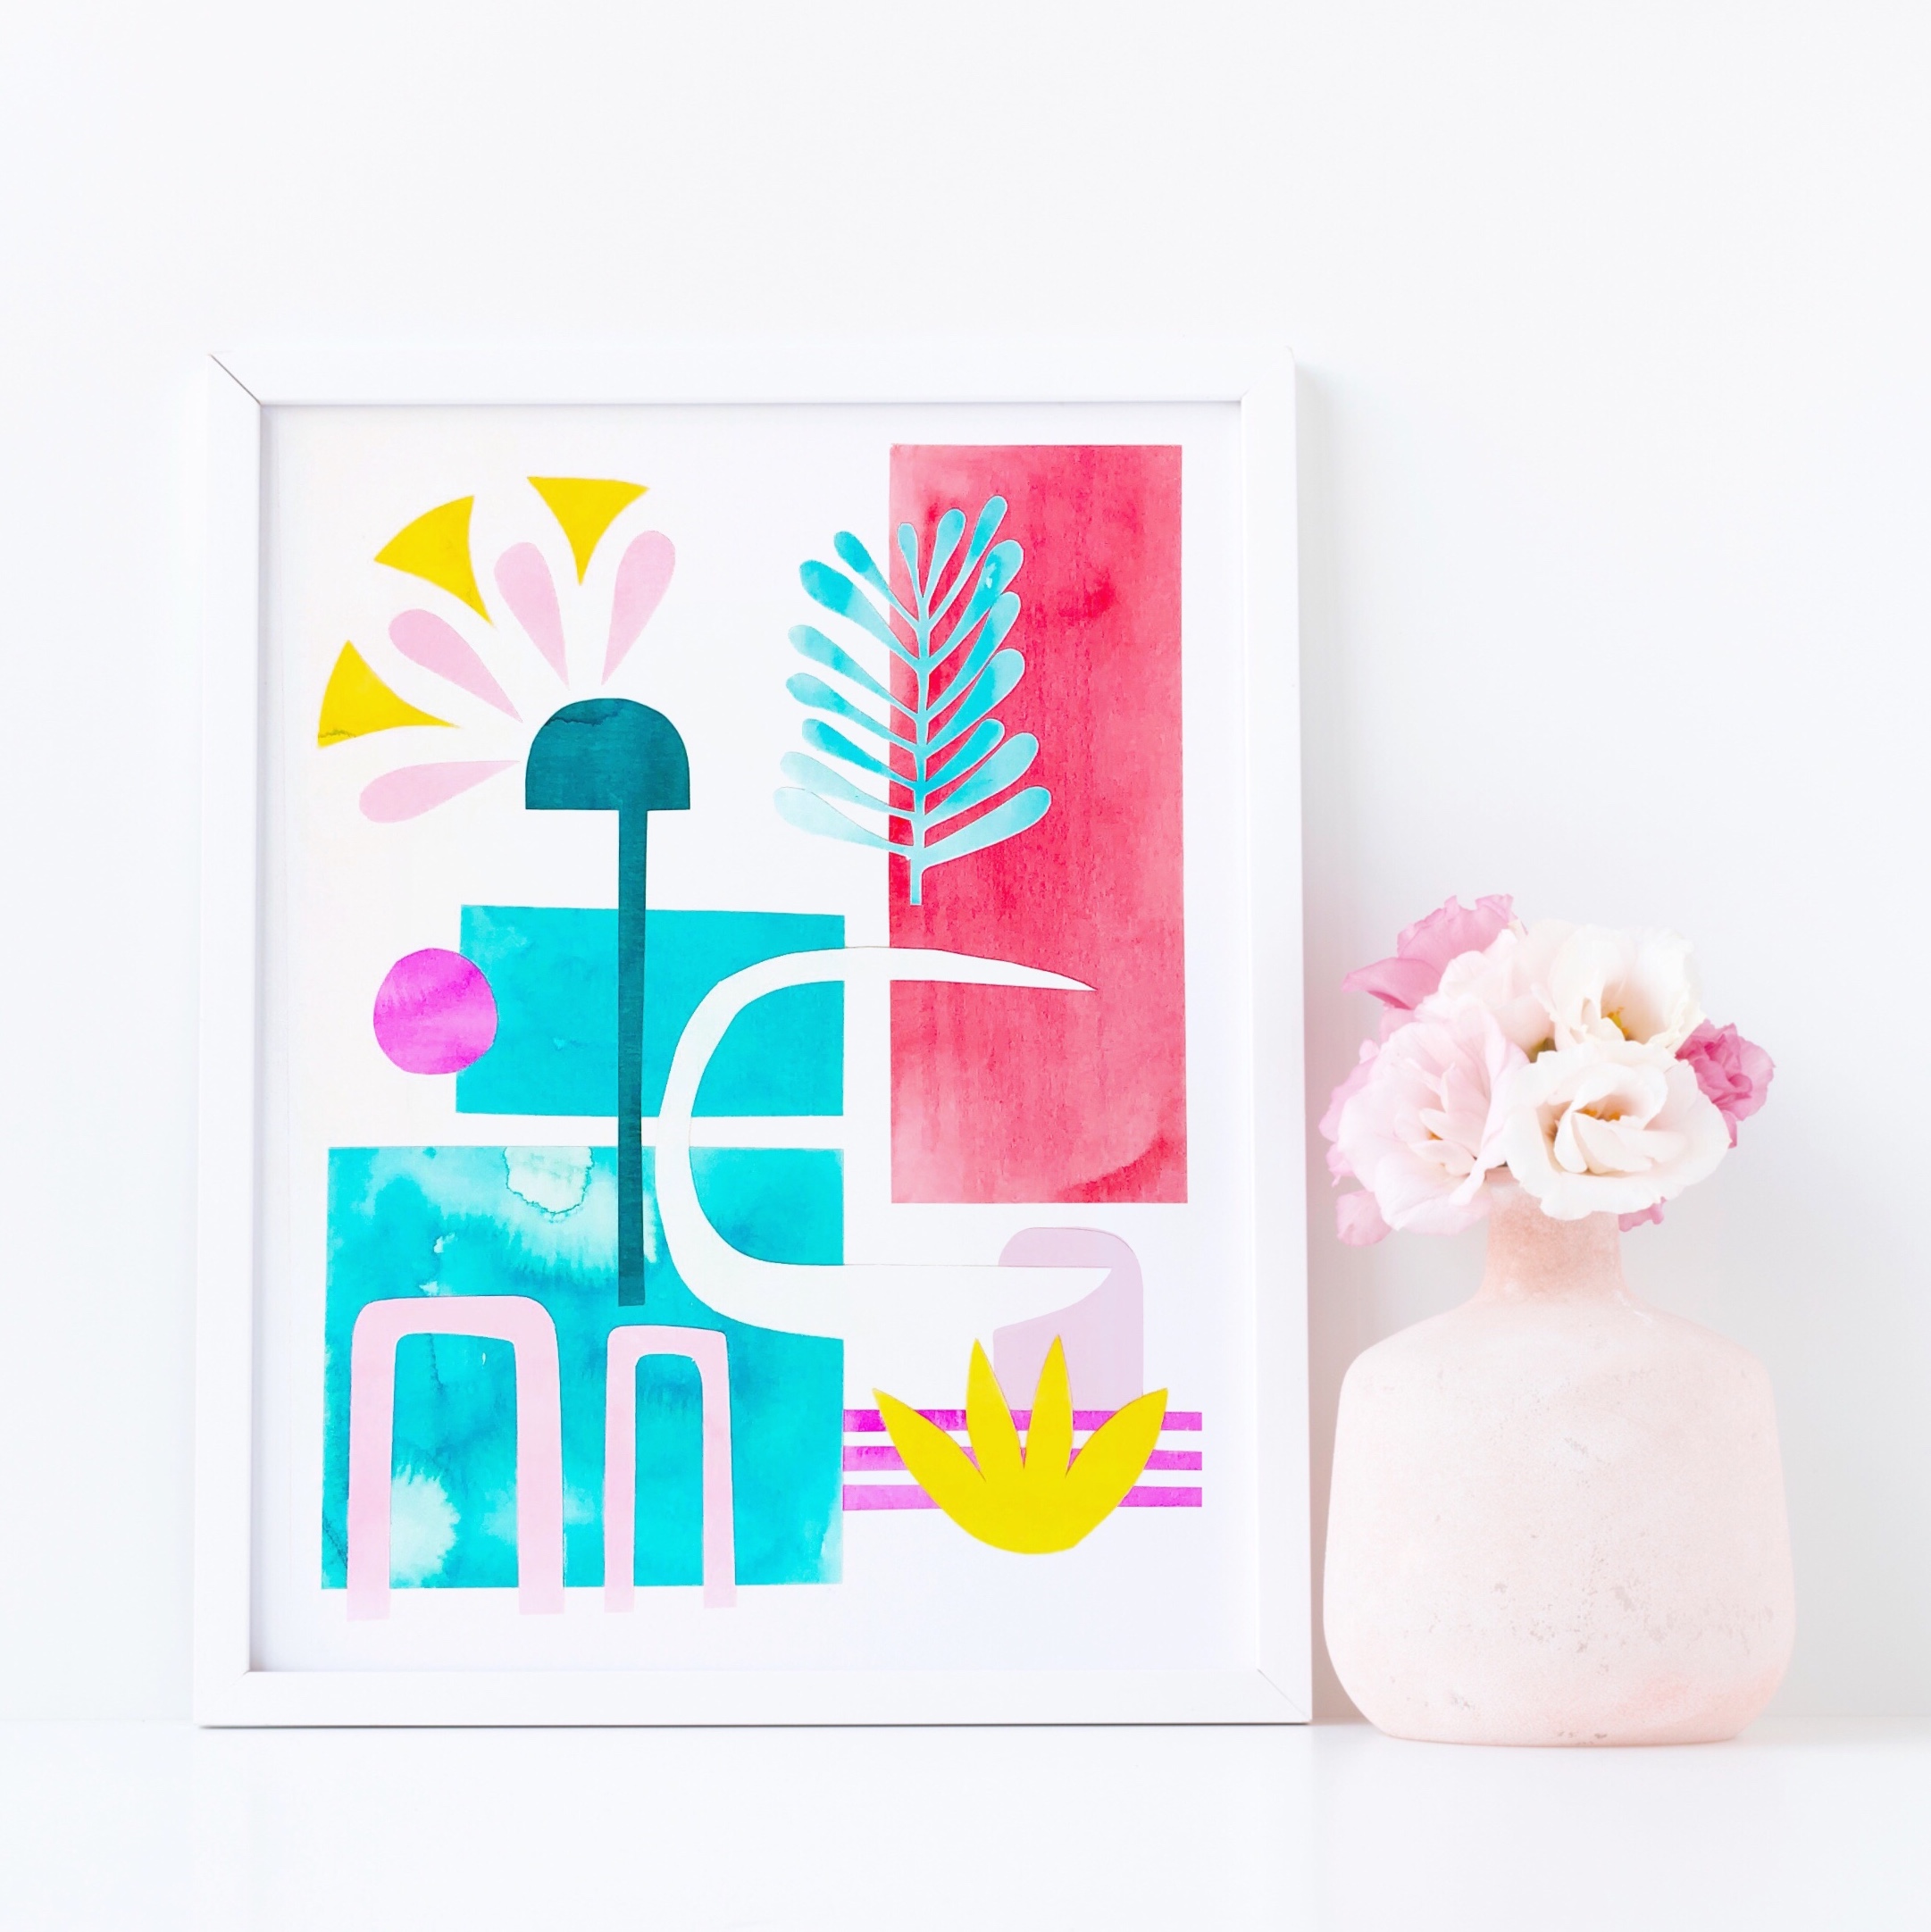
Step 3: Arrange The Shapes

Once all of your shapes are cut out, start arranging them on a new piece of paper until you have a combination you like. Try a minimalist layout with just two or three shapes, then try one with lots of shapes and colors.

Step 4: Glue Everything Down

Once you have a layout you like, use your MONO Multi XL Liquid Glue to stick all the pieces down. Once everything is dry you can frame your masterpiece and hang it on the wall!

How to Make an Abstract Collage by Jessica Mack of BrownPaperBunny

Comment below and tell me if you have any of your own art hanging up at home. If not, why not?!

In Ink, Tutorial, Dec 2018, Watercolor
9 Comments
How to Make a Watercolor Easter Card by Jessica Mack of BrownPaperBunny

How to Make a Watercolor Easter Card

April 4, 2019

Please note: This blog post contains affiliate links, which help pay for the upkeep of this site. That being said, I will never, ever promote anything I am not 100% in love with!

----------

Today I’m going to show you how to make a watercolor Easter card in pastel Dual Brush Pen colors. We're also going to use embossing powder because it resists ink nicely to give you white outlines. Here's what you'll need to get started.

Supplies:

  • Tombow Dual Brush Pens Pastel Palette

  • White Embossing Pen & Powder

  • Heat Gun

  • Watercolor Paper (140lb)

  • Tombow MONO Graph Mechanical Pencil

  • Paint Brush & Water

How to Make a Watercolor Easter Card by Jessica Mack of BrownPaperBunny

Step 1: Bunnies

Start by drawing a bunny template on a plain piece of paper. Think of them as snowmen with ears...a big circle for the body and a smaller one for the head, then two ears and a fluffy tail. Use your template to trace bunnies onto the right-hand side of your watercolor paper (when you fold it that will be the front) using your MONO Graph Mechanical Pencil. This is a good time to write a greeting on the front too. I chose a simple Happy Easter.

How to Make a Watercolor Easter Card by Jessica Mack of BrownPaperBunny

Step 2: Embossing

Follow the directions for your particular embossing pen, powder and heat gun. The general steps are usually to draw / write with the pen, sprinkle the powder on top of the ink, shake off any excess then heat with the gun for around 15 seconds until the powder melts and looks 'embossed'. Emboss over all of your pencil lines for the bunnies and your greeting.

Step 3: Adding Color

This is the really fun step. You get to choose how you'll color your bunnies. Will you pick one color for each, or blend all of the pastel colors to make a rainbow? I choose to pair up the pinks, yellows, blues and purples to make each bunny two-tone, and used the green for the greeting at the bottom. You can color directly onto your watercolor paper, right over the embossing once it is cool. Then to get the watercolor look, use a damp paintbrush to go over the ink and blend it together.

How to Make a Watercolor Easter Card by Jessica Mack of BrownPaperBunny

And there you go, once your ink is dry your card can hop on over to its intended recipient!

How to Make a Watercolor Easter Card by Jessica Mack of BrownPaperBunny

I’d love to see your card, share it with me by tagging @BrownPaperBunny on social media!

In Dec 2018, Illustrations, Ink, Tutorial, Watercolor
8 Comments
Spring Flower Letters with Tombow Dual Brush Pens by Jessica Mack of BrownPaperBunny

Spring Flower Letters with Tombow Dual Brush Pens

March 18, 2019

Please note: This blog post contains affiliate links, which help pay for the upkeep of this site. That being said, I will never, ever promote anything I am not 100% in love with!

----------

Are you as excited as I am about spring?! I'm so excited that I've been creating lots of spring flower letters with Tombow Dual Brush Pens and I want to show you how to make them. Here's what you'll need to get started.

Supplies:

  • Tombow Dual Brush Pens

  • Watercolor Paper (140lb)

  • Tombow MONO Drawing Pens

  • A small paintbrush

  • A pencil

Spring Flower Letters with Tombow Dual Brush Pens by Jessica Mack of BrownPaperBunny

Step 1: Draw Your Letter Shape

Start by drawing the shape of your letter, lightly, in pencil. You can choose to draw either an uppercase or lowercase letter. Next, add your first spring flower. I like to draw one larger flower near the top of my letter as a focal point. Keep it nice and loose, starting with the lightest color first. Add small amounts of different shades to give it some variety. The colors I chose were 873 Coral, 991 Light Ochre, 723 Pink, 761 Carnation, 195 Light Green, and 245 Sap Green). 

Spring Flower Letters with Tombow Dual Brush Pens by Jessica Mack of BrownPaperBunny

Step 2: Draw Your Stems

Next, draw flower stems along the penciled shape of your letter, leaving some spaces for smaller flowers and buds to be drawn in between them.

Spring Flower Letters with Tombow Dual Brush Pens by Jessica Mack of BrownPaperBunny

Step 3: Add Buds and Smaller Flowers

Start filling in the spaces at the ends of the stems with flower bud shapes and small, slightly open flowers. Follow the same approach as you did for the first flower, by adding different colors to each flower for variety. Don't worry if they don't look much like flowers at this stage, and it's ok if they're a little messy. After all your flowers have been drawn you can fill in any gaps with leaves.

Spring Flower Letters with Tombow Dual Brush Pens by Jessica Mack of BrownPaperBunny

Step 4: Add Water

Next, it's time to add water. Start with either the stems and leaves or the flowers, but don't do everything at once or it will run together into a muddy mess! With a damp paintbrush gently brush over the ink, blending colors together a little until you have a watercolor look. Once your first part is dry then you can start on the next bit.

Spring Flower Letters with Tombow Dual Brush Pens by Jessica Mack of BrownPaperBunny

Step 5: Adding Detail

If you'd like you can leave your spring letter at the last, watercolor stage. But if you'd like to add some small details, grab your MONO Drawing Pens and add thin lines to suggest where the petals are, and which direction they are going in. You can add some lines to the outsides of the stems and leaves as well. To keep it looking loose and fresh I recommend not closing all of the petal and leaf shapes completely, but leaving some gaps here and there.

Spring Flower Letters with Tombow Dual Brush Pens by Jessica Mack of BrownPaperBunny

Voila, you're finished! Now you can frame it and hang it on your wall, or give it as a gift! I’d love to see your spring flower letters, so be sure to tag @BrownPaperBunny if you share them on social media!

In Dec 2018, Ink, Illustrations, Tutorial, Watercolor
3 Comments
Blog Cover BrownPaperBunny.jpg

Watercolor Portrait Using Markers

March 11, 2019

Please note: This blog post contains affiliate links, which help pay for the upkeep of this site. That being said, I will never, ever promote anything I am not 100% in love with!

----------

This week I’m redoing an old watercolor portrait from 2011, using skills and knowledge I’ve learned since then to try and improve upon it.

I’ve always loved messy watercolor portraits with ink lines so I wanted to re-do that style. If you’d like to create along with me, here are the materials I’m using:

  • MONO Graph Mechanical Pencil

  • Tombow Dual Brush Pens

  • MONO Drawing Pens

  • Fudenosuke Brush Pen (hard tip)

  • Watercolor paper

  • A Paintbrush

Re-doing a watercolor portrait from 2011 by Jessica Mack of BrownPaperBunny

A few things I’ve learned since creating my 2011 portrait are not to mix too many different colors or everything will get muddy and brown. I’ve also learned that using different line weights gives you more interest. AND I discovered that if you color across the whites of someone’s eyes they look really weird and creepy.

So I’m using a limited color palette, I’ve got my 01, 03, 05 MONO Drawing Pens and Fudenosuke Brush Pen for the line work, and I’m avoiding washes near the eyes.

Re-doing a watercolor portrait from 2011 by Jessica Mack of BrownPaperBunny

To start, sketch out your portrait in pencil, then either transfer ink from a Blending Palette with a wet paintbrush (like I did for the cheeks and lips) or use the Dual Brush Pens directly onto the watercolor paper then go back and wet it. I made sure to let the color run together a little, and added some extra water splotches. You can watch each step in the video below.

What do you think, did I improve on my 2011 effort? Have you ever recreated an old project? Or is there one you’d like to re-do? Let me know in the comments!

Re-doing a watercolor portrait from 2011 by Jessica Mack of BrownPaperBunny

If you’re new here, I’m Jessica — a watercolor artist and fashion illustrator, living in Seattle. I’d love to connect on social media, come say hi on Instagram, Facebook or Twitter @BrownPaperBunny! 

You might also like these blog posts:

Featured
Make a Watercolor Planner Bookmark by Jessica Mack on BrownPaperBunny
Make a Watercolor Planner Bookmark
Fashion Illustration Inspired by Food. By Jessica Mack of BrownPaperBunny.
Fashion Illustrations Inspired by Food
Watercolor portrait by Jessica Mack of BrownPaperBunny using different watercolor techniques
Watercolor Techniques
In Watercolor, Illustrations, Ink, Dec 2018, Tutorial
8 Comments
Loose Watercolor Florals in Living Coral by Jessica Mack of BrownPaperBunny

Loose Watercolor Florals in Living Coral

March 4, 2019

Please note: This blog post contains affiliate links, which help pay for the upkeep of this site. That being said, I will never, ever promote anything I am not 100% in love with!

----------

Howdy! Today I’m going to show you how to create some loose watercolor florals in living coral (try saying that five times fast). Living Coral is the Pantone Color of the Year for 2019. These florals are super easy to make and I'll be showing you how to use Tombow Dual Brush Pens to get a watercolor look and add line work. Here's what you'll need to get started.

Supplies:

  • Tombow Dual Brush Pens

  • Round Paintbrush (Size 8)

  • Tombow Blending Palette

  • Watercolor Paper (140 lb)

Loose Watercolor Florals in Living Coral by Jessica Mack of BrownPaperBunny

Step 1: Mix Your Colors

The first step is to scribble some ink onto your blending palette. Dual Brush Pen 905 is pretty close to the color Living Coral already, but I wanted to add a little punch of pink so I used a touch of 815 in the mix. Experiment with blending different quantities of each color until you get a shade you love.

Loose Watercolor Florals in Living Coral by Jessica Mack of BrownPaperBunny

Once you've got your ink onto the blending palette wet it with your paintbrush.

Loose Watercolor Florals in Living Coral by Jessica Mack of BrownPaperBunny

Step 2: Create Loose Petal Shapes

Using your paintbrush, transfer ink from the blending palette onto your watercolor paper. Start making loose flower petal shapes around in a circle. Leave a little white space so the paper can show through. And don't worry if it looks pretty messy at this stage, we're going to add detail at the end, and they are meant to be loose florals after all. ;)

Loose Watercolor Florals in Living Coral by Jessica Mack of BrownPaperBunny

Step 3: Drop in a Third Color

To add a little more variety to your base color, drop in a few dots of yellow ink using the same technique as before. Let them spread into the living coral color while it is still wet.

Loose Watercolor Florals in Living Coral by Jessica Mack of BrownPaperBunny

Step 4: Add a Stem and Leaves

On your blending palette, mix up some green for the stem and leaves. I used colors 177 and 228. Using your paintbrush, transfer the ink from the blending palette to create a stem and leaves coming down from your flowers.

Loose Watercolor Florals in Living Coral by Jessica Mack of BrownPaperBunny

Here's what mine looks like so far.

Loose Watercolor Florals in Living Coral by Jessica Mack of BrownPaperBunny

Step 5: Adding Detail

Once the ink is completely dry, use your Dual Brush Pens to add detail to the petals and leaves. Experiment with the brush tip and the bullet tip and see which you're more comfortable with.

Loose Watercolor Florals in Living Coral by Jessica Mack of BrownPaperBunny

And voila, you've got some loose florals in living coral. These would make a nice framed art piece, or look great in your journal, or on a card to someone special.

Loose Watercolor Florals in Living Coral by Jessica Mack of BrownPaperBunny

I’d love to see your flowers! Share them on social media and tag @BrownPaperBunny so I can see!

In Dec 2018, Illustrations, Watercolor, Tutorial, Ink
19 Comments
DIY Collage Plant Card by Jessica Mack of BrownPaperBunny

DIY Collage Plant Card

February 26, 2019

Please note: This blog post contains affiliate links, which help pay for the upkeep of this site. That being said, I will never, ever promote anything I am not 100% in love with!

----------

Craft month is coming up, and I’m getting right into card making, so today I’m going to show you how to make this collage plant card.

Supplies:

  • Tombow Dual Brush Pens

  • Scissors

  • Blending palette

  • Paint brush

  • MONO Aqua Liquid Glue

  • Mixed media paper

  • Pencil

  • Blank card

DIY Collage Plant Card by Jessica Mack of BrownPaperBunny

Step 1: Color

The first step in creating your collage plant card is to scribble some Dual Brush Pen ink onto your blending palette then paint it onto mixed media paper with a wet paintbrush. Note: Mixed media paper is great for this because it can withstand a light ink and water wash but isn’t too thick to cut easily.

DIY Collage Plant Card by Jessica Mack of BrownPaperBunny

Step 2: Draw Your Shapes

Once the ink is dry, draw some leaf and pot shapes over the color, in pencil.

DIY Collage Plant Card by Jessica Mack of BrownPaperBunny

Step 3: Cut Everything Out

Next, cut out all your leaf and pot shapes. You can also cut out some details to add extra dimension to the pots.

DIY Collage Plant Card by Jessica Mack of BrownPaperBunny

Step 4: Glue Time

The final step is to use MONO Aqua Liquid Glue to stick each piece down onto your blank card. Overlap some of the leaves and pots for a little extra depth, and voila, you’re ready to send it to the plant-lover in your life!

DIY Collage Plant Card by Jessica Mack of BrownPaperBunny

Do you have a favorite plant? Let me know in the comments.

In Ink, Dec 2018, Tutorial
Comment
Invisible Ink Invitations by Jessica Mack of BrownPaperBunny

Invisible Ink Invitations

February 21, 2019

Please note: This blog post contains affiliate links, which help pay for the upkeep of this site. That being said, I will never, ever promote anything I am not 100% in love with!

----------

In honor of our little girl’s upcoming birthday I’m going to show you how to get an invisible ink effect with Tombow’s new Fudenosuke Colors Brush Pens. I don’t know about you but when I was a kid I was obsessed with invisible ink, codes, and spy gadgets. I guess I never grew up because I still love those things! Recently, I discovered that you can use Fudenosuke Brush Pens under water-soluble ink (such as Dual Brush Pens) to create hidden text and drawings that can be revealed later. Here’s how!

Supplies:

  • Tombow Fudenosuke Colors 10-Pack

  • Watercolor Paper (140lb works best)

  • Tombow Dual Brush Pens in matching colors

  • Paintbrush and water 

Invisible Ink Invitations by Jessica Mack of BrownPaperBunny

Step 1: Create Your Hidden Layer

Use your Fudenosuke Colors Brush Pens to create your hidden text, drawing, or designs on the watercolor paper. This technique would be a fun way to write a letter to someone, create an invitation, a birthday card, a little note or a drawing. 

Invisible Ink Invitations by Jessica Mack of BrownPaperBunny

Step 2: Create Your Top Layer

Let your first layer dry completely. Then use Dual Brush Pens in colors that match the Fudenosukes to cover the first layer. The Dual Brush Pen colors I found that matched well were: 856 for Red, 946 for Orange, 055 for Yellow, 195 for Green, 476 for Blue, 636 for Purple, 725 for Pink, 969 for Brown, N65 for Grey, and N15 for Black.

If you can still see the Fudenosuke ink through the first layer of Dual Brush Pen, let it dry completely and add a second layer.

Invisible Ink Invitations by Jessica Mack of BrownPaperBunny

Step 3: The Big Reveal

You’re finished, and you can send your creation off with instructions to wet each color with a paintbrush and water. Here’s what the rainbow invitation looked like after I wet each top layer color and the Fudenosuke ink emerged.

Invisible Ink Invitations by Jessica Mack of BrownPaperBunny
In Dec 2018, Ink, Tutorial, Watercolor
8 Comments
How to Make a Valentine's Day Wreath by Jessica Mack of BrownPaperBunny

How to Make a Valentine's Day Wreath

January 28, 2019

Please note: This blog post contains affiliate links, which help pay for the upkeep of this site. That being said, I will never, ever promote anything I am not 100% in love with!

----------

Don’t you just love love?! Today I’m going to show you how to create a Valentine’s Day wreath that you could use on a card, or as a gift for someone special. Here’s what you’ll need to get started:

Supplies

  • Tombow Dual Brush Pens

  • Mono Graph Mechanical Pencil

  • Mono Knock Eraser

  • Watercolor Paper

  • Mono Drawing Pens

  • Paintbrush

How to Make a Valentine's Day Wreath by Jessica Mack of BrownPaperBunny

Step 1: Pencil Outlines

The first step in drawing your Valentine’s wreath is to trace a circle (I used an upside-down bowl) then start drawing flowers and leaves around the circle, using your Mono Graph Mechanical Pencil.

Step 2: First Layer of Color

Next, add your lightest color of Dual Brush Pen on the outlines of your flower petals, and use a wet paintbrush to blend it. This will give you a nice soft background color. Watch the time-lapse video below to see how it all comes together.

Step 3: Layers of Color

Once the first layer of ink is dry you can repeat with darker shades in certain areas. I chose to draw stylized chrysanthemums, what’s your favorite flower? Let me know in the comments!

Step 4: Finishing Touches

I added a quote to the center, and outlined the flowers and leaves using Mono Drawing Pens. Do you have a favorite quote or saying about love?

How to Make a Valentine's Day Wreath by Jessica Mack of BrownPaperBunny
In Watercolor, Ink, Dec 2018, Illustrations, Tutorial
13 Comments
Start an Art Journal by Jessica Mack of BrownPaperBunny

Start an Art Journal

January 23, 2019

Please note: This blog post contains affiliate links, which help pay for the upkeep of this site. That being said, I will never, ever promote anything I am not 100% in love with!

----------

This week I want to show you how to start an art journal. Last year was my first time using one and I found it such a freeing way to be creative, even when I wasn't feeling the creative bug biting, or to warm up before I started drawing or painting. I want to encourage you to start one if you haven't already!

Supplies:

  • Tombow Dual Brush Pens

  • Notebook or Sketchbook (get one with multimedia paper for versatility)

  • Tombow Mono Adhesive Dots

  • Scissors

  • Tombow Mono Graph Mechanical Pencil

  • Tombow Mono Knock Eraser

  • Embellishments (photos, scrap paper, washi tape etc)

  • Tombow Mono Drawing Pens

  • Paintbrush

Start an Art Journal by Jessica Mack of BrownPaperBunny

Art Journal Prompts

Your art journal is your safe space to do whatever you like. If you want to fill it with shopping lists, dreams you've had, photos of your dog, go right ahead! If you're feeling a bit stuck and aren't sure where to start, here is a list I have taped to the inside back cover of my journal. Whenever I feel like working in it, but inspiration isn't striking, I just choose something from the list:

  • Stick something onto a page

  • Make a page with only purple / pink / blue / green things

  • Draw everything you ate today (or want to eat)

  • Write your favorite word, over and over in different styles

  • Choose a color that matches your mood and fill a page with it

  • Make color swatches of your pens and paints

  • Draw yourself with different hairstyles

  • Record your favorite recipe using only drawings

  • Create a map of your neighborhood

  • Look around you to find something to draw

  • Fill a whole page with drawings of leaves

  • Journal about something that happened this week

Write a list:

  • Your favorite TV shows of all time

  • 10 places you'd like to visit

  • Everything in your purse

  • People from history you admire

  • Books you've read this year

  • Things you'd like to try

  • Your favorite songs

  • Things you need to do this week

  • Your all-time favorite movies

  • 10 things that make you happy

Easy Watercolor-Look Backgrounds

One of my favorite ways to start a page is to mix Tombow Dual Brush Pen colors with water, right on the paper. Start by scribbling the first color loosely over the page, then add a second (and maybe a third) color over the top. Then use a wet paintbrush to blend it all together. I tend to gravitate towards spiral-bound watercolor or mixed media sketchbooks because they handle wet mediums better than regular paper. Tip: use small bulldog clips to hold your paper flat if you're using water or paint.

Start an Art Journal by Jessica Mack of BrownPaperBunny

Stick Stuff In

Pages of my art journal are filled with stamps, scraps of paper, cards I've gotten, packaging I particularly liked and things I find throughout the day. My favorite adhesive to use is Tombow Mono Adhesive Dots because it won't warp the paper of your art journal, and it isn't messy like wet glues or glue sticks. Sometimes I'll stick something onto a page and then use it as inspiration for a drawing or pattern. Other times I'll dedicate a whole page to a particular color and throughout the year, as I find things in that color I stick them in.

Start an Art Journal by Jessica Mack of BrownPaperBunny

Create Swatch Charts

Another fun thing to do in your art journal is to create swatch charts of your art supplies. It's a useful reference, as well as just being a lot of fun! Create fun shapes or drawings for each color, or just scribble the color down on the page and label each one. Try mixing and layering colors and taking note of the combinations you like.

Start an Art Journal by Jessica Mack of BrownPaperBunny

Create Seasonal Sections

It can be fun to see how different your art journalling is from season to season. Mark the start of a new season with a dedicated page or spread.

Start an Art Journal by Jessica Mack of BrownPaperBunny

Do you have other suggestions for ways to art journal, or prompts to get started? Leave a comment and let me know!


In Dec 2018, Ink, Sketchbook, Tutorial
1 Comment
Blending Markers with Water by Jessica Mack of BrownPaperBunny

Blending Markers with Water

January 10, 2019

Please note: This blog post contains affiliate links, which help pay for the upkeep of this site. That being said, I will never, ever promote anything I am not 100% in love with!

----------

One of my absolute favorite things is blending markers with water (specifically Tombow Dual Brush Pens) to create soft backgrounds you can draw over. Let me show you how I do it.

Supplies:

  • Tombow Dual Brush Pens

  • Watercolor Paper

  • Tombow Mono Drawing Pencil

  • Paintbrush

  • Tombow Blending Palette

Blending Markers with Water by Jessica Mack of BrownPaperBunny

Step 1: Blend Your Colors

Start by scribbling some Dual Brush Pen colors, that you'd like to blend, onto your blending palette. Then wet your paintbrush and blend the colors together until you have the shade you want. Next, use the paintbrush to paint the ink from your blending palette onto your watercolor paper to create a soft, watercolor-look background.

Blending Markers with Water by Jessica Mack of BrownPaperBunny

Step 2: Add More Color

If you want a little more variation in your background color, repeat step one with a different shade of the same color, or a color you think will go nicely with the first color you painted onto the paper. I used yellow, blues and greens for my leaves and pinks and yellow for my flowers. Add your new color to your existing ink on the paper while it is still wet, and watch the colors blend together!

Blending Markers with Water by Jessica Mack of BrownPaperBunny

Step 3: Add Details

Once your background colors are dry go back in with either the bullet or the brush tip of your Dual Brush Pen and add details over the top. This adds some nice contrast to the soft background. And there you have it — I hope blending markers with water will become one of your favorite ways to create too!

Blending Markers with Water by Jessica Mack of BrownPaperBunny

I’d love to see what you create, tag @BrownPaperBunny on social media so I can take a look!

Blending Markers with Water by Jessica Mack of BrownPaperBunny
In Pattern, Ink, Watercolor, Tutorial, Dec 2018, Illustrations
7 Comments
New Year's Resolution Cards by Jessica Mack of BrownPaperBunny

New Year's Resolution Cards

December 13, 2018

Please note: This blog post contains affiliate links, which help pay for the upkeep of this site. That being said, I will never, ever promote anything I am not 100% in love with!

----------

With New Year's just around the corner, there are lots of parties being planned and resolutions being made. So why not combine the two?! Set up a table with these cute New Year's Resolution Cards so people can write theirs down and mail it to themselves (so it doesn't get lost in all the merriment). Here's what you'll need to get started.

Supplies:

  • Tombow Dual Brush Pen

  • Watercolor paper or card

  • Tombow Fudenosuke Colored Pen Set

  • Envelopes + Stamps

  • Tombow Mono Aqua Liquid Glue

  • Ruler

  • Tombow XL Blending Palette

  • Scissors

  • Water spritzer

  • Glitter 

New Year's Resolution Cards by Jessica Mack of BrownPaperBunny

Step 1: Create a Watercolor Background

Scribble some ink onto your XL Blending Palette, using your favorite color Dual Brush Pen. Then spritz the ink with water and lay your piece of watercolor paper down on top of the ink. Carefully pull it off and leave it ink-side-up to dry. You can watch a video of this technique over on my Instagram account.

New Year's Resolution Cards by Jessica Mack of BrownPaperBunny

Step 2: Cut Out Your New Year's Resolution Cards

Once your watercolor-look paper is dry you can either repeat the process on the back, or leave it white. Then cut your paper up into any size cards you'd like, just be sure they fit into the envelopes you have.

New Year's Resolution Cards by Jessica Mack of BrownPaperBunny

Step 3: Write on the Front

Use your colored Fudenosuke pens to write on the front of the cards. You can write 'My 2019 Resolutions' like I have, or come up with something different. Leave the 2019 blank, or just in pencil, ready for the next step. 

New Year's Resolution Cards by Jessica Mack of BrownPaperBunny

Step 4: Add the Glitter!

Use your Mono Aqua Liquid Glue to write 2019, then sprinkle some glitter over the glue. Wait until it has dried completely before you shake and brush off any excess glitter.

New Year's Resolution Cards by Jessica Mack of BrownPaperBunny

Step 5: Draw Lines on the Back

Once the glue on the front is completely dry, turn the cards over and use the small end of your Dual Brush Pen and a ruler to draw lines on the back. This will make it easier for people to write their resolutions.

New Year's Resolution Cards by Jessica Mack of BrownPaperBunny

Step 6: Set up a Resolutions Table

Now you're ready to set up a resolutions table at your party! Stock it with your New Year's resolution cards, envelopes, cute stamps, and pens. If you have some extra time, wrap a shoebox in gift-wrap, and cut a slot in the top for people to put their sealed envelopes. The next day, after a sleep-in and you have suitably recovered from all the party merriment, mail off the cards to everyone.

New Year's Resolution Cards by Jessica Mack of BrownPaperBunny
In Ink, Tutorial, Watercolor, Dec 2018
7 Comments
Watercolor Gift Tags by Jessica Mack of BrownPaperBunny

Watercolor Gift Tags

December 6, 2018

Please note: This blog post contains affiliate links, which help pay for the upkeep of this site. That being said, I will never, ever promote anything I am not 100% in love with!

----------

This week I wanted to show you how to use Tombow Dual Brush Pens to make some cute watercolor-look tags for your holiday gifts. You’ll need the following supplies to get started.

Supplies:

  • Dual Brush Pens

  • XL Blending Palette

  • Water Mister

  • Scissors

  • Watercolor paper or card

  • Hole punch

Watercolor Gift Tags by Jessica Mack of BrownPaperBunny

Step 1: Applying the Color

To make your watercolor-look gift tags, start by putting some ink down on your XL Blending Palette using your Dual Brush Pens. Try some different color combinations. Then spray the ink with water. Lay your watercolor paper or card on top and give it a good smush to make sure the ink blends.

Carefully lift the paper off and let it dry. Watch the video below to see the steps in action.


Step 2: Trace Your Tags

Using a light pencil, trace gift tag outlines onto the paper. I used a store-bought tag I had lying around.

Step 3: Cut Out Your Tags

Cut around each of your traced tags and voila, you’re ready to wrap!

You could get really creative with your color combinations, no need to stick to traditional holiday colors!

Do you have any gift-wrapping secrets? Share them with me in the comments!

In Ink, Tutorial, Aug 2017, Watercolor
8 Comments
Create Time-Lapse Videos of Your Art by Jessica Mack of BrownPaperBunny

New Skillshare Class: Create Time-Lapse Videos of Your Art

November 24, 2018

Hi friends!

I’ve spent the last few weeks preparing to launch my first ever Skillshare class, and it’s just gone live! If you’re not familiar with Skillshare, it is basically the Netflix of learning things…from painting to running a business.

My class is called ‘Create Time-Lapse Videos of Your Art’. I attribute so much of my business and social media growth to time-lapse videos of my art. While I don’t often get featured on Instagram’s discover feed with my still pictures, my videos get listed there all the time, meaning a lot more people can find me. I’ve also had so many paying jobs come my way via Instagram videos, so I’m excited to tech you how to make them too.

And, Skillshare will give you two months free Premium Membership if you follow this link. You can always cancel before the two months are up, if you decide it isn’t for you, but having been learning amazing things on Skillshare for years I bet you’ll get hooked!

I’d love to know what you think of my new class!

Check it Out
In Aug 2017, Fashion Illustration, Illustrations, Ink, Social Media Tips, Tutorial
2 Comments
Draw a Fall Wreath in Jewel Tones by Jessica Mack of BrownPaperBunny

Draw a Fall Wreath in Jewel Tones

November 16, 2018

Please note: This blog post contains affiliate links, which help pay for the upkeep of this site. That being said, I will never, ever promote anything I am not 100% in love with!

----------

Hello hello! Today I’m going to show you how to draw a fall wreath in jewel tones. While I love the colors of changing leaves at this time of year I thought it would be fun to branch out (pun intended) and try some brighter jewel tones that are a little less associated with fall. This wreath is super easy to draw and looks great on cards, your art journal, or in your planner. Here's what you'll need to get started.

Supplies:

  • Tombow Dual Brush Pens (I chose 312, 346, 528, 606, and 946)

  • Watercolor paper or thick paper or card

  • Tombow Mono Drawing Pencil (2H or 4H)

  • Paintbrush

  • Water

Draw a Fall Wreath in Jewel Tones by Jessica Mack of BrownPaperBunny

Step 1: Sketch Your Wreath in Pencil

The first step is to sketch out your wreath, using a pencil. I chose a 4H pencil because it is super light. You can sketch in some flowers, leaves, and fruit at this stage, or just draw the basic circle you plan to follow.

Step 2: Create a Soft First Layer

Next you're going to use your lighter colors to draw in some lose branch shapes around the wreath. These are going to end up being your background branches to add depth to your drawing.

Draw a Fall Wreath in Jewel Tones by Jessica Mack of BrownPaperBunny

Go over them with a wet paintbrush to soften them and blend the ink together a little.

Draw a Fall Wreath in Jewel Tones by Jessica Mack of BrownPaperBunny

Step 3: Add Your Largest Leaves and Shapes

Once your background branches are dry, it's time to start adding your larger shapes. These can be flowers, large leaves, fruit etc. If you want to have a watercolor-look you can use your wet paintbrush to go over these shapes as well, to blend your marker strokes together. To see how I do this, watch the time-lapse video at the end of this blog post. 

Draw a Fall Wreath in Jewel Tones by Jessica Mack of BrownPaperBunny

Step 4: Creating Details

Once everything is dry it's time to go back in and add more details. You can use the brush or the fine tip of your Dual Brush Pens to create more leaves, branches, add detail to your flowers etc.

Draw a Fall Wreath in Jewel Tones by Jessica Mack of BrownPaperBunny

Step 5: Lettering

The final step is to add some lettering to the middle of your wreath. You could simply write the word 'Fall' like I did, or add your favorite quote, someone's name, or a holiday greeting.

Draw a Fall Wreath in Jewel Tones by Jessica Mack of BrownPaperBunny

Watch the video below to see how this wreath all came together. And share your own wreath on social media! Tag @BrownPaperBunny so I can see!

In Watercolor, Illustrations, Aug 2017, Tutorial, Ink, Type
3 Comments
DIY Black and White Halloween Banner by Jessica Mack of BrownPaperBunny

DIY Black and White Halloween Banner

October 26, 2018

Please note: This blog post contains affiliate links, which help pay for the upkeep of this site. That being said, I will never, ever promote anything I am not 100% in love with!

----------

This week I’m going to show you how to make this chic DIY black and white Halloween banner. It's easy to make, looks great, and you'll only need a few supplies to get started.

Supplies:

  • Tombow Dual Brush Pen (Black N15)

  • Card or thick paper

  • Tombow Mono Drawing Pens

  • Black or white ribbon or string

  • Tombow Adhesive Permanent

  • Scissors

DIY Black and White Halloween Banner by Jessica Mack of BrownPaperBunny

Step 1: Cut Out Your Pennants

The first step is to cut out the pennants for your banner. An easy way to choose the size of your pennants is to divide the card in half horizontally then see how many you can fit into each half, with one side made up of triangles and the other side dovetail shapes. You'll fit twice the triangles by having every second one upside down. Leave a strip at the top of each pennant to fold over the ribbon. Once you have your first set of shapes cut out you can use them as a template for the rest.

Step 2: Create Your Designs

Once all your pennant shapes are cut out you are ready to draw your Halloween designs using Mono Drawing Pens and your black Dual Brush Pen. I made mine a little less scary to avoid giving my daughter nightmares but you can make yours as kid-friendly or as spooky as you like. Think about drawing ghosts, ghouls, haunted houses, witch silhouettes, spiders, bats, webs or jack-o-lanterns. Feel free to alternate simple patterns in between the Halloween motifs.

DIY Black and White Halloween Banner by Jessica Mack of BrownPaperBunny

Step 3: Stick The Pennants to the Ribbon

Once all your pennants are completed it's time to stick them to the ribbon or string. To make sure they are secure fold the top of the card over the ribbon and use your adhesive to stick the folded flap to the back of the pennant. To ensure a strong bond it helps to place the folded section under a heavy book for a few minutes. Continue until all of your pennants are fixed to the ribbon, then you're ready to hang it. It looks great above a fireplace, in a doorway, or a window.

DIY Black and White Halloween Banner by Jessica Mack of BrownPaperBunny

Show me your DIY black and white Halloween banner on social media. Tag @BrownPaperBunny so I can see your handiwork!

In Ink, Aug 2017, Tutorial
7 Comments
DIY Happy Mail with Mixbook and Tombow by Jessica Mack of BrownPaperBunny

DIY Happy Mail with Mixbook and Tombow

October 19, 2018

Please note: This blog post contains affiliate links, which help pay for the upkeep of this site. That being said, I will never, ever promote anything I am not 100% in love with!

----------

Hello hello! This week I’m going to show you how to make some fun travel-themed happy mail with Mixbook and Tombow supplies. I think the world would be a happier place in general if we all sent a little more snail mail to each other!

Supplies:

  • Tombow Fudenosuke Color Brush Pens

  • Mixbook Invitation Cards

  • Tombow Mono Drawing Pen

  • Map or travel photo

  • Tombow Mono Adhesive + Permanent

  • Plain paper

  • Scissors

DIY Happy Mail with Mixbook and Tombow by Jessica Mack of BrownPaperBunny

Step 1: Write Your Greeting

Use your colored Fudenosuke brush pens to write your greeting onto a separate piece of paper. Have some fun with the colors and try some different writing styles!

DIY Happy Mail with Mixbook and Tombow by Jessica Mack of BrownPaperBunny

Step 2: Cut Everything Out

Cut out your greeting, and trim down your map or travel photos so they fit just inside the border of your Mixbook invitation cards.

Step 3: Stick the Pieces Together

Using your Mono Permanent + Adhesive stick your map or photos to the card, then layer your greeting on top. Use your Fudenosuke brush pens to add some fun details or finishing touches then write on the back with your Mono Drawing Pen and your DIY Mixboook happy mail is ready to be sent!

DIY Happy Mail with Mixbook and Tombow by Jessica Mack of BrownPaperBunny

To put a little extra sparkle in your recipient's day why not decorate the envelope as well. Use your Fudenosuke or Mono Drawing Pens to continue the travel theme on the outside.

I’d love to see your happy mail, tag @BrownPaperBunny on social media so I can take a look!

In Tutorial, Type, Ink, Aug 2017
2 Comments
How to Draw a Witch by Jessica Mack of BrownPaperBunny

How to Draw a Witch

October 1, 2018

Please note: This blog post contains affiliate links, which help pay for the upkeep of this site. That being said, I will never, ever promote anything I am not 100% in love with!

----------

I hate when people tell themselves that they can’t draw. I hear it WAY too often!

So I’m here to tell you that it’s really just breaking objects down into shapes and lines, and today I’m going to show you how to draw a cute little witch so you can make your own Halloween cards!

Here’s what you’ll need to get started.

Supplies:

  • Tombow Dual Brush Pens

  • Scissors

  • Thick card or watercolor paper (I’m using Strathmore Bristol)

How to Draw a Witch by Jessica Mack of BrownPaperBunny

Step 1: Draw Your Shapes

To draw your cute little witch start with a circle for her head, a Hershey's Kiss shaped body, and little sausage-shaped arms and legs.

Draw a line for the broomstick and a rounded rectangle for the broom bristles.

Step 2: Add Details

Once you’re happy with the basic shapes starting adding some details. Give her a face, hair and clothes.

How to Draw a Witch by Jessica Mack of BrownPaperBunny

Step 3: Add Color

The last step is to color your cute little witch, using your Dual Brush Pens. Add a darker shade anywhere there might be a shadow (under her arm, the brim of her hat etc). Once the ink is dry, cut her out and you’ve got a fun Halloween card! For an extra special touch make your own matching envelopes.

How to Draw a Witch by Jessica Mack of BrownPaperBunny

If you make some of your own I’d love to see! Tag @BrownPaperBunny on social media.

In Ink, Aug 2017, Tutorial
6 Comments
Make a Halloween Candy Card with Jessica Mack of BrownPaperBunny

Make a Halloween Candy Card

September 28, 2018

Please note: This blog post contains affiliate links, which help pay for the upkeep of this site. That being said, I will never, ever promote anything I am not 100% in love with!

----------

Today I’m going to show you how to make these deliciously simple Halloween candy cards. These tasty greetings are great for work colleagues, friends or family. Here's what you'll need to get started.

Supplies:

  • Tombow Dual Brush Pens

  • Strathmore Bristol or other cardstock

  • Tombow Mono Drawing Pen

  • Scissors

  • Tombow Mono Permanent Adhesive 

  • Individually-Wrapped Halloween Candy 

Make a Halloween Candy Card with Jessica Mack of BrownPaperBunny

Step 1: Draw a Cauldron

Using your Tombow Dual Brush Pens, draw a cauldron and some bubbles onto the right-hand side of your card. Try spooky Halloween colors like purples or oranges!

Make a Halloween Candy Card with Jessica Mack of BrownPaperBunny

Step 2: Cut Out The Cauldron

The next step is to carefully cut out the center of your cauldron, this way the candy will show through to the front once the card is finished. 

Make a Halloween Candy Card with Jessica Mack of BrownPaperBunny

Step 3: Add Detail

Use your Mono Drawing Pen to add lines around the bubbles and give them a little more definition.

Make a Halloween Candy Card with Jessica Mack of BrownPaperBunny

Step 4: Color The Background

Using your Dual Brush Pens again color the background of your Halloween candy card. If you want to leave the front of the card white you can skip this step.

Make a Halloween Candy Card with Jessica Mack of BrownPaperBunny

Step 5: Stick On Your Candy

Now fold your card in half, then use the cutout section on the front of your card to draw a cauldron outline on the inside of the card. Next, use your Mono Permanent Adhesive to cover the cauldron shape and stick down your Halloween candy.

Make a Halloween Candy Card with Jessica Mack of BrownPaperBunny

Voila, you're finished! It's time to hand out your delicious Halloween candy cards, who will you give yours to?

Make a Halloween Candy Card with Jessica Mack of BrownPaperBunny

I’d love to see how your Halloween candy cards came out, so tag @BrownPaperBunny on social media!

In Ink, Tutorial, Aug 2017
Comment
Make Fall Leaf Place Cards with Jessica Mack of BrownPaperBunny

Make Fall Leaf Place Cards

September 21, 2018

Please note: This blog post contains affiliate links, which help pay for the upkeep of this site. That being said, I will never, ever promote anything I am not 100% in love with!

----------

Fall is the perfect season to host lots of cozy dinner parties, so today I’m going to show you how to make some fun fall-themed place cards.  But first, you'll need to gather a few supplies. 

Supplies:

  • A pencil

  • Watercolor paper

  • Tombow Dual Brush Pens

  • Tombow Mono Drawing Pens

  • A paintbrush

  • Scissors

To create your fall-themed place cards start by using your pencil to draw a mason jar and some leaf shapes onto your watercolor paper.

Make Fall Leaf Place Cards with Jessica Mack of BrownPaperBunny

Next, color in your leaves with Dual Brush Pens, and use a wet paintbrush over the ink to get a watercolor effect. Once they are dry you can add lines and detail with your Mono Drawing pens, then cut everything out. Check out the time-lapse video below to see each step, sped up.

To finish off your place cards write your guest's name on the jar and fall-themed questions on the back of each leaf as conversation starters, then make a slit in the top of your mason jar, and arrange the leaves in the top.

Make Fall Leaf Place Cards with Jessica Mack of BrownPaperBunny

The cards look great laid on top of a plate or held up in a place-card holder.

What’s your favorite fall dish to have at a dinner party or pot-luck? 

In Aug 2017, Ink, Tutorial, Watercolor
6 Comments
Create a Floral Self-Portrait with Jessica Mack of BrownPaperBunny

Create a Floral Self-Portrait

September 15, 2018

Please note: This blog post contains affiliate links, which help pay for the upkeep of this site. That being said, I will never, ever promote anything I am not 100% in love with!

----------

Hello hello! Today I'm going to show you how to create an easy floral self-portrait. You could make one for all the members of your family and hang them on the wall together!

Here are the supplies you'll need to get started.

Supplies:

  • Tombow Dual Brush Pens
  • Watercolor Paper
  • Tombow Mono Drawing Pen
  • Pencil
  • Paintbrush
Create a Floral Self-Portrait with Jessica Mack of BrownPaperBunny

Step One: Draw Your Silhouette

An easy way to capture your profile silhouette is to sit near a wall with a lamp on your other side and have a friend or family member trace your shadow onto the paper. Once your silhouette has been captured you can go over it with Mono Drawing Pen to make it stand out.

Create a Floral Self-Portrait with Jessica Mack of BrownPaperBunny

Step Two: Fill Your Silhouette with Loose Floral Shapes

Using your Dual Brush Pens fill your silhouette with loose florals. Then, with your wet paintbrush, go over the ink to give it a soft watercolor effect. 

Create a Floral Self-Portrait with Jessica Mack of BrownPaperBunny

You can leave some white space, or fill everything in completely.

Create a Floral Self-Portrait with Jessica Mack of BrownPaperBunny

Step Three: Outline Your Flowers

This step is optional, but if you want to add a little more definition to your flower shapes, use your Mono Drawing Pen to add in some lines and details. 

Create a Floral Self-Portrait with Jessica Mack of BrownPaperBunny

Voila, you're ready to frame your self-portrait and hang it on the wall! And if flowers aren't your thing, you could fill your silhouette with patterns, fruit, or anything else that feels like you! If you really like tennis, fill it with tennis rackets and balls. Maybe books are more your thing, you could fill it with all your favorite titles. Tell me in the comments what you'd fill yours with!

I'd love to see your finished self-portrait, so share it on social media and tag @BrownPaperBunny!

In Portraits, Ink, Illustrations, Aug 2017, Tutorial, Watercolor
10 Comments
← Newer Posts Older Posts →

Subscribe

Sign up to receive social media tips, freebies, special promotions, and art tutorials!

Thank you!

Please click confirm in the email you were just sent!

Directory of Illustration Jessica Mack

Shop my work on Society6

Watercolor World Map by Jessica Mack of BrownPaperBunny

Follow on Instagram

For the 100 Days Project this year I’m keeping it super low pressure. I’ve got a very busy couple of months coming up and want to set myself up to be able to stick with it, while still making sure I do something creative every day. You ca

See my classes on Skillshare

Skillshare Classes by Jessica Mack

Popular Posts

Popular Posts
CRL-Horizontal-Laptop-Beige-Floral-Painting.jpg
Creative Retreat Live
Rainbow-Watercolor-Wreath-Using-Markers.JPG
Rainbow Wreath Tutorial
15 Ways to Journal by Jessica on BrownPaperBunny
15 Ways to Journal
Tombow Brush Pen Markers and Colored Pencils
Brown Paper Bunny

Privacy + Terms of Use

Shop

Watercolor with Markers Book

Classes

Art Tutorials

Art & Illustration Portfolio

About

Contact

Custom Book Print

Custom Book Mug

How to Paint Watercolor Flowers Using Markers

Free Fashion Croquis

Start an Art Journal

6 Easy Flowers to Draw with Tombow Markers

Make Your Own Watercolor Bookmarks