• Book
    • Watercolor with Brush Pens
    • Watercolor Flowers Using Markers
    • Paint a Watercolor Galaxy Butterfly with Markers
    • Paint Watercolor Galaxy Bookmarks using Markers
    • Timelapse Video for Artists
  • Shop
  • Society6 Store
  • Blog
  • Portfolio
  • About
  • Contact
Menu

Brown Paper Bunny Studio

Art & Fashion Illustration
  • Book
  • Classes
    • Watercolor with Brush Pens
    • Watercolor Flowers Using Markers
    • Paint a Watercolor Galaxy Butterfly with Markers
    • Paint Watercolor Galaxy Bookmarks using Markers
    • Timelapse Video for Artists
  • Shop
  • Society6 Store
  • Blog
  • Portfolio
  • About
  • Contact
Inktober Fall Fashion Illustration BrownPaperBunny

Inktober Day 11: Blouse (Tombow Marker Tutorial)

October 12, 2016

Please note: This blog post contains affiliate links, which help pay for the upkeep of this site. That being said, I will never, ever promote anything I am not 100% in love with!

Today's prompt for the Inktober Fall Fashion Illustration Challenge is 'Blouse'. Naturally I added some bunnies. ;)

Someone told me about a 'watercolor' technique using Tombow Brush Markers. I tested it out, and it was pretty cool, so I wanted to share it with you. I assume it would work just as well with any water-soluble markers!

First, pick out the colors you want to use - you can also blend them together to get just the right shade. 

Then make yourself a palette. I tried a scrap of watercolor paper, which didn't work so well once I started scrubbing at the marker color with water, so in the end I used tracing paper but I've heard a zip-lock sandwich bag works well too. (UPDATE: Tombow sent me a care package with a plastic coated blending palette, which works a treat. I bet a piece of plastic overhead projector sheet or something similar would also work well). 

Scribble some ink down on the palette, this is where you can mix the marker colors. 

Then use a paintbrush to wet the marker ink and then start painting on your page. If you aren't getting enough color you usually just need a little more water on your brush.

Here's my finished product.

This technique allows for subtle color build up and layers that you can't always get by using the markers directly on the paper. I'm definitely going to experiment a little more. 

Watch the timelapse video below of it all coming together. 

Leave me a comment and let me know if you've ever tried this - or if you're going to try it now. :)

And if you'd like to see the rest of my #Inktoberff entries, click here. 

In Illustrations, Fashion Illustration, Ink, Sketchbook, Tutorial, Oct 2016
2 Comments
Flannel-fashion-illustration-BrownPaperBunny

Inktober Day 1: Flannel

October 1, 2016

Please note: This blog post contains affiliate links, which help pay for the upkeep of this site. That being said, I will never, ever promote anything I am not 100% in love with!

Inktober is a month-long challenge than happens every year in October. I joined in a couple of years ago, and it's become one of my favorite challenges! This year I came up with my own fashion-related prompts for each day. (I'd love for you to join in by the way - check out my last blog post).

Here is Day 1: Flannel 

I used Dr Ph Martin's Bombay India Ink, Micron Pens, Liquitex Markers (which I suppose are technically paint - but shh, don't tell anyone), and Winsor & Newton Cotman Brushes.

First I sketched out my drawing using pencil, then went over it with grey pens, and erased as much of the pencil lines as I could without scrubbing up the ink lines. Then I used red India Ink to create the 'splashy' side of the flannel, and more neatly color in the right-hand side.

Once that was dry I used a watered down teal India Ink in stripes over the red to create the flannel look. I also used teal to create some background texture in the upper right corner. 

I then painted on some pale yellow ink on some strands of her hair, and used watered down magenta ink on her lips and cheeks. 

Lastly I busted out the Liquitex marker in bright yellow to make some of her hair pop a little more, and to add some detail to the bottom left corner. 

I added a couple of faint triangles in photoshop, because I felt like the big white area of her jeans was a little too plain. And voila - all done!

Ink-BrownPaperBunny

I'd love to know what you think of this slightly looser and messier style - often my illustrations are very neat. ;)

Flannel-Fashion-Illustration-II-BrownPaperBunny
In Illustrations, Fashion Illustration, Ink, Tutorial, Oct 2016
Comment
Best iPad Pro Apps for Artists, by Jessica Mack of BrownPaperBunny

Top 5 iPad Pro Apps for Artists!

January 18, 2016

Hey friend! I'm sure we're already besties on Instagram, which means you know how much I've been raving about my new iPad Pro!

I've resisted going digital for a long time, I tried a few Wacom tablets and didn't really enjoy them. But when the iPad Pro, and more specifically the Apple Pencil came along, and I could do everything from rough pencil-looking sketches to outputting vector art...all from Starbucks...SOLD! And best of all I'm drawing and (digitally) painting more than ever!

Here's a round-up of my top five favorite apps for art and drawing, so far (and believe me, I've downloaded and tried a LOT of apps)!

1. Adobe Illustrator Draw (Free)

Now I know this is going to be a controversial 'number one' but here's why I love Adobe Draw so much. Vector Art people. You can output it straight to Illustrator, upload it to Adobe Cloud or Behance with a tap of a finger. Awesome. Think of all the lovely line art coloring pages you can produce on this thing. And while I love, love, love paper and watercolor, it sure is nice to be able to just hit the back button when I mess up.

Best iPad Pro Apps for Artists, by Jessica Mack of BrownPaperBunny

Here's an example of something I recently drew in Adobe Illustrator Draw.

Best iPad Pro Apps for Artists, by Jessica Mack of BrownPaperBunny

2. Procreate ($5.99)

Procreate is a super professional app with lovely brushes, pens, and other tools to choose from. The Apple pencil works brilliantly, letting you shade when held at an angle etc. You can change the size and resolution of your canvas, have multiple layers, and export your files as PSD / PNG / JPG etc. I have yet to really master Procreate, but I can see the astounding potential of this app.

Best iPad Pro Apps for Artists, by Jessica Mack of BrownPaperBunny

3. Adobe Photoshop Sketch (Free)

You can layer your artwork as PSD files, and send it over to Photoshop or Illustrator on your Mac. There are loads of tools, rulers, graph guides and you can import your own images to include in your artwork. With Adobe Photoshop Sketch you can also upload to the Adobe Cloud or send straight to your Behance profile. 

Best iPad Pro Apps for Artists, by Jessica Mack of BrownPaperBunny

4. Tayasui Sketches (Free + in-app purchases)

I like how simple and clean this app is, but it still has some great brushes including a pencil, watercolor brush, felt tip pen, rotring, and eraser. You get all of that for free, but there are in-app purchases that will upgrade you to having different types of paper, additional brushes, pressure sensitivity, more layers, and different brush sizes. And best of all, if you want to test it out first, you can upgrade for an hour before committing to the $5 cost.

Best iPad Pro Apps for Artists, by Jessica Mack of BrownPaperBunny

5. Auryn Ink ($3.99)

The closest thing you'll find to real watercolors, on the iPad Pro! You can choose the grain of paper you want, how much water your brush holds, and there is even a little hairdryer if you need your layer of paint to dry a little quicker. Hours of fun!

Best iPad Pro Apps for Artists, by Jessica Mack of BrownPaperBunny

6. Paintstorm Studio ($12.99)

Ok, I'm adding a sixth app to my list. I've just come across Paintstorm Studio. It's the closest thing I've seen to full Photoshop functionality on the iPad Pro. Loads of brushes and options, you can do collage and edit pictures as part of your artwork (most apps just let you have a photo as a background but not actually do anything to it). It is on the expensive size, but not when you consider what a Photoshop license costs! 

Best iPad Pro Apps for Artists, by Jessica Mack of BrownPaperBunny

Now it's your turn. Which of these apps have you used? And what did you like about best about it? Leave me a comment below.

If you’re new here, I’m Jessica — a watercolor artist and fashion illustrator from Australia (but now living in Seattle, Washington). I’d love to connect on social media, come say hi on Instagram, Facebook or Twitter @BrownPaperBunny! 

You might also like these blog posts:

Featured
CRL-Horizontal-Laptop-Beige-Floral-Painting.jpg
Creative Retreat Live
Rainbow-Watercolor-Wreath-Using-Markers.JPG
Rainbow Wreath Tutorial
15 Ways to Journal by Jessica on BrownPaperBunny
15 Ways to Journal
In Product Reviews, Tutorial, Jan Feb 2016
4 Comments

The Best Watercolor Paper to Use

January 14, 2016

"What is the best watercolor paper to use?" is a question I get asked a lot. So rather than just listing out my favorites, I made a short video showing you the differences between hot pressed and cold pressed, the different brands of watercolor paper, and which one you should choose depending on whether you're a beginner or a watercolor pro. Check it out, and let me know if you have any other art questions - I'd be happy to answer them if I can. 

Top of my list is: 

  • Arches Hot Pressed Watercolor Block (a little more expensive but great for scanning)
  • Fluid Hot Pressed Watercolor Block (less expensive than Arches so great for beginners and trying out new things)
In Product Reviews, Tutorial, Jan Feb 2016
Comment
Repeating-Pattern-Watercolor-Trees

Repeating Watercolor Patterns: Trees

January 5, 2016

So, this is my first ever attempt at making a repeating pattern! I definitely recommend Jenn Coyle's Skillshare class on turning watercolor paintings into repeating patterns, or you could follow the tutorial I found over at The Jungalow which was easy enough to follow, but took a lot more messing around in Photoshop than I expected. 

I'm also participating in Anika Starmer's Pattern Challenge. She's creating a pattern every single day in 2016, whereas I've only committed myself to a pattern a week. But I am enjoying her monthly prompts. You can find them here if you'd like to join in, or you can voyeuristically check out everyone else's work here. 

This is my original watercolor painting. If you look closely you'll see I had to resize a few pesky trees that just didn't want to fit into my pattern. 

Watercolor-Trees-Repeating-Pattern

I've already painted three more of Anika's January prompts, so stay tuned to see how they look as repeating (or 'conversational') patterns. 

If you're interested, I also found this super cute pattern tutorial by Julia Rothman, using nothing more than a sheet of paper, markers, scissors and tape. Check it out on the Design Sponge Blog.

Leave a comment below and let me know if you've ever made any patterns, either digitally, or the old-school way!

In Illustrations, Pattern, Sketchbook, Tutorial, Watercolor, Jan Feb 2016
5 Comments
Best Colored Pencils and Markers to Use for Adult Coloring by Jessica Mack of BrownPaperBunny

The 16 Best (and Worst) Coloring Tools

January 4, 2016

Adult coloring books are clearly the shizz, so I've been testing out a lot of different coloring tools to find out which ones work best. The quality of the paper seems to be getting better, at least in the coloring books I've picked up lately, so that opens up your options. 

Here are the ones I tested: 

Best Colored Pencils and Markers to Use for Adult Coloring by Jessica Mack of BrownPaperBunny

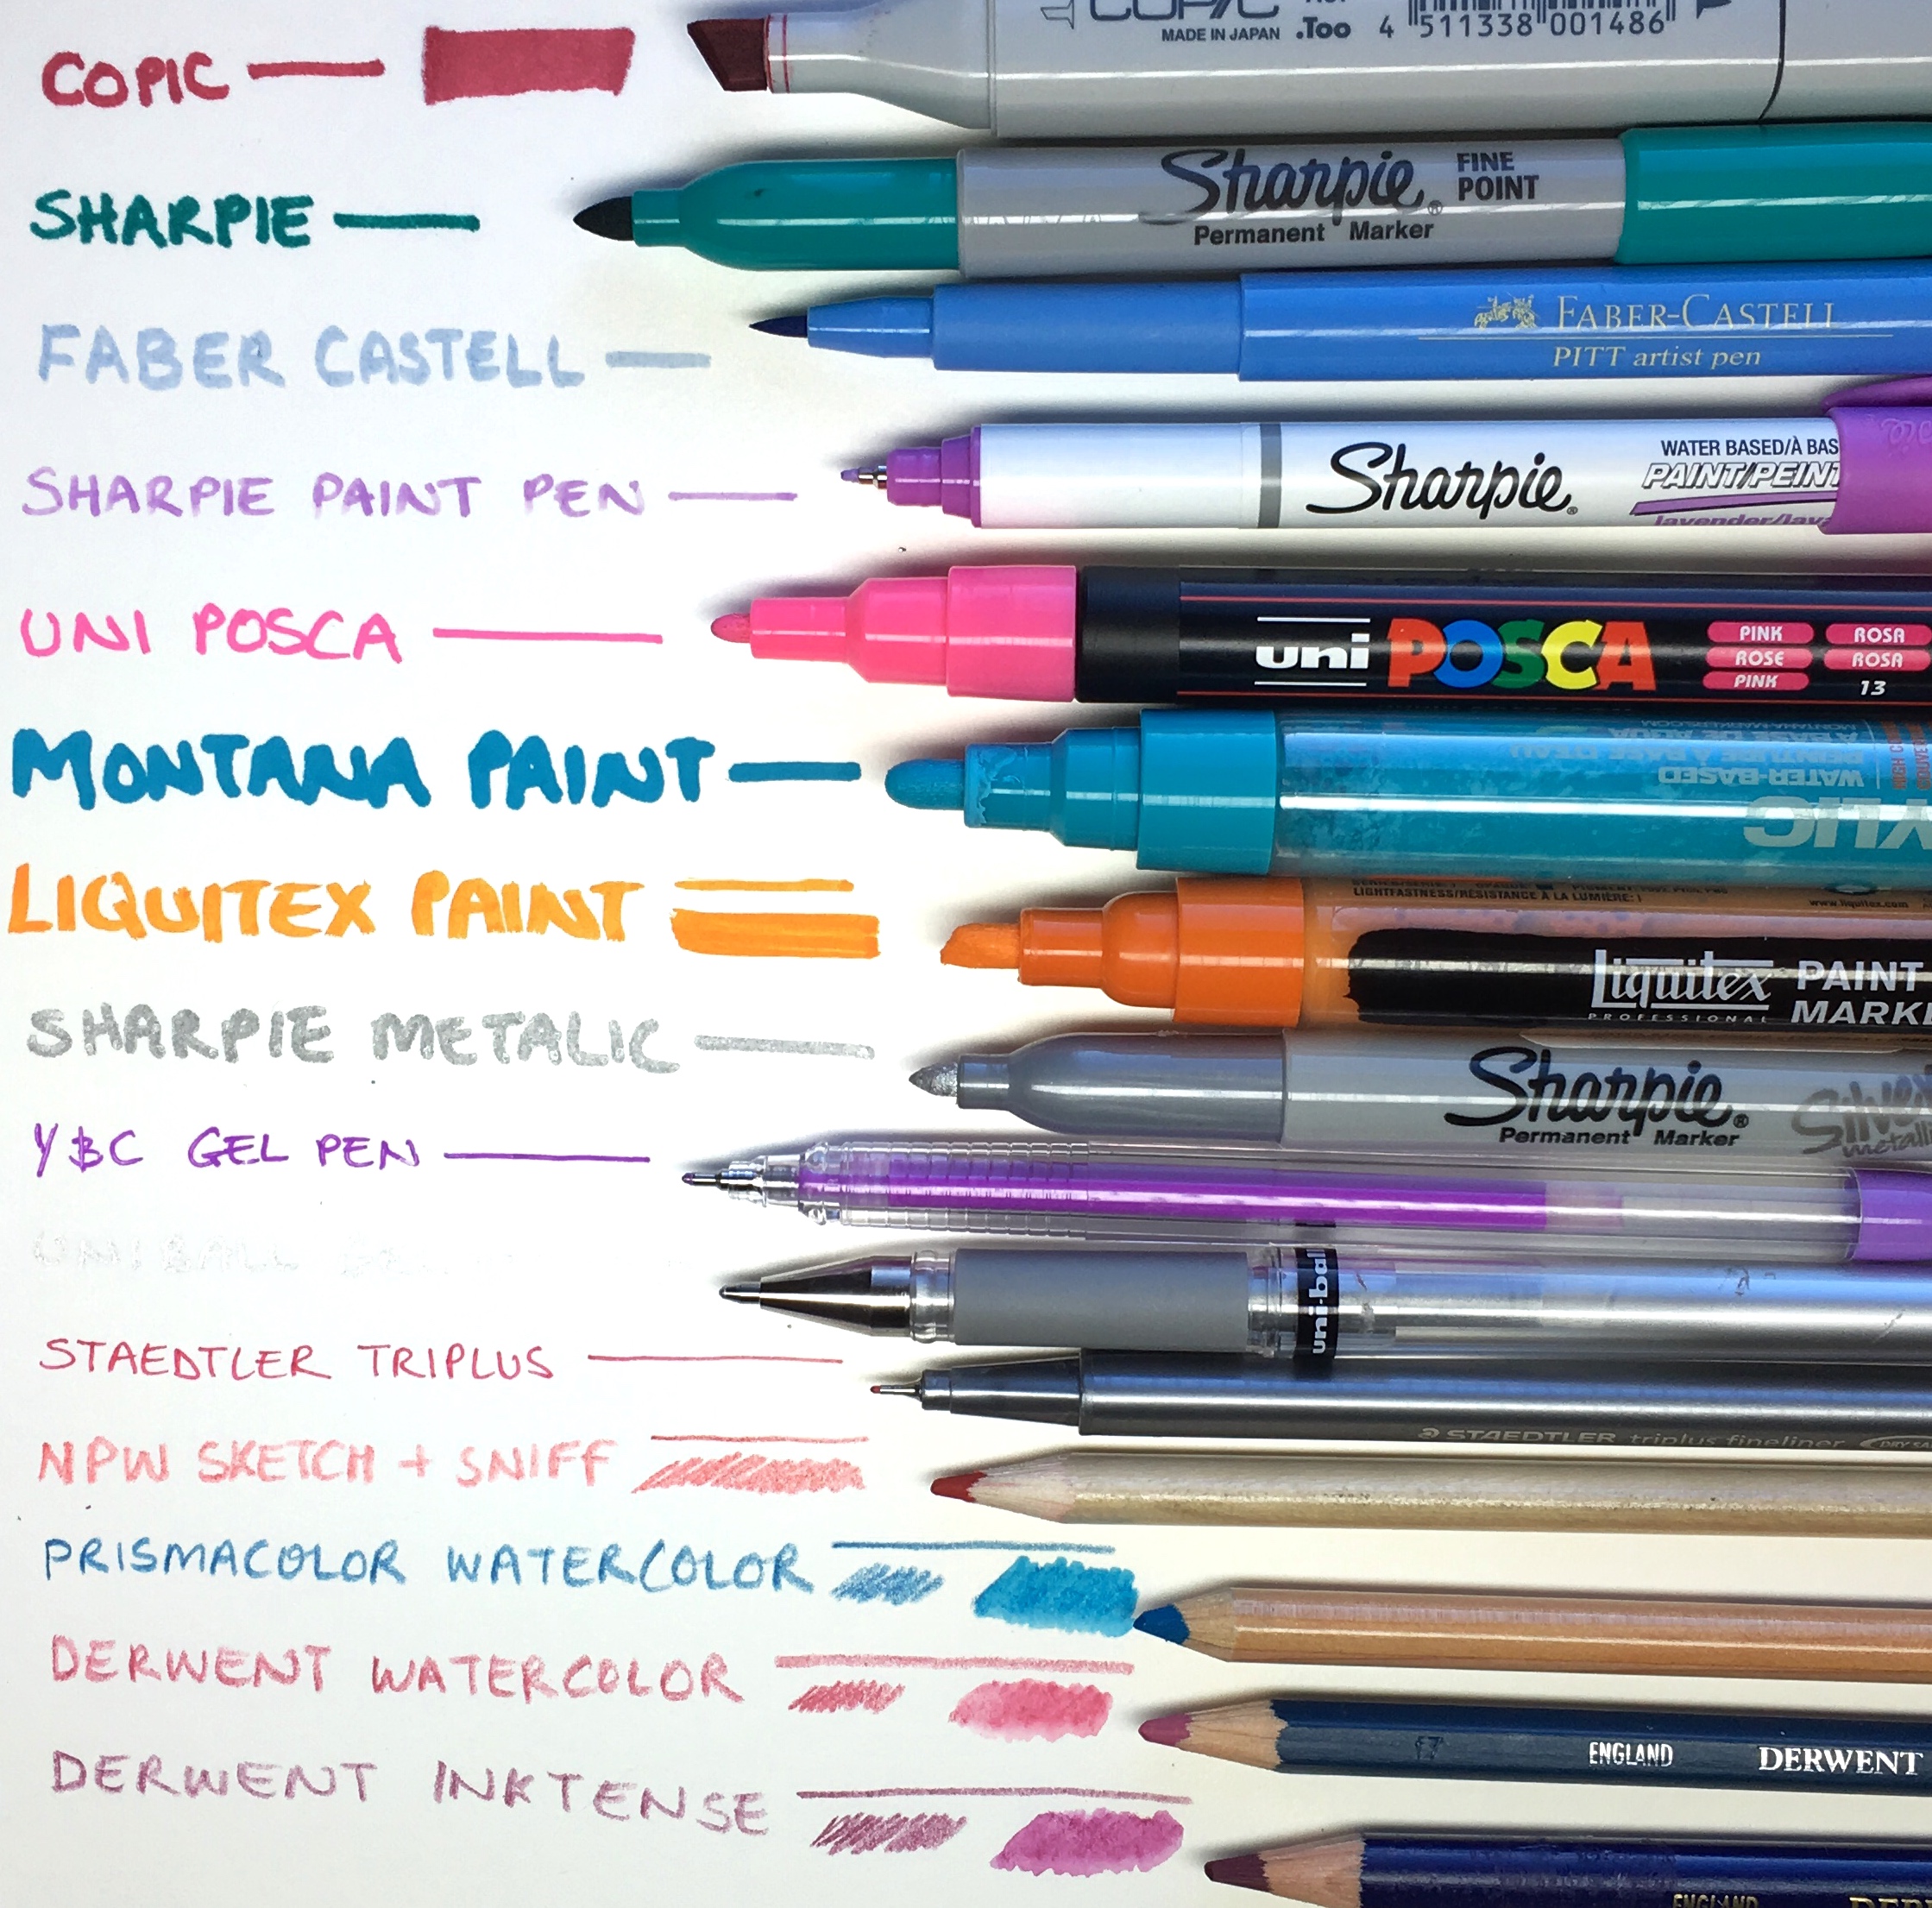
In order of suckiest to 'OMG I love this marker' here are the results!

16. Copic Dual Tip

The Copic markers are on the pricey side, and they go straight through most coloring book paper stock. Plus they smell really strong. Thumbs down.

15. Sharpie

I know Sharpies are handy, and you almost always have some in the house. BUT, just like their more expensive Copic counterpart, they went straight through the paper and they smell pretty bad. (Unless you like the smell of Sharpies, in which case I say, put the marker down, and go get some fresh air). Thumbs down. 

14. Derwent Inktense Pencil

If you use these colored pencils dry, they do a really nice job. They're soft so they cover and blend well. But if you wet them to make them more vibrant, and permanent, they do go through the paper. Not as badly as the Copic or Sharpies, but still....not great. 

13. Sharpie Paint Pen

I love paint pens, love them. Except for the Sharpie ones. Now, don't get me wrong, I'm not hating on Sharpies - usually I love them - they're just not great for coloring. The sharpie paint pens have a super fine nib, and seem to be both watery and dry somehow. So they don't cover the paper very well, and they also tend to bleed through. Thumbs down.

12. Y&C Gel Pen

You'll be there for days, head hunched over your coloring book, hump starting to form on your back, just trying to coloring in with these gel pens. The ink isn't free-flowing and the nib is ultra tiny! They might be ok if you have some teeny-tiny detailed spaces to get into, but otherwise I'd avoid them. Thumbs down.

11. Montana Paint Pen

This is a BIG nibbed paint pen. If you got a big area to cover, great. But if you're trying to do the fine detail required in most adult coloring books, forget it. Surprisingly it didn't go through the paper, despite laying down a thick, opaque layer of paint!

10. Liquitex Paint Pen

I love the variety of colors the Liquitex Paint Pens come in, but they can be a little watery and were just starting to go through the page a little if I colored a larger space with them. They are a fairly broad-nibbed pen too, so not great for finer detail. 

9. Sharpie Metallic Marker

The metallic Sharpie ink is much more opaque than its colored friends, and doesn't seem to bleed through the paper at all, unless you do some serious scrubbing. Thumbs up. Side note though, it will cover up your black lines. So you either have to be ultra careful, or not mind too much when the shapes start blobbing together.

8. Uni-Ball Metallic Gel Pen

This metallic gel pen is wonderful. The ink practically glides onto the paper, it gives reasonable coverage for a fine nib, and it doesn't bleed through the paper! Thumbs up.

7. Staedtler Tri-Plus Pen

These pens have super fine nibs, but the vibrancy and color range they offer is outstanding, and then won't bleed through your paper either. So I'd definitely recommend them for those more detailed coloring pages. Thumbs up.

6. Uni Posca Paint Pen

I love, love, love this pen. It has a smaller nib than it's Liquitex counterpart (still a little larger than a Sharpie though), and the vibrant paint is super opaque and glides onto the paper. Best of all, it doesn't go through the page! Amazing! Thumbs up!

5. NPW Sketch and Sniff Colored Pencil

For super-cheap colored pencils, these weren't too bad at all. They blended well, weren't too waxy, and best of all they smelled delicious! Thumbs up.

4. Prismacolor Watercolor Pencil

I found the Prismacolor pencils to be a little waxy and hard to blend, which is strange for a watercolor pencil. They're usually super soft. Having said that, you could wet them and blend the color out, and as long as you didn't go crazy with the water, there was no bleed-through. Thumbs up. 

3. Derwent Watercolor Pencil

The Derwent pencils are nice and soft, blend and cover well, and you can use a little water to spread them out and make them more even, without them bleeding through the page. Thumbs up.

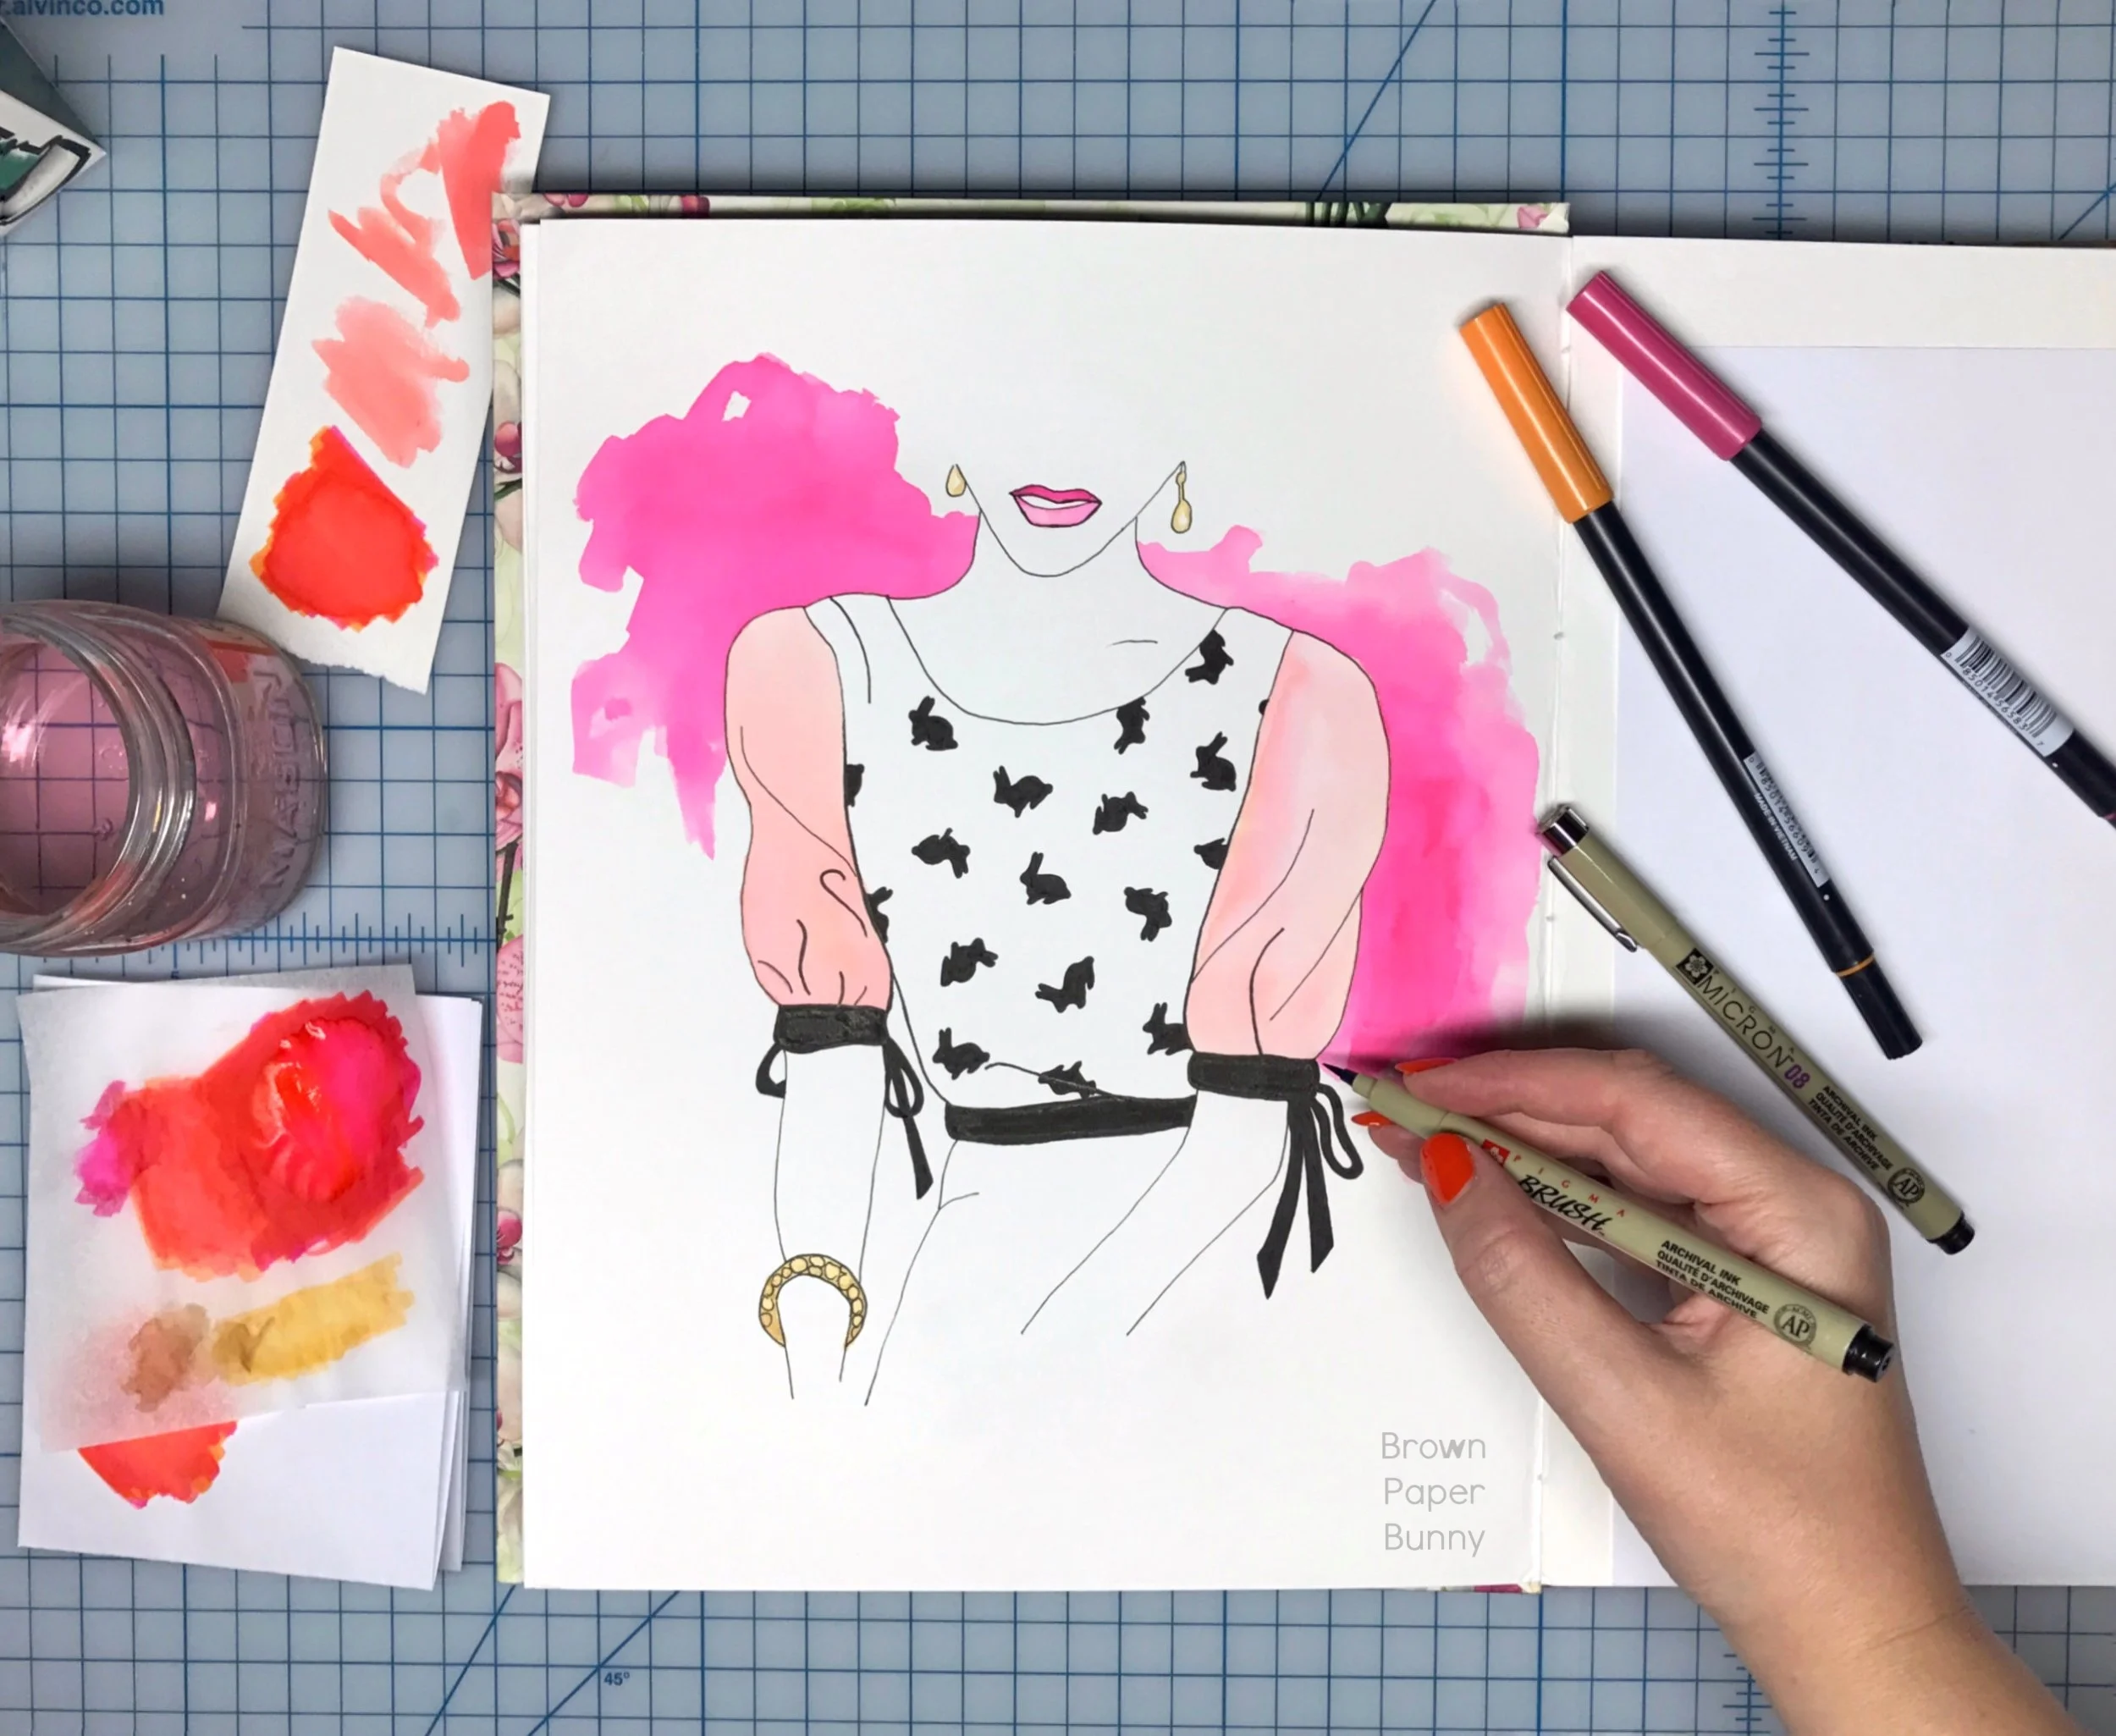
2. Winsor and Newton Watercolor

Surprisingly the watercolors did really well. They were easy to fill in small spaces with a fine brush, and as long as you didn't get splash-happy and use too much water, they didn't go through the paper! Thumbs up. 

1. Faber Castell Pitt Artist Pen

Ooh, ahh. The Faber Castell markers were my favorite. They have a brush tip so you can easily get into the small crevices, as well as block-color larger areas quickly. They come in loads of colors, they don't smell, and unless you are really scrubbing (and in which case I suggest you get a grown-up to show you how to hold your marker correctly) they won't go through the paper. We have a winner folks! 

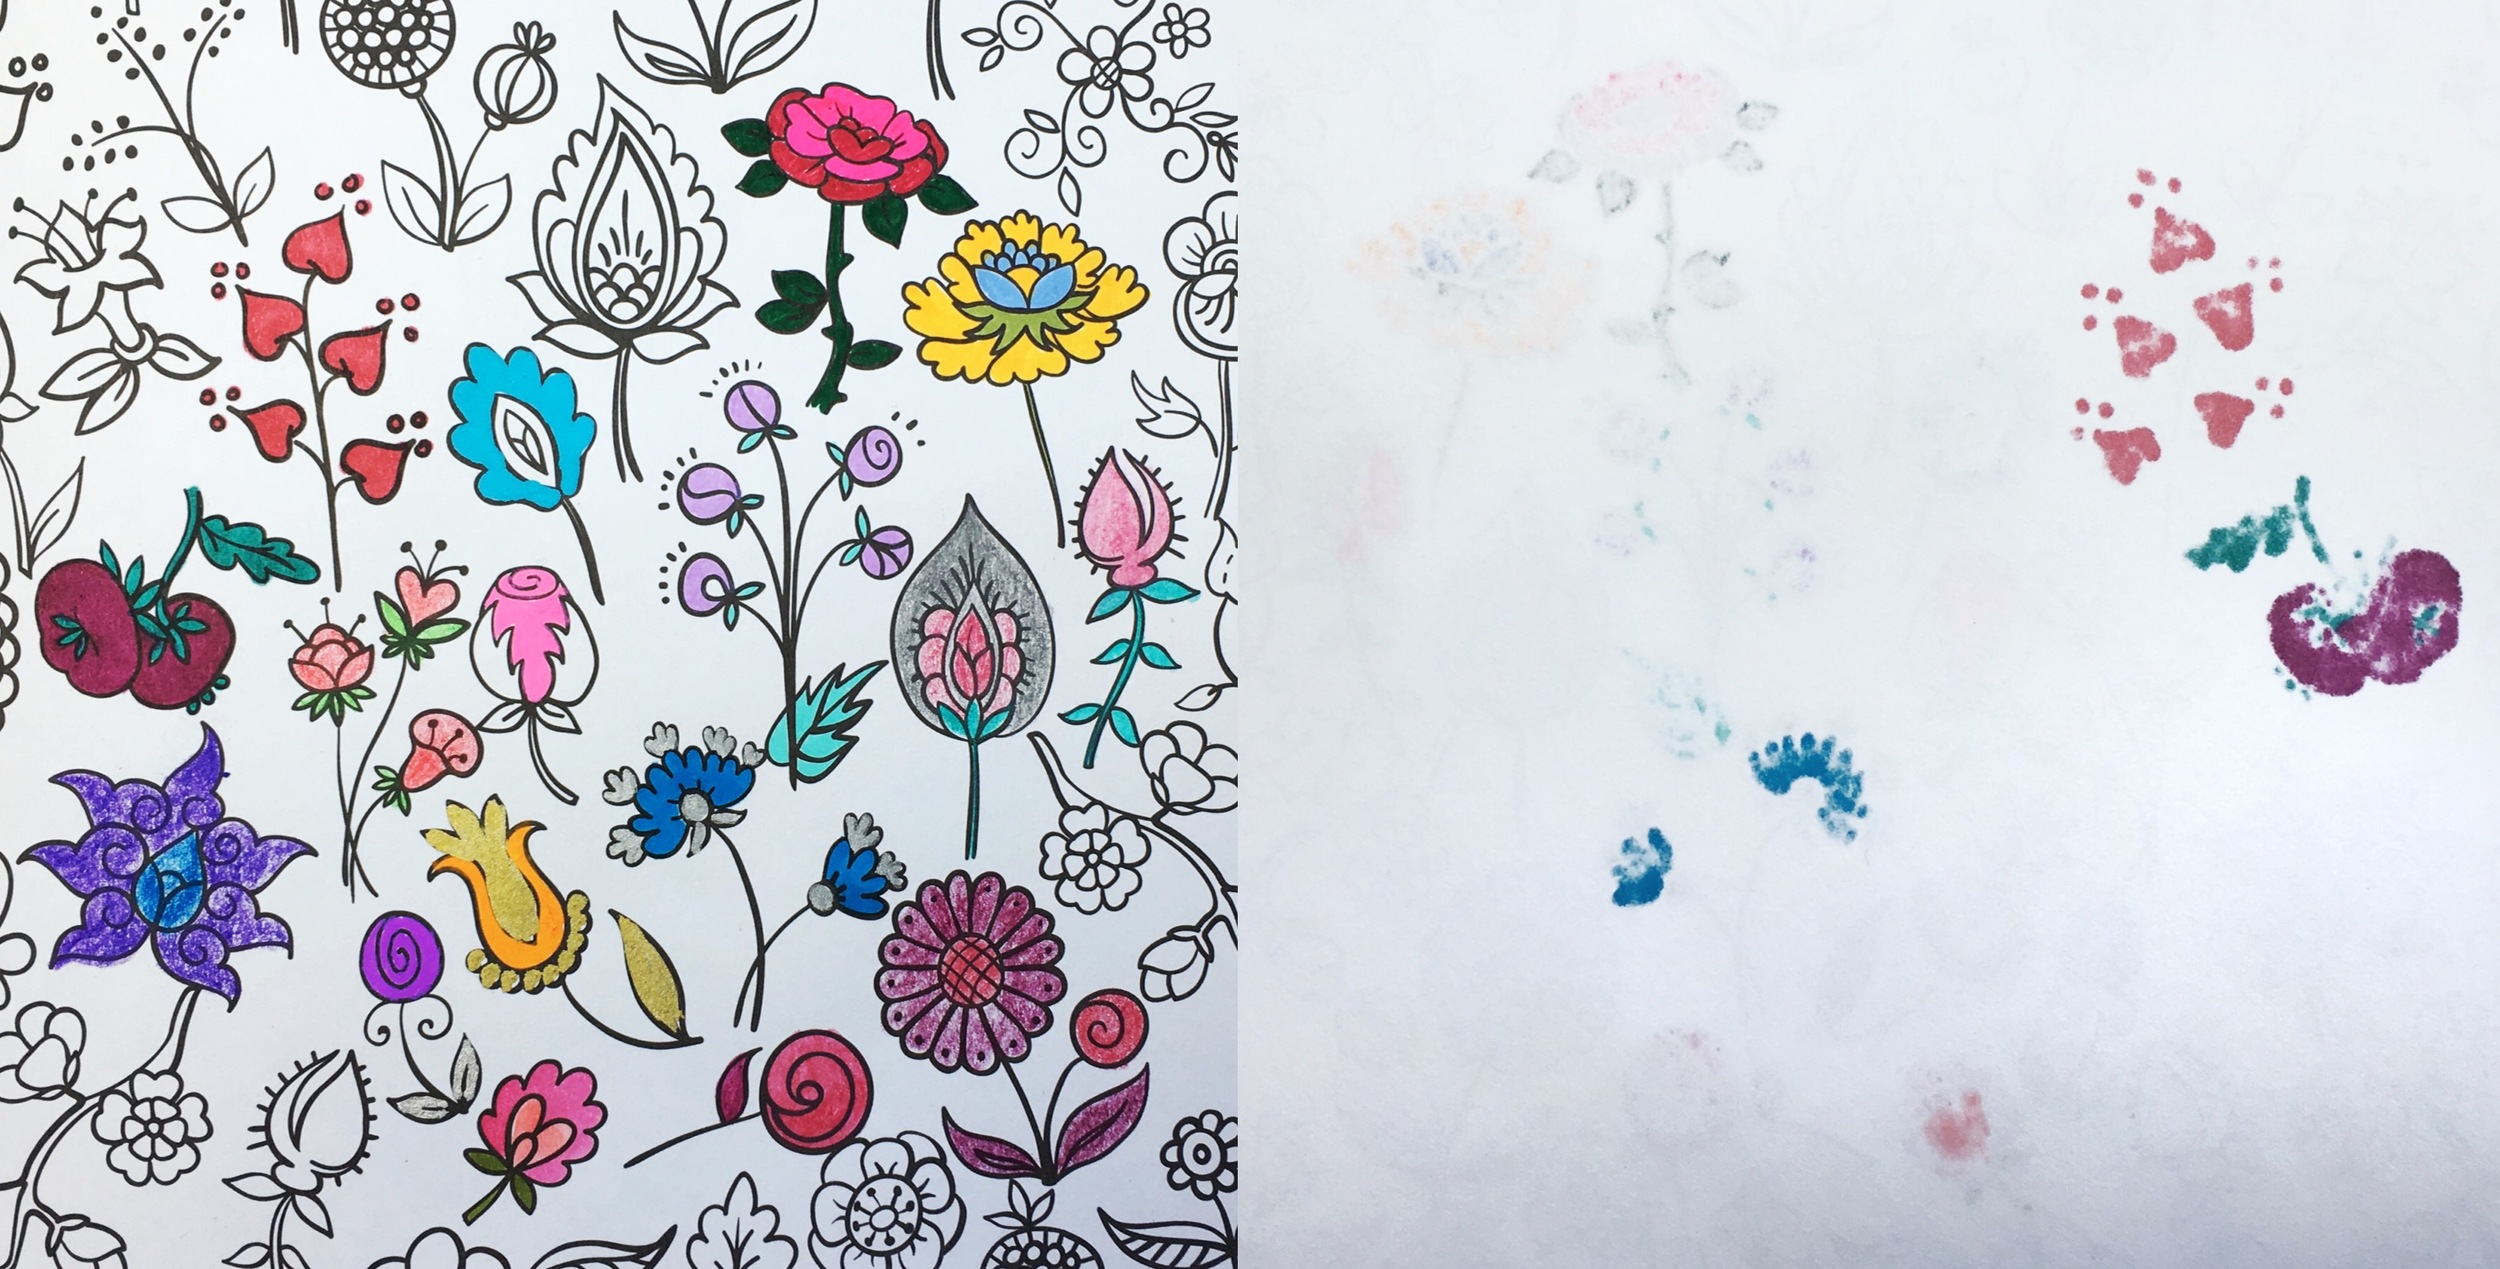
Here's the front and the reverse of my test page. You can see the sharpies and Copic pens went through the worst, followed by the Inkense pencils when wet. 

Best Colored Pencils and Markers to Use for Adult Coloring by Jessica Mack of BrownPaperBunny

What are your favorite coloring tools? Leave me a comment below and let me know (preferably a link to them, if you have one handy).

Have a great week everyone!

If you’re new here, I’m Jessica — a watercolor artist and fashion illustrator from Australia (but now living in Seattle, Washington). I’d love to connect on social media, come say hi on Instagram, Facebook or Twitter @BrownPaperBunny! 

You might also like these blog posts:

Featured
CRL-Horizontal-Laptop-Beige-Floral-Painting.jpg
Creative Retreat Live
Rainbow-Watercolor-Wreath-Using-Markers.JPG
Rainbow Wreath Tutorial
15 Ways to Journal by Jessica on BrownPaperBunny
15 Ways to Journal
In Tutorial, Product Reviews, Ink, Jan Feb 2016
5 Comments
BrownPaperBunny-Fashion-Illustration

Are you cheating if you trace?

December 27, 2015

I was recently asked my opinion on tracing. I have mixed feelings, and think it can be useful when you're just learning to draw, to help you out with proportions etc., but in the long run it may do more harm than good. Check out my video response. 

If you have a question you'd like me to answer, leave a comment below! And if you enjoyed this post, please share it with your friends!

In Fashion Illustration, Portraits, Tutorial, Watercolor, Jul - Dec 2015
4 Comments
How To Paint A Geometric Mural by Jessica Mack of BrownPaperBunny

How to Paint a Large Geometric Mural

September 19, 2015

I decided to try my hand at painting a large-scale, geometric mural to brighten up our garage. 

My husband helped me tape up the design, using painters' tape, and then I got to work...making a lot of mistakes along the way.

I thought I'd be able to use spray paint, which turned out to be a disaster. The dust from the cans went everywhere, and I mean EVERYWHERE in the garage, including contaminating all of the other triangles (even when they were covered up). Turns out spray paint doesn't cover large areas very well either, I went through a whole can for every two triangles. 

Several trips to Home Depot and I finally got myself some rollers and house paint which were by far the better option. 

Tools-To-Paint-A-Mural

I used three shades of pink, two shades of teal, and a metallic bronze paint - and did at least two coats on each triangle. It was important to let the paint dry for at least 24 hours before removing the tape, so I didn't mess up the edges. Watch the short time-lapse video below:

I started with the geometric triangle design because it was fairly simple to execute and I thought it would make a fun photo backdrop. In a few months I may paint over the whole thing and try a more complex mural or some graffiti. Any suggestions on what I should paint next?

Paint-A-Fun-Photo-Backdrop

If you have any questions on the steps I took, or you've painted your own large mural before, leave me a comment and let me know!

While you're here, sign up to the BrownPaperBunny newsletter so you don't miss the special things I only send to my subscribers! (Free downloads, tips, exclusive content, and other fun things).

Sign Up
In Tutorial, Jul - Dec 2015
4 Comments

How to make your own watercolor set

January 7, 2015

I get a lot of questions on how I make my mini watercolor sets out of mint tins, so I thought I would show you rather than tell you. 

Here are the supplies you'll need:

  • Mint tin (Altoid tins work really well, or you can find interesting ones at candy stores)
  • Fimo or other bake-able modeling clay
  • Chopsticks (to help in the smaller areas)
  • Liquid watercolors in tubes

Note: Currently my favorite brand of watercolor is Sennelier, a French artists' watercolor with honey to keep it from drying too quickly. However, when you're traveling you probably don't have a lot of time to wait for paint to dry so I've opted for Winsor and Newton Cotman and Artist watercolors for my little tins.

And here is the tutorial on how to put it all together:

In Watercolor, Tutorial, Jan 2015
2 Comments
← Newer Posts

Subscribe

Sign up to receive social media tips, freebies, special promotions, and art tutorials!

Thank you!

Please click confirm in the email you were just sent!

Directory of Illustration Jessica Mack

Shop my work on Society6

Watercolor World Map by Jessica Mack of BrownPaperBunny

Follow on Instagram

For the 100 Days Project this year I’m keeping it super low pressure. I’ve got a very busy couple of months coming up and want to set myself up to be able to stick with it, while still making sure I do something creative every day. You ca

See my classes on Skillshare

Skillshare Classes by Jessica Mack

Popular Posts

Popular Posts
CRL-Horizontal-Laptop-Beige-Floral-Painting.jpg
Creative Retreat Live
Rainbow-Watercolor-Wreath-Using-Markers.JPG
Rainbow Wreath Tutorial
15 Ways to Journal by Jessica on BrownPaperBunny
15 Ways to Journal
Tombow Brush Pen Markers and Colored Pencils
Brown Paper Bunny

Privacy + Terms of Use

Shop

Watercolor with Markers Book

Classes

Art Tutorials

Art & Illustration Portfolio

About

Contact

Custom Book Print

Custom Book Mug

How to Paint Watercolor Flowers Using Markers

Free Fashion Croquis

Start an Art Journal

6 Easy Flowers to Draw with Tombow Markers

Make Your Own Watercolor Bookmarks