• Book
    • Watercolor with Brush Pens
    • Watercolor Flowers Using Markers
    • Paint a Watercolor Galaxy Butterfly with Markers
    • Paint Watercolor Galaxy Bookmarks using Markers
    • Timelapse Video for Artists
  • Shop
  • Society6 Store
  • Blog
  • Portfolio
  • About
  • Contact
Menu

Brown Paper Bunny Studio

Art & Fashion Illustration
  • Book
  • Classes
    • Watercolor with Brush Pens
    • Watercolor Flowers Using Markers
    • Paint a Watercolor Galaxy Butterfly with Markers
    • Paint Watercolor Galaxy Bookmarks using Markers
    • Timelapse Video for Artists
  • Shop
  • Society6 Store
  • Blog
  • Portfolio
  • About
  • Contact
How to Draw Dahlias with Tombow Dual Brush Pens By BrownPaperBunny

6 Easy Flowers to Draw with Tombow Markers

August 26, 2017

Please note: This blog post contains affiliate links, which help pay for the upkeep of this site. That being said, I will never, ever promote anything I am not 100% in love with!

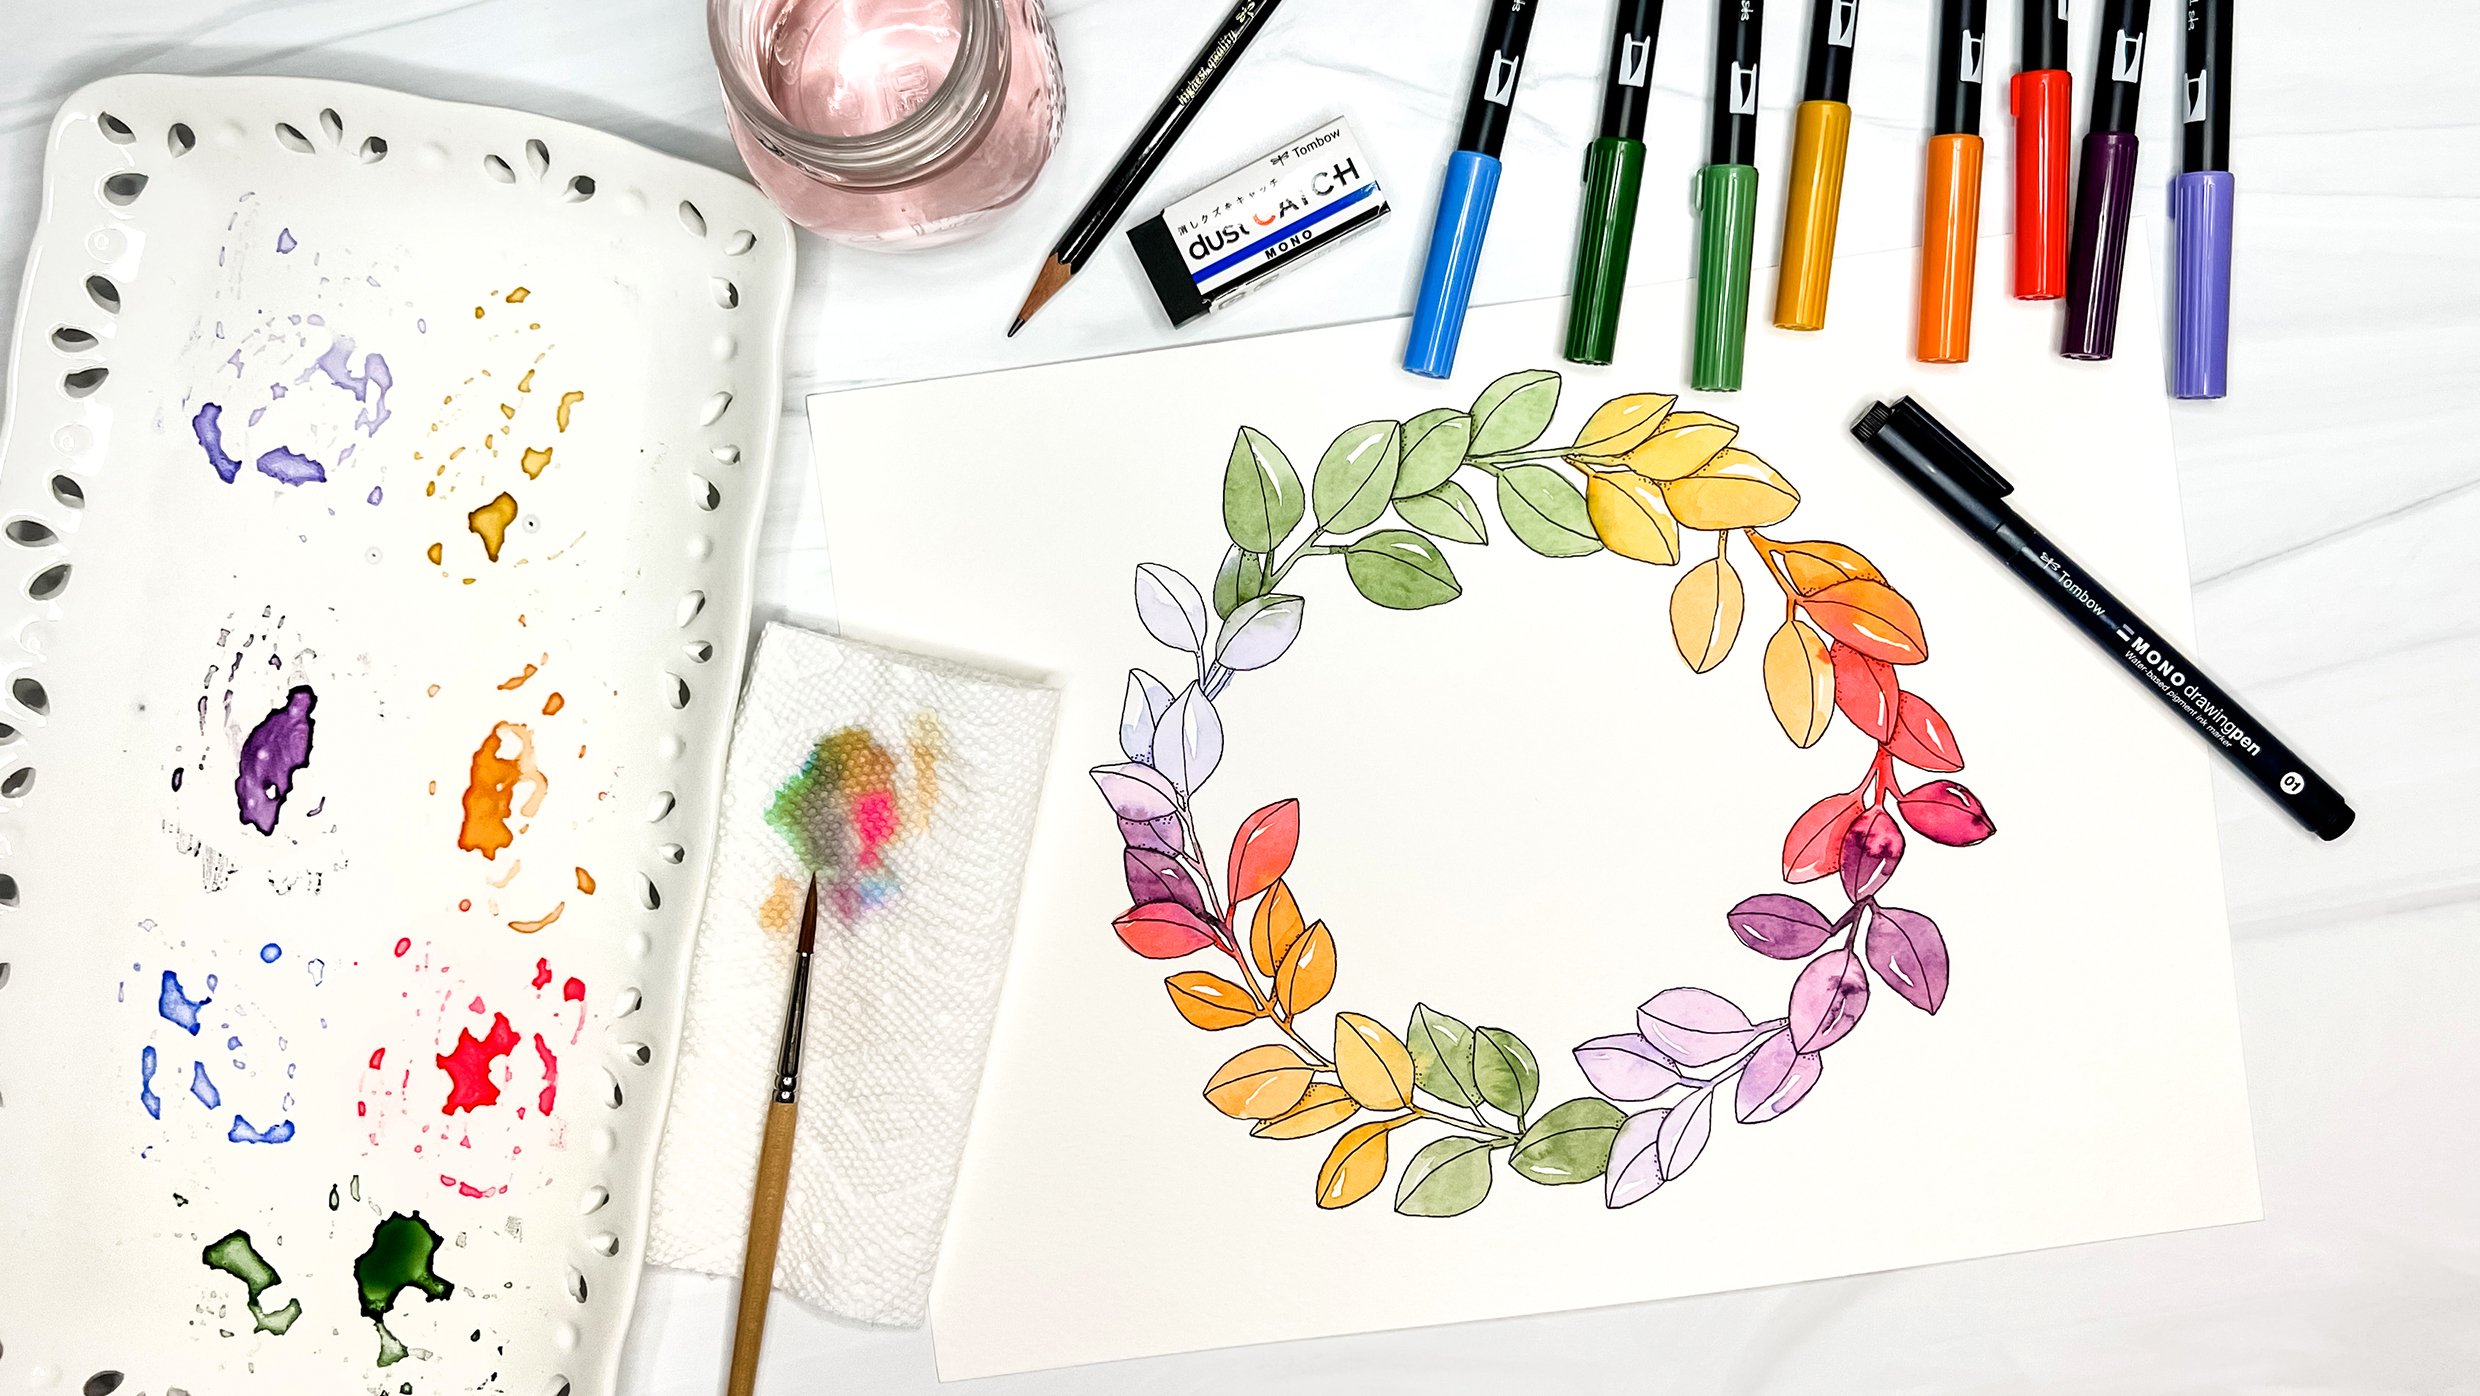
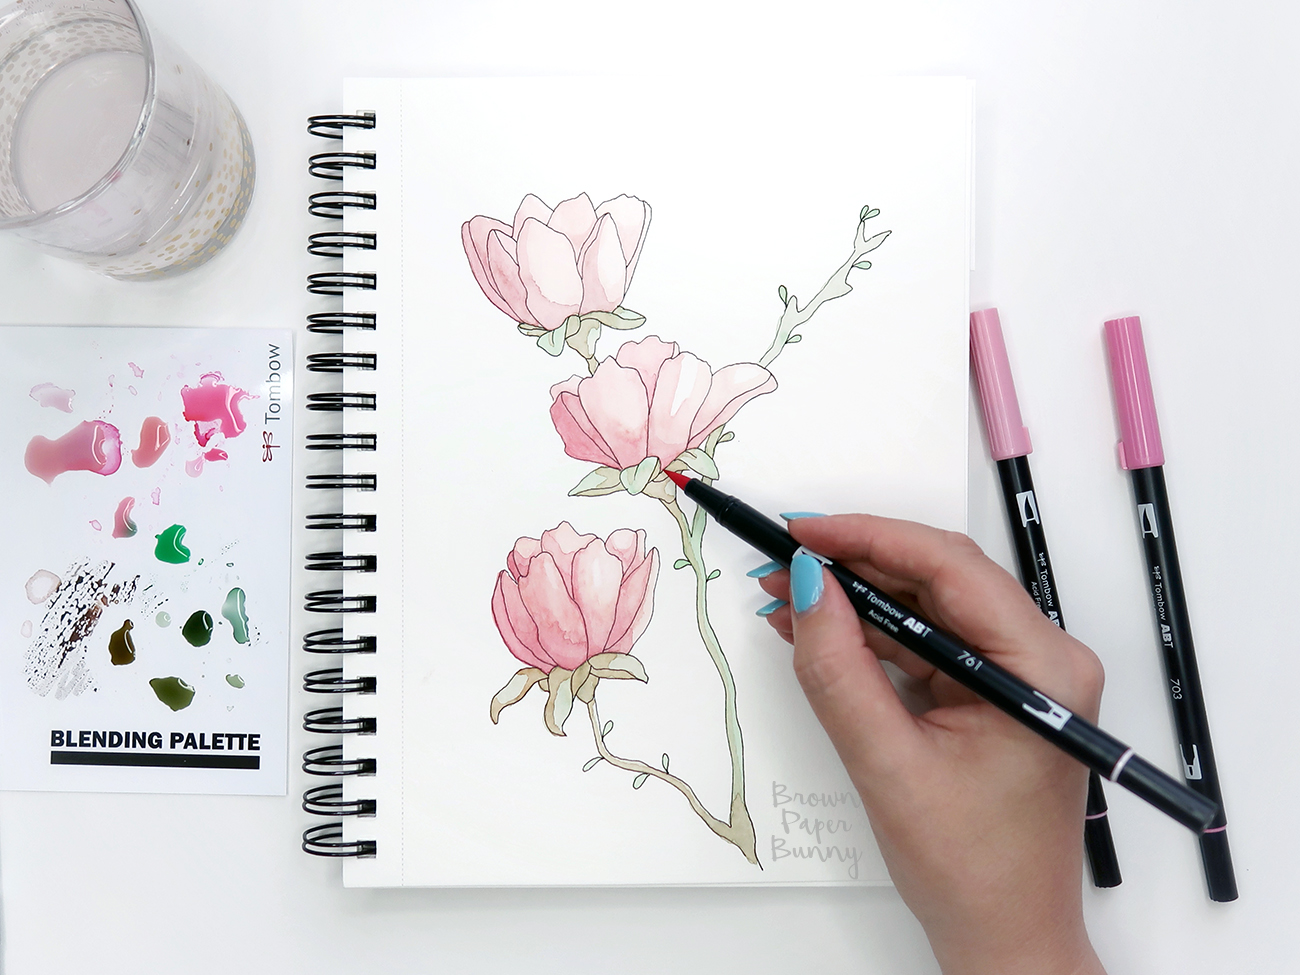
I often find myself drawing flowers in my planner or notebooks to brighten up the margins, so I wanted to show you five of my favorite, super easy stylized flowers to draw using Tombow Dual Brush Pens. 
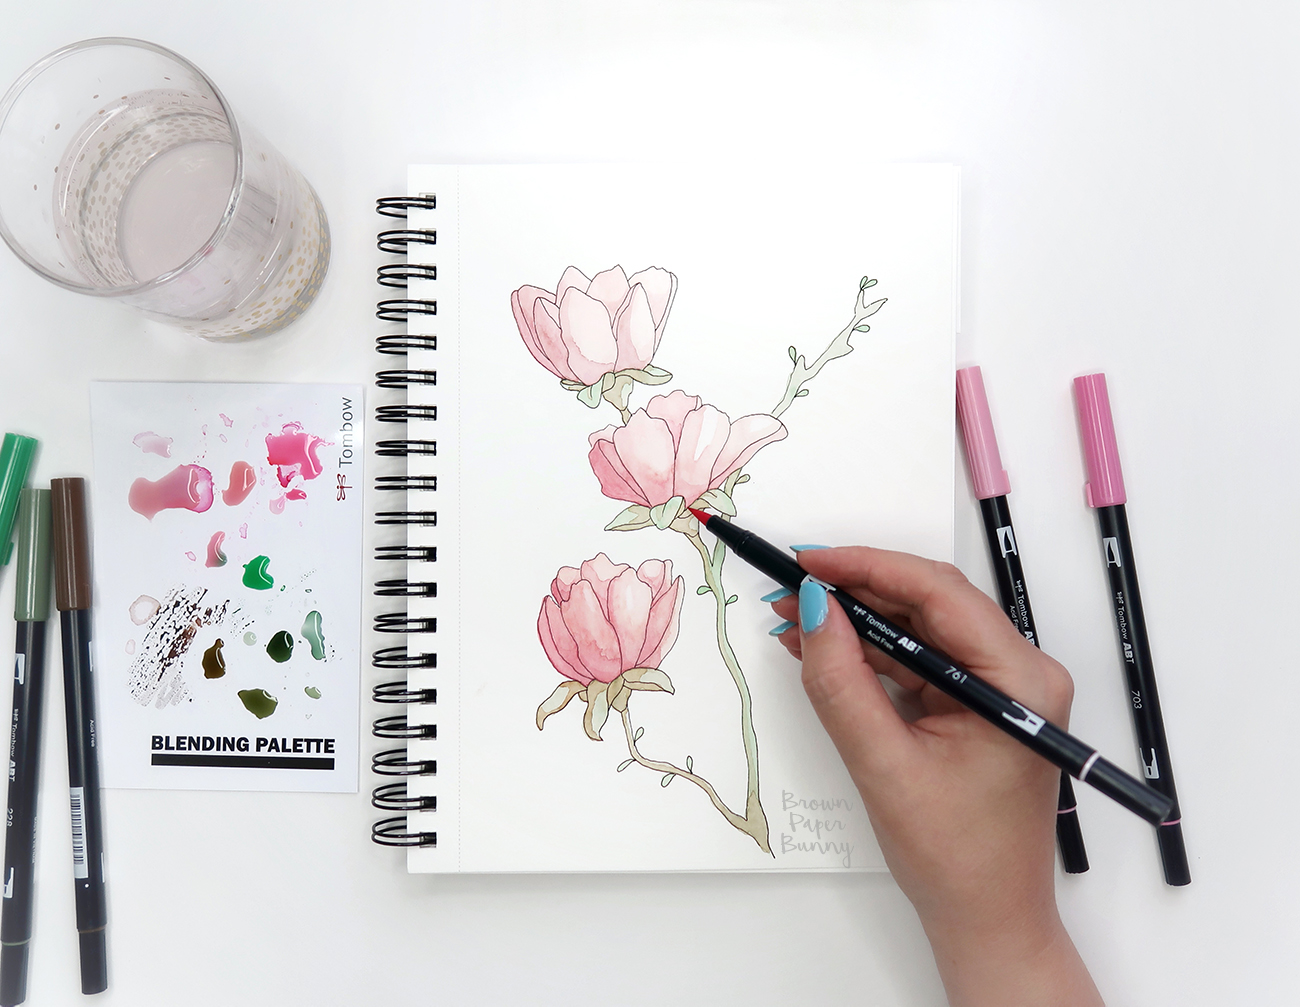
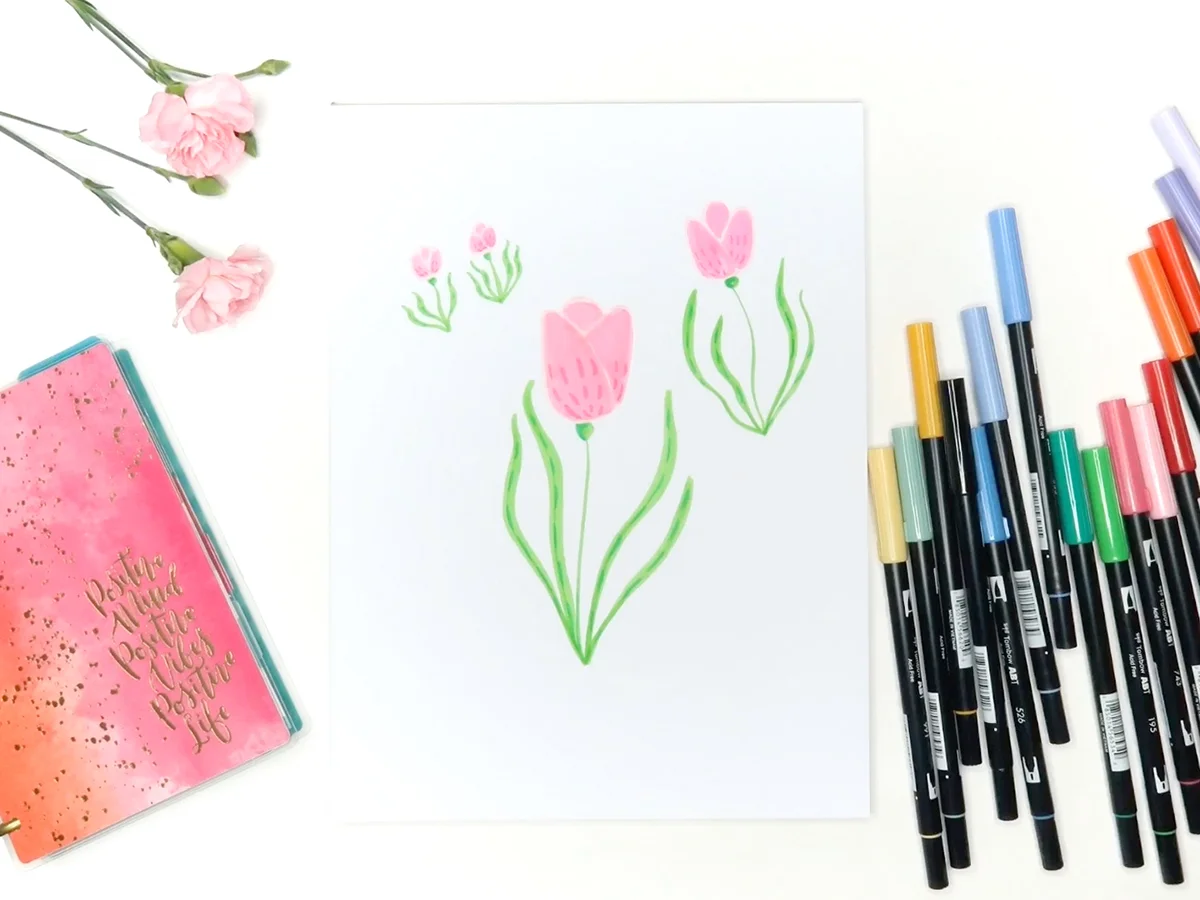
1. Tulips

Using the brush end of the markers I start with a lighter color to draw two main petals at the front and one peeking over from the back, then I use a slightly darker shade to color the petals in, leaving some space for the first color to show through in between petals.

Next I draw a simple stem and leaves, making use of the brush tip to vary the size of the line by applying more pressure as I draw the leaf.

I then use an even darker shade of both pink and green to add some simple lines as detail. Watch the video below to see it all come together.

2. Sunflowers

I start with a light shade of yellow, and using the brush end I create the first layer of petals. Then, using a slightly darker shade of yellow create more petals in the spaces of the first layer. Next comes a simple stem and a leaf or two, before adding short black dashes to create the seeds in the middle. Watch the video below to see it come together.
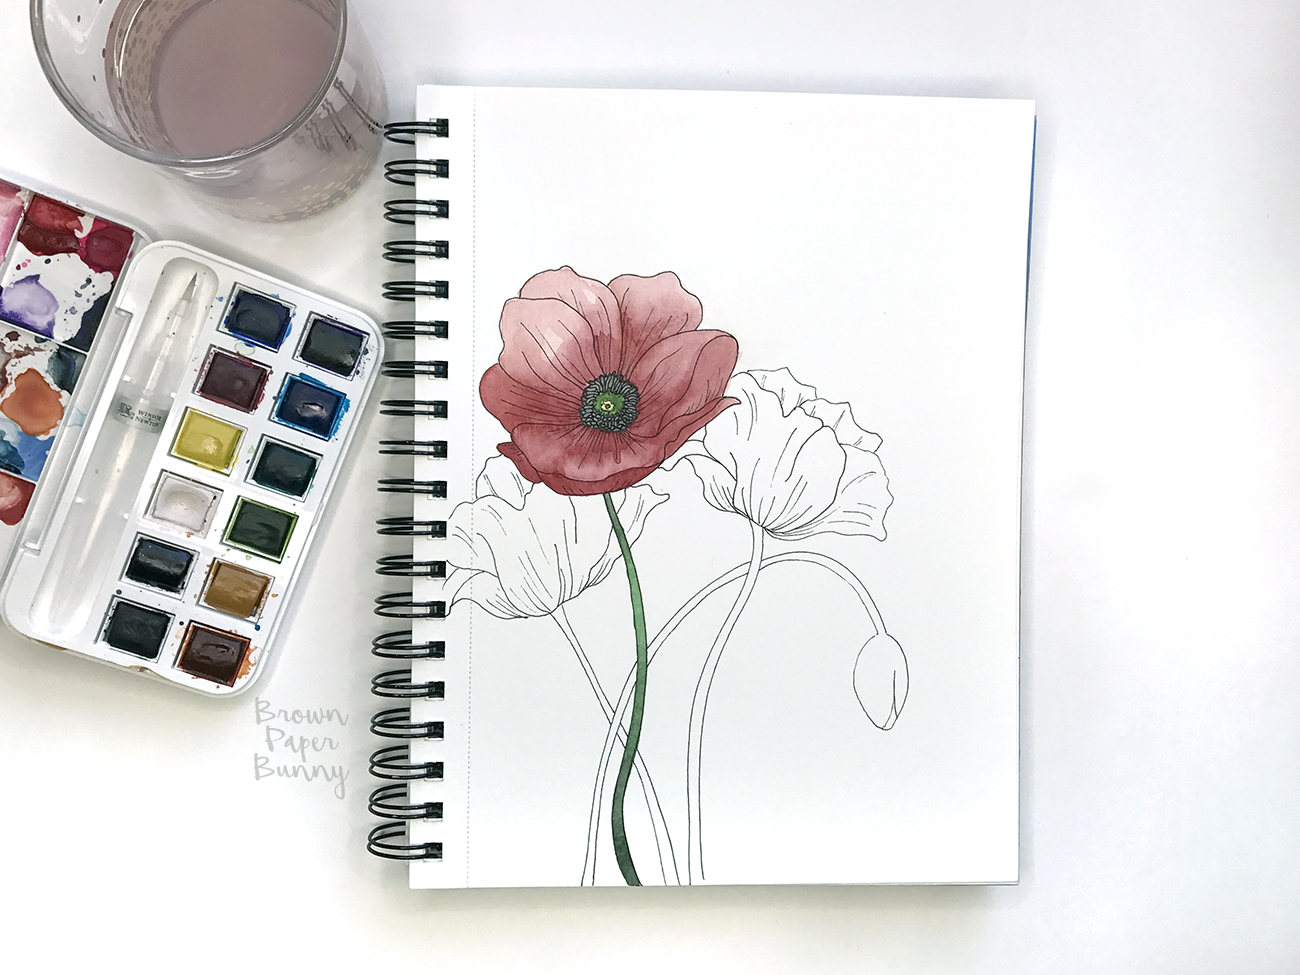
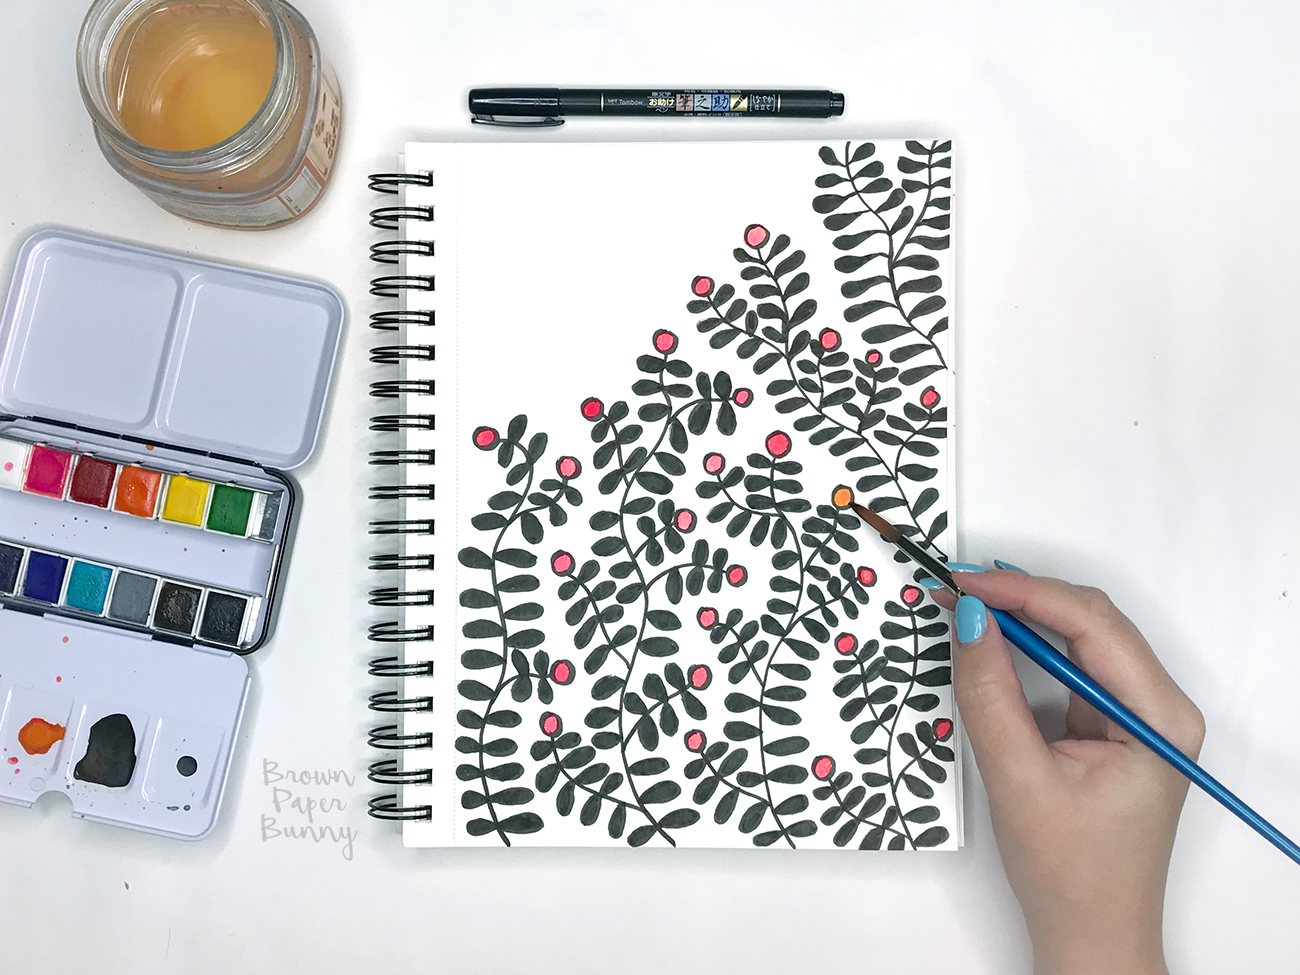
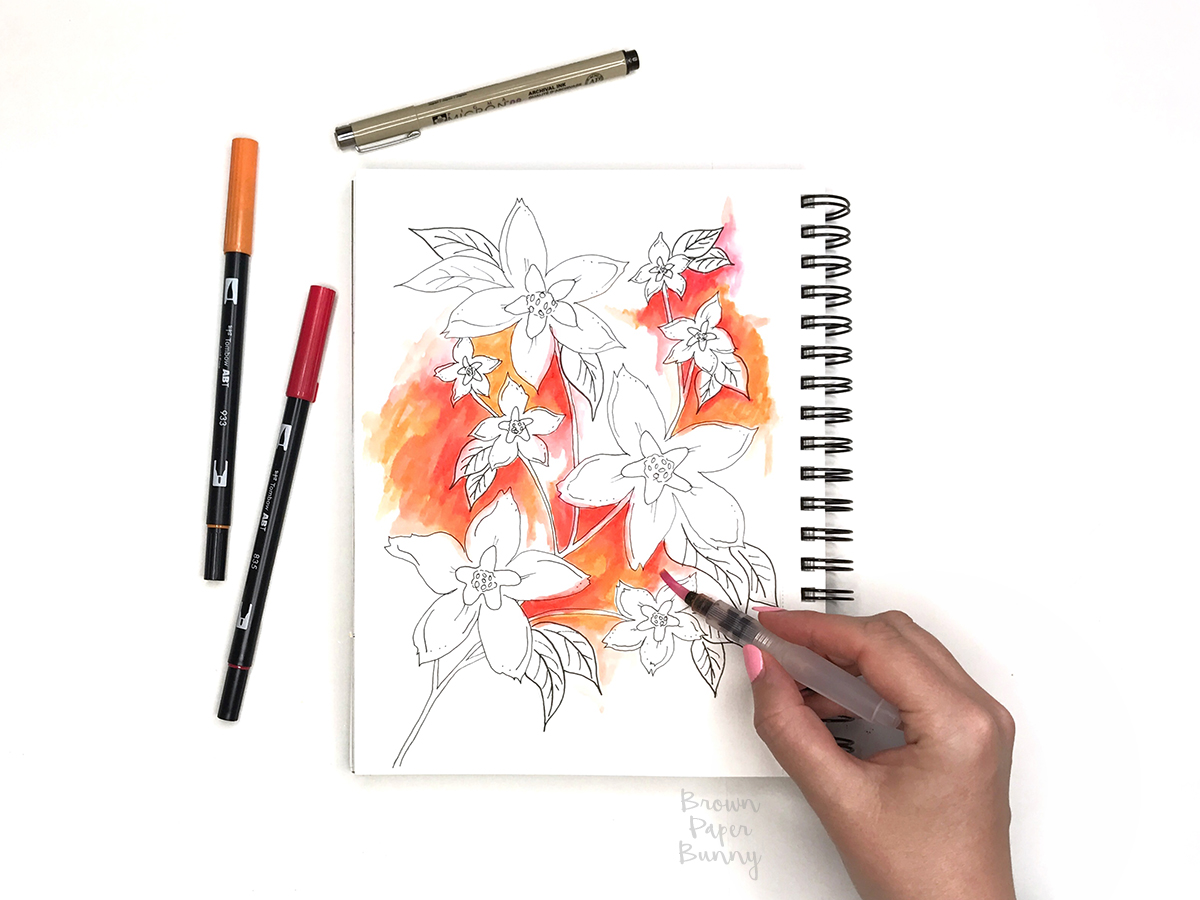
3. Poppies

These super stylized versions of Poppies are really easy! You start with a lighter shade of orange, drawing a circle in the middle. Then go around it with a darker orange or a red. Next I draw wavy stems and fuzzy bulbs, before adding a few black dots in the middle. Watch the video below to see the process.
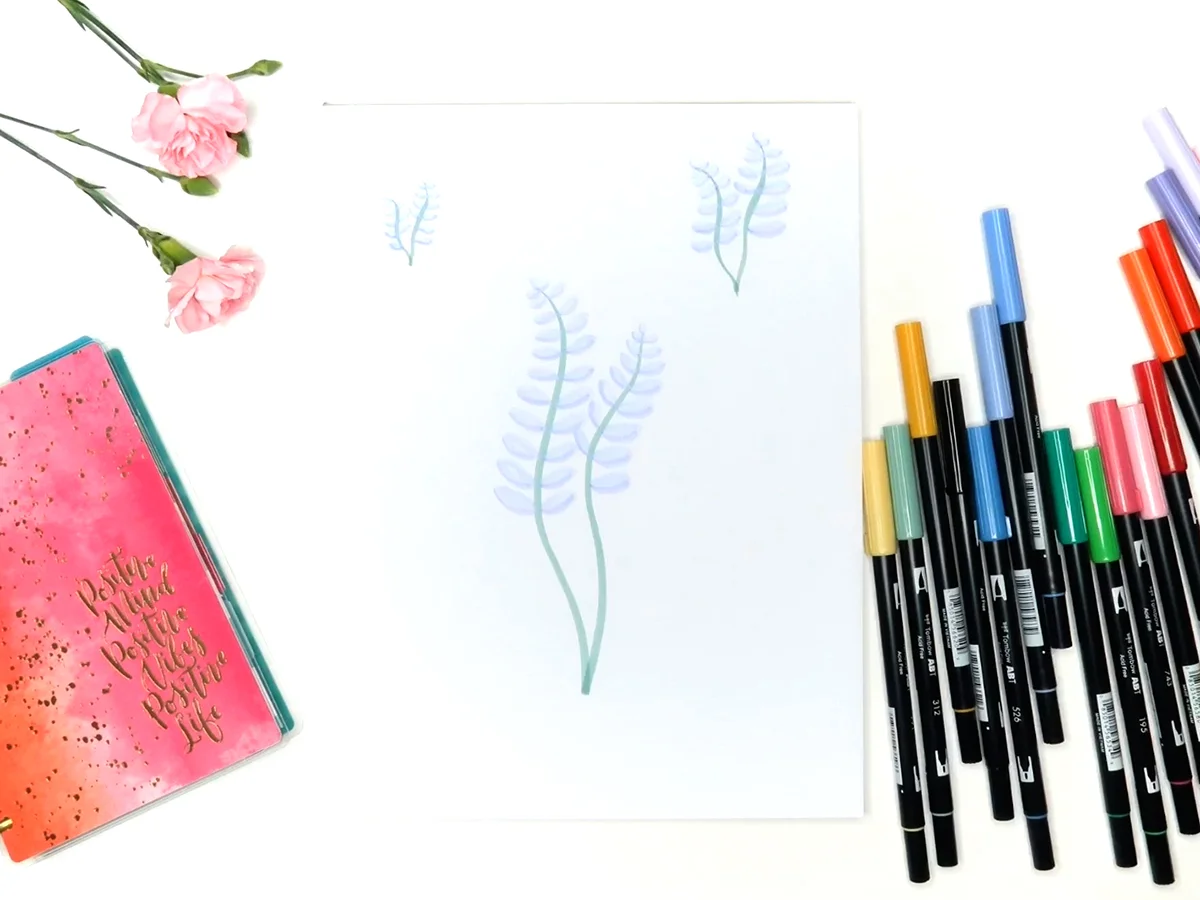
4. Lavender

Lavender flowers are particularly great for brightening up the margins of your planner without taking up too much space! I start with a wavy stem in a blue-green-grey color, then add oval petals down each side, gradually increasing in size. I use a darker shade of purple or blue to give some definition to the bottom of the petals. Voila, super easy! Watch the video below to see.
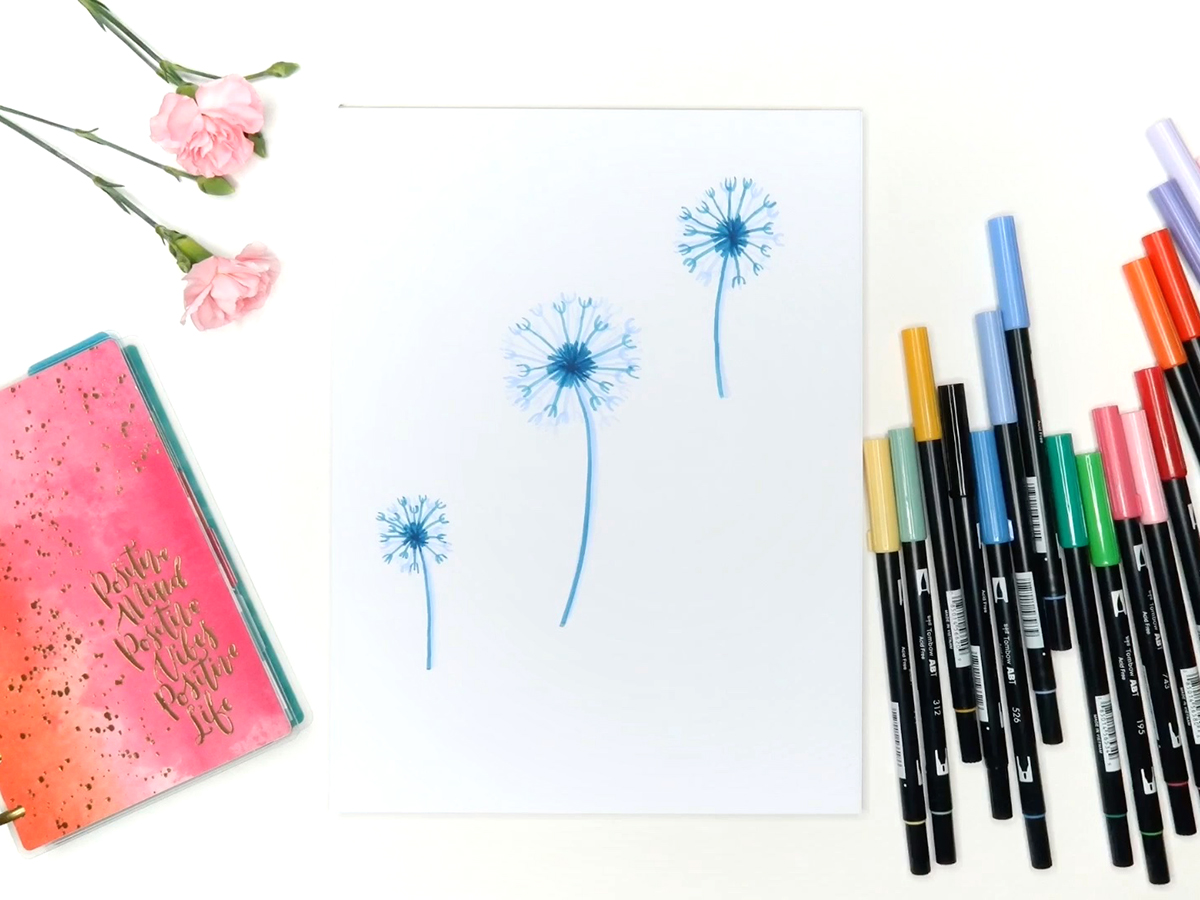
 

5. Dandelions

Are Dandelions actually flowers? I'm not really sure. But they're super fun to draw! I start with a light blue, or purple, drawing spokes all the way around the center. Then I do the same thing with a slightly darker shade. Simple, slightly-curved stem, add a little more color to the center, and you're done! Watch the video below to see the steps.
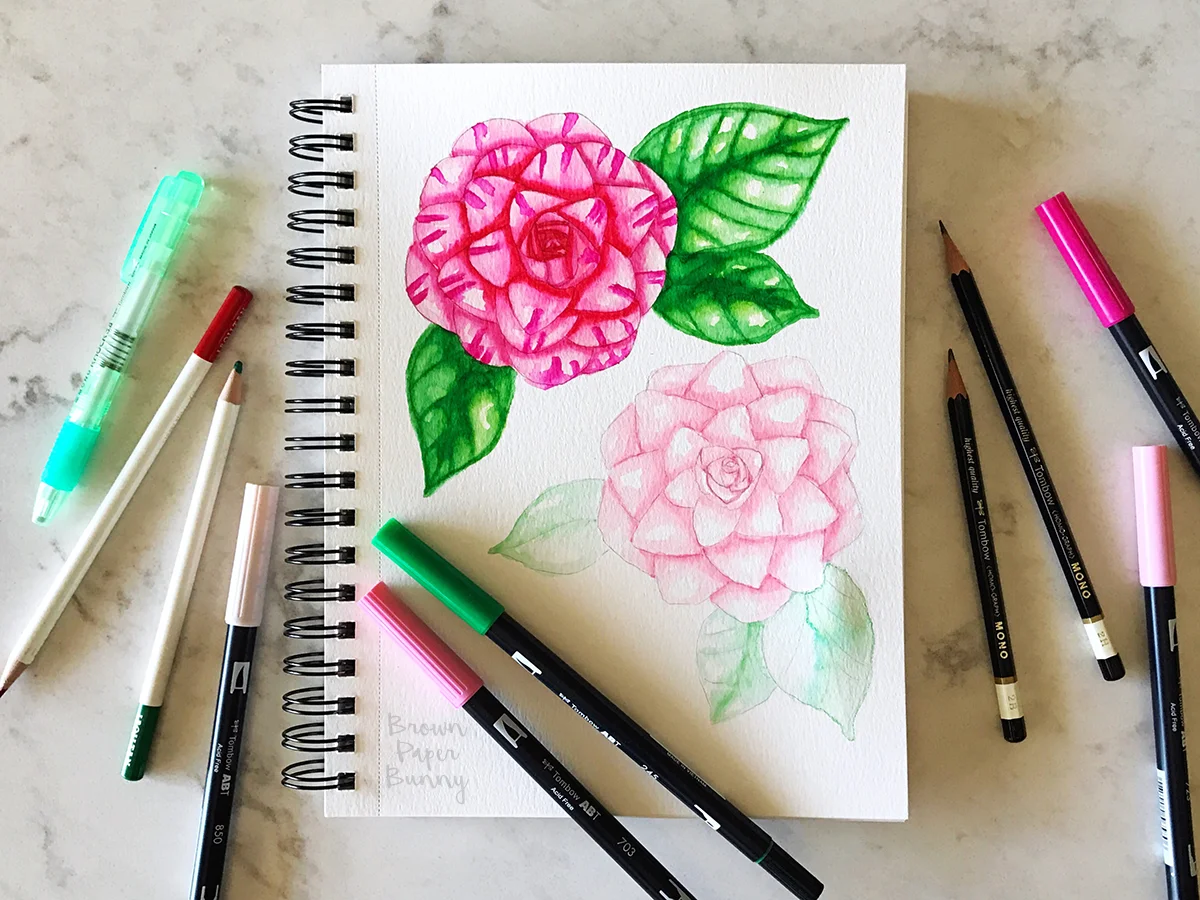
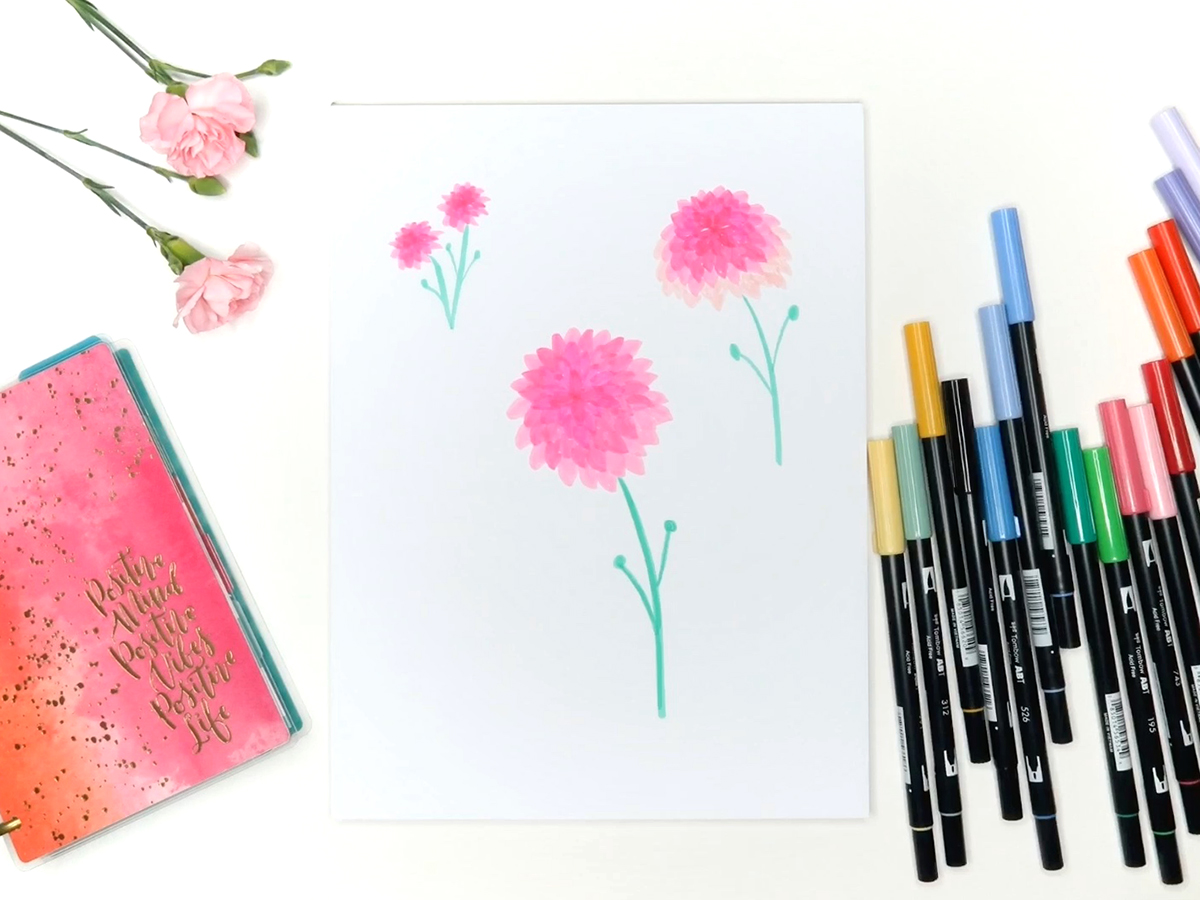
 

6. Dahlias

Dahlias are some of my favorite flowers. All those little petals, and the colors...oh my! I start with the darkest shade in the center, drawing little curved triangles. Then switch to a slightly lighter shade and keep adding petals. Switch to a lighter shade again and repeat as many times as you like. A simple stem and some little stalks and you're done! Watch the video below to watch it come together.


BONUS FLOWERS:

I was having so much fun I ended up drawing a couple of extras! If you end up drawing some of these flowers I'd love to see! Leave me a link in a comment, or tag @BrownPaperBunny on social media!
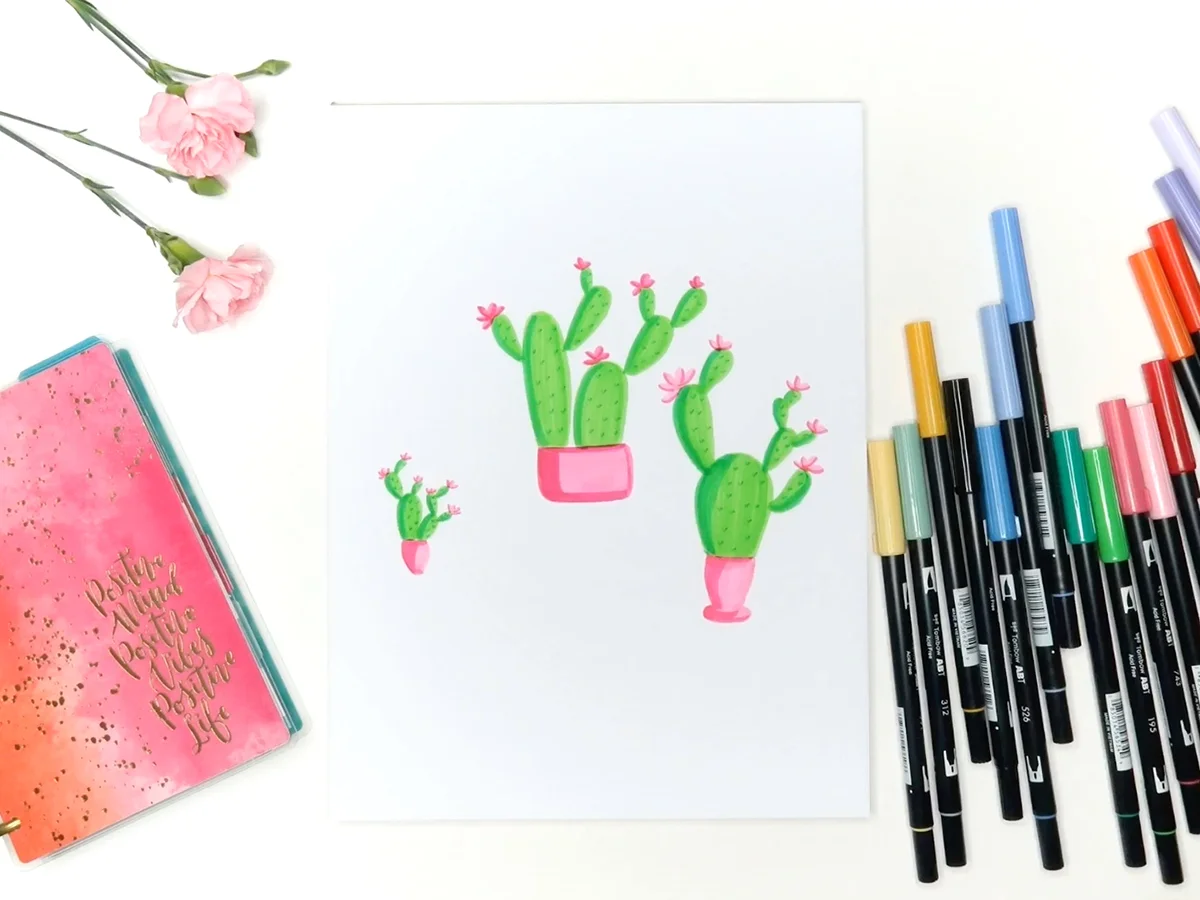
7. Cacti Flowers

So technically you're drawing the whole cactus here, but they're pretty fun to draw, and really easy, so why not! You can either start with a cute pot, or draw the cactus as if it was in the ground. Then add a couple of green blobs and upside-down tear shapes and you've got your base layer. Next, add some little flowers on some of the cacti branches. Next use a darker shade to give some definition to your cacti and you can draw in little spikes (I draw them as tiny 'V' shapes). Use a darker shade to also define your pot and your flowers and you're finished! Watch the video below to see how I drew mine.
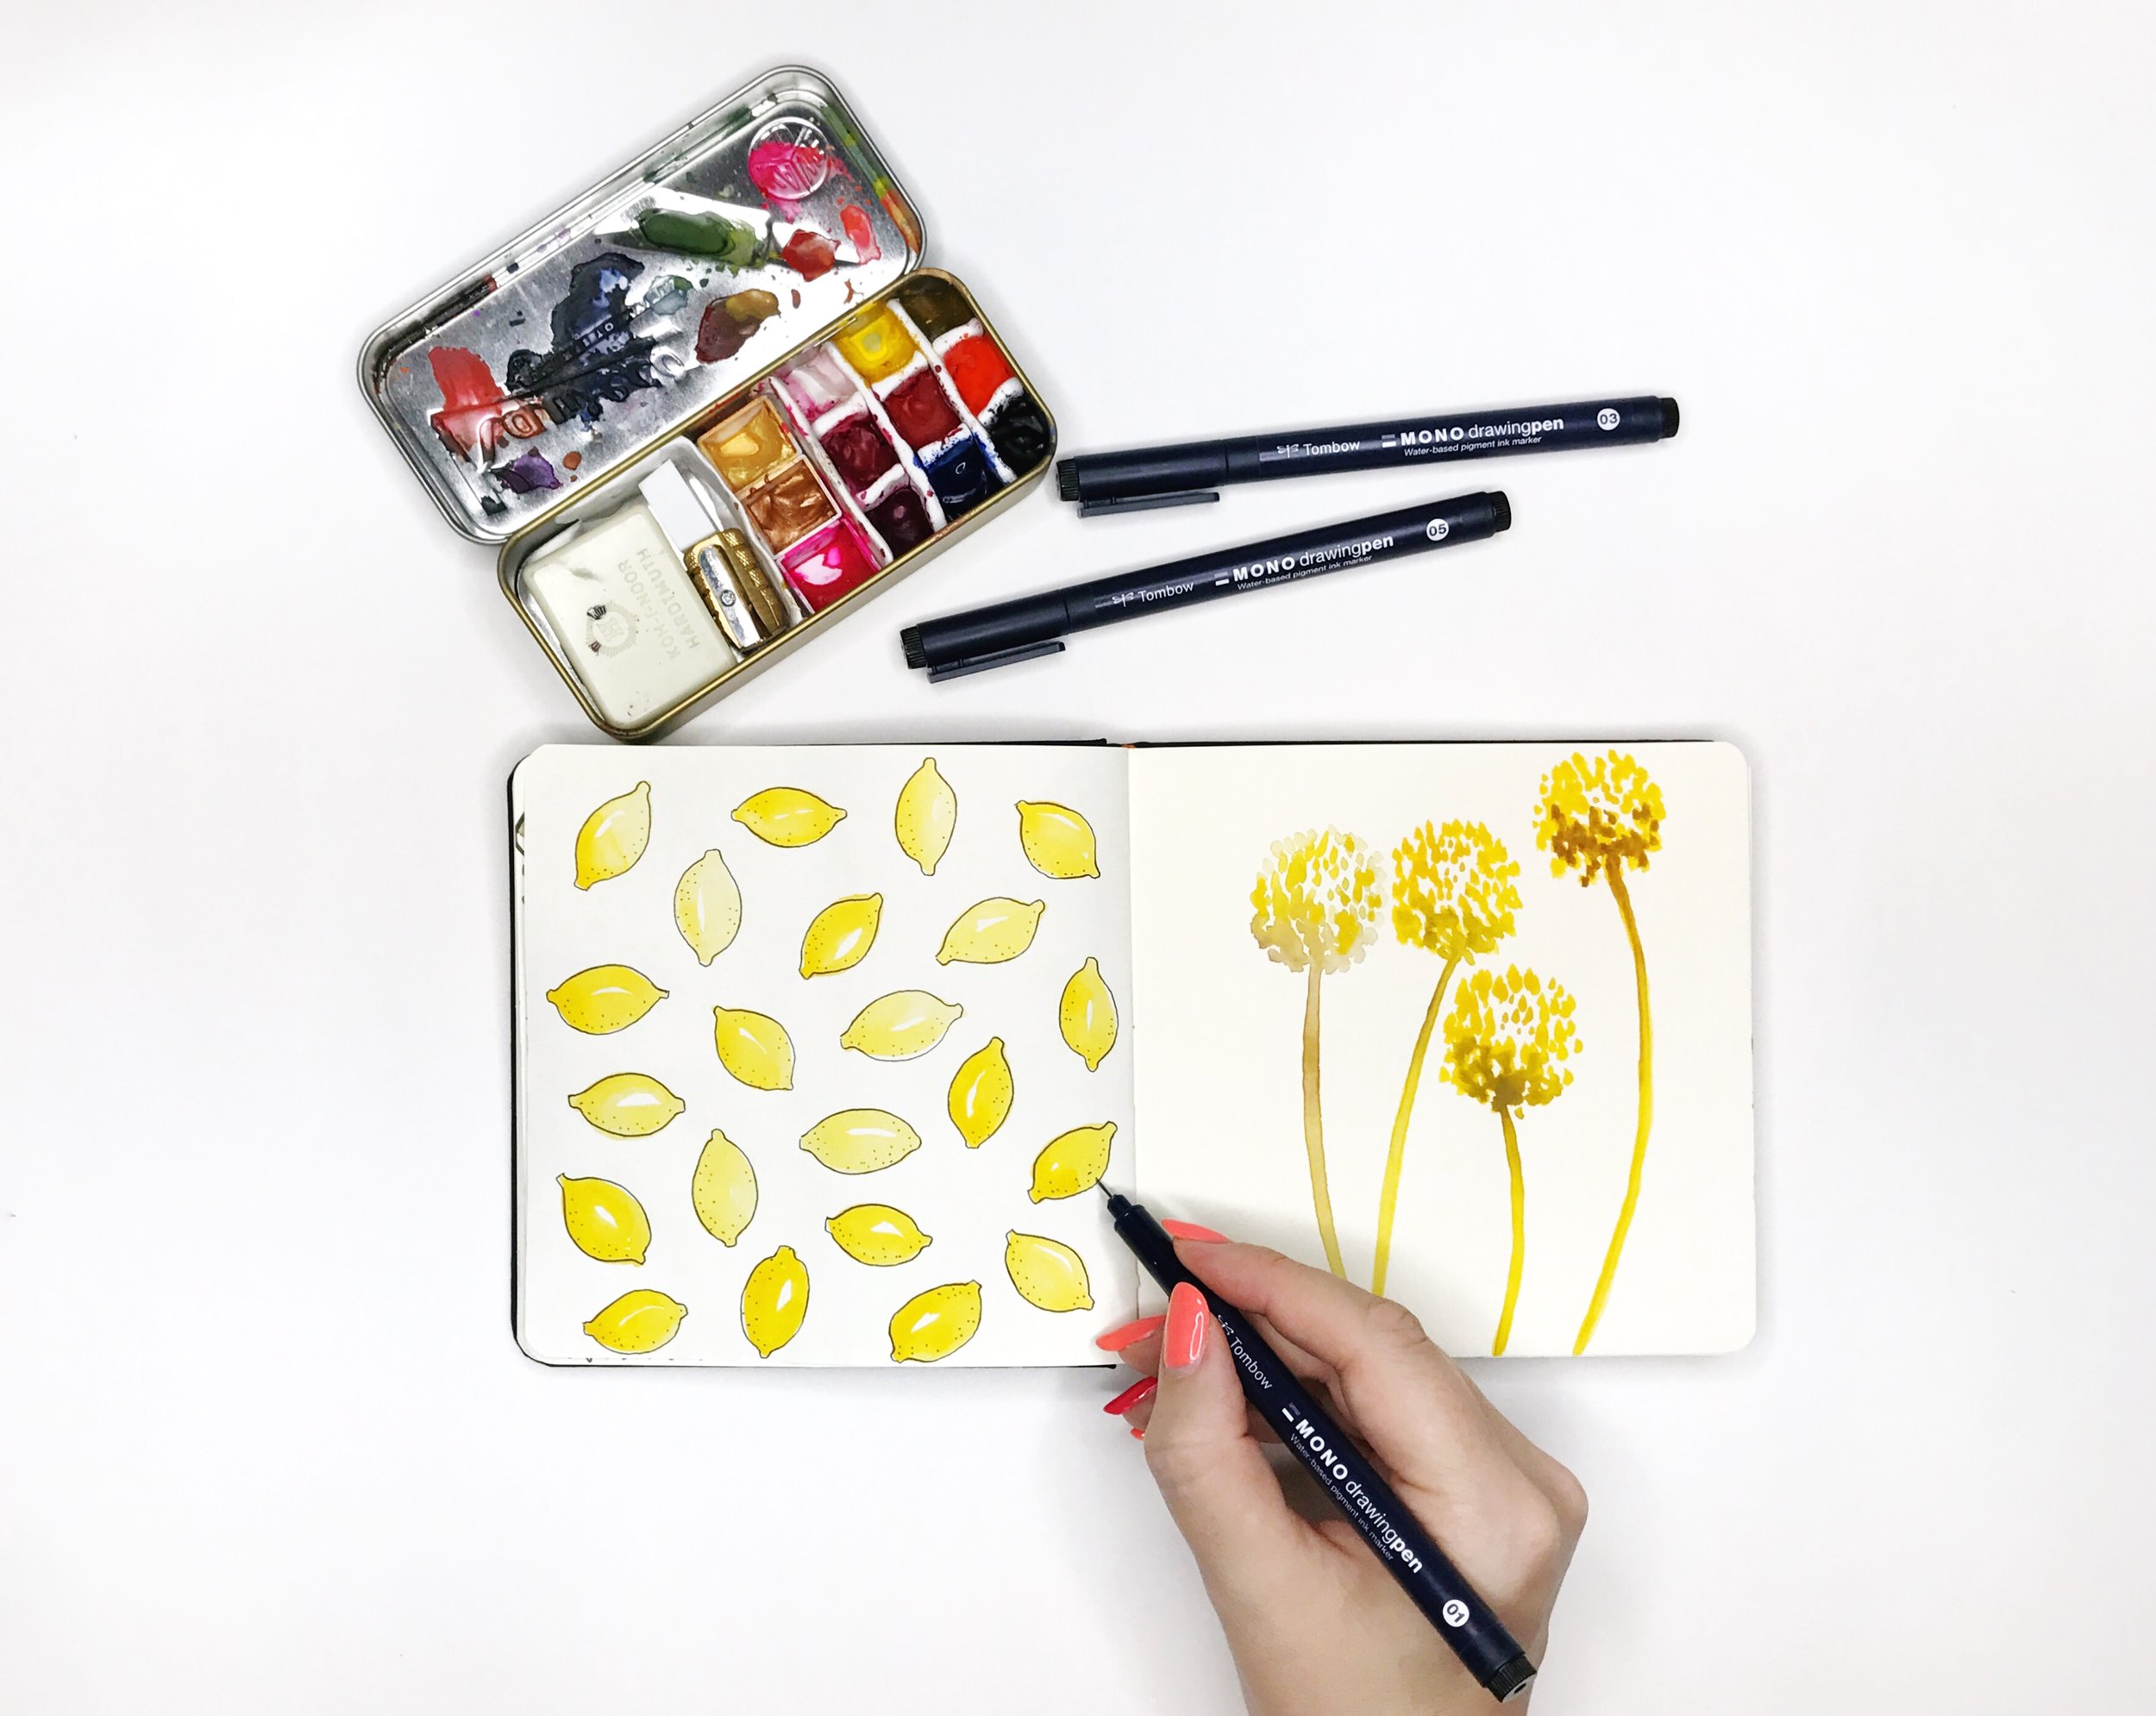
8. Billy Buttons

As a kid we had Billy Buttons growing all over the place on our farm, and I used to think they were called 'Belly Buttons' — which to a little kid is just about the funniest thing you can imagine!

These are super easy to draw. You start with a pale yellow circle, then use a slightly darker yellow to give some definition along one edge. Some straight stalks, and a few dark brown or black dots and that's all there is to it. They look really cute on a yellow-themed planner page though! Watch the video below to see how easy it is.

9. Asters

I draw these little flowers all the time and I think they most resemble Aster Flowers. They only take a few seconds to draw, and you could make them in any color!

Start by drawing thin petals strokes outwards from the center, all the way around. Then add a simple stalk a cute curvy leaf or two and you're finished! Watch the video below to see how I drew these.

If you’re new here, I’m Jessica — a watercolor artist and fashion illustrator from Australia (but now living in Seattle, Washington). I’d love to connect on social media, come say hi on Instagram, Facebook or Twitter @BrownPaperBunny! 

You might also like these blog posts:

Featured
CRL-Horizontal-Laptop-Beige-Floral-Painting.jpg
Creative Retreat Live
Rainbow-Watercolor-Wreath-Using-Markers.JPG
Rainbow Wreath Tutorial
15 Ways to Journal by Jessica on BrownPaperBunny
15 Ways to Journal
In March 2017, Tutorial, Ink, Illustrations
19 Comments
How to make a magnetic planner bookmark By BrownPaperBunny

How to Make a Magnetic Bookmark

August 24, 2017

Please note: This blog post contains affiliate links, which help pay for the upkeep of this site. That being said, I will never, ever promote anything I am not 100% in love with!

I'm getting RIGHT into the whole planner thing. I guess I've always been a notebook kind of gal, but lately I've combined my bullet journals with pretty planners full of color, ink, and stickers!

This week I made myself a magnetic bookmark so I could easily turn to the current date in my planner, and it was so fun and so easy that I thought I'd show you how I did it!

 
How to make a magnetic planner bookmark By BrownPaperBunny
 

Supplies

  • Scrap of watercolor paper or card
  • Ruler
  • Scissors or cutting tool
  • Bone folder (optional)
  • Tombow Dual Brush Pens in your favorite colors
  • Tombow Mono Drawing Pen (I like Size 01)
  • Tombow XL Liquid Glue
  • Plastic sheet (overhead projector sheet, or sandwich bag etc)
  • Old fridge magnet or Stick-On Magnetic Craft Dots or Magnetic Tape

Steps

1. Cut a rectangle double the size you want your finished bookmark

You're going to fold it in half once you're finished decorating the watercolor paper or cardstock, so measure and cut it out at double the size you want the finished product. I made my rectangle about 1 inch wide and 2 inches long.

 
How to make magnetic planner bookmark By BrownPaperBunny
 

2. Make a crease down the middle of your rectangle

Because watercolor paper or cardstock is fairly thick, it helps to make a crease so that when you fold it in half the paper doesn't split or bend unevenly. You can use the back of a butter knife if you don't have a bone folder.

 
How to make magnetic planner bookmark By BrownPaperBunny
 

3. Lay your plastic on top of your rectangle

You don't have to lay your plastic sheet or sandwich bag on top of your rectangle, but I like to see the size of the paper I'm coloring so I can get the ink roughly in the right spot.

 
How to make magnetic planner bookmark By BrownPaperBunny
 

4. Color on the plastic with your Tombow Dual Brush Pens

Pick a couple of your favorite Tombow Dual Brush Pen colors, that go nicely together, and color right onto the plastic.

 
How to make magnetic planner bookmark By BrownPaperBunny
 

5. Wet the ink

I like to spray a little water using a craft mister, but you could just as easily drop a few droplets of water onto the plastic with a paintbrush or your fingers.

 
How to make magnetic planner bookmark By BrownPaperBunny
 

6. Turn the wet side onto your paper

Carefully turn the plastic over and press it down onto your watercolor paper or cardstock and smush the color together to get a nice watercolor effect.

 
How to make magnetic planner bookmark By BrownPaperBunny
 

7. Fold in half

Once your paper is dry (I used a hair-dryer to speed it along) fold it in half along the line you scored / creased at the begining.

 
How to make magnetic planner bookmark By BrownPaperBunny
 

8. Trim the edges

This step is optional, but I think it adds a special touch to cut the open side into a point or use a corner rounding punch etc.

 
How to make magnetic planner bookmark By BrownPaperBunny
 

9. Glue your magnets to your paper

Glue or stick your magnets to the inside (non colored side) of your paper. If you're using glue, I like Tombow Mono Aqua Liquid Glue or Multi XL Liquid Glue.

 
How to make magnetic planner bookmark By BrownPaperBunny
 
 
How to make magnetic planner bookmark By BrownPaperBunny
 

10. Decorate your bookmark

This step is optional too, but I decorated both sides of my finished bookmark using the Tombow Mono Drawing Pen (size 01), which draws and writes really smoothly, even over thick paper. I did polka dots on one side and stripes on the other, just to mix it up.

 
How to make magnetic planner bookmark By BrownPaperBunny
 

And you're finished!

 
How to make magnetic planner bookmark By BrownPaperBunny
 

If you'd like to watch all of the steps together, check out the short time-lapse video below.


If you'd like to learn how to make and edit time-lapse videos on your phone, click the button below!

Learn More
In Ink, Tutorial, Watercolor, March 2017
2 Comments
Artist's Guide to Using Live Video on Social Media by BrownPaperBunny

Artist's Guide to Live Video

August 19, 2017

So, why should you use live video? 

It’s a great way for your fans and social media community to get to know you better and build a more personal connection (which ultimately leads to increased sales because people inherently want to buy from people they know). 

Live video is also a great way to increase your exposure. Because each social media channel is really pushing the video feature they reward you for using it by showing your video and profile to more of your fans than you’ll reach through regular posting.

It also keeps you top of mind by showing up first in the top of your fan's Instagram and Facebook feeds...for example:

Live-Video-On-Instagram

A little planning goes a long way

Before you jump into a live video just for the sake of it, think about what you want to say, how it adds value for your audience and why they will care. Do you have something to teach them, something they would find exciting or entertaining? Maybe you’re giving them an exclusive peek behind the scenes into your process.

Also, if you’re doing a demonstration, or creating live, make sure you have all your supplies gathered and within arms reach. You don’t want to have to leave your viewers to go off and grab different paints or markers!

Make a cheat sheet

Don’t write everything word for word, but having a few bullet points will work wonders in keeping you on track and to keep you from freezing up and forgetting what you wanted to say in the video. Stick your points up somewhere where you can see them but they’re outside the camera or phone’s field of view.

Be repetitive

There is a bit of a delay from when you start your live video, to when people are notified and have a chance to join. This is the case for Periscope, Instagram, and Facebook. So introduce yourself and tell your audience what you’re planning to talk about, then do it again for all the newcomers a minute or two later. For example “For everyone that just joined, I’m unboxing XYZ product today and showing you a few different ways to use it”.

Involve your audience

Ask them questions, where are they from, what is their favorite medium, what are they doing this weekend, have they ever tried XYZ product etc. Just because you can’t hear them doesn’t mean you can’t engage in meaningful conversation. It will also be more fun for your viewers and takes some of the pressure off of you to be scripted and on-point the whole way through.

Roll with the punches

Spammers and trolls live on the internet, it’s hard to escape them completely. But you can learn to roll with the punches, laugh it off and block them without breaking your stride. Say a ‘gentleman’ from Turkey asks you to take your top off while you’re in the middle of a watercolor tutorial on Periscope. Laugh, tell him you’re flattered, then block his ass.

You don’t have to show your face

Don’t feel comfortable in front of the camera? Haven’t done your hair today? No problem! It’s totally acceptable to point your camera or phone at your desk and show what you’re working on, flip through a sketchbook, give a mini tutorial, unbox a cool new product etc. 

Schedule your ‘go live’ time

Think about when your audience is likely to be online, is it really 5am on a Sunday, or should you wait a few hours? If you have an Instagram Business account or a Facebook Page you can pop into the analytics / insights and see where most of your audience is based and what time they are most often online.

Scheduling when you'll go live also gives you a chance to promote it to your fans ahead of time if you'll be talking about something particularly interesting or news-worthy.

Ask for what you want

If you have a new online class, an event or something else going on ask people to check it out and give them the link. If you don’t ask, how will they know what you’d like them to do next?

Promote Your Live Video

Most social media channels now let you save your live video once you're done, so get the link and share it in other places, on your website, in additional social media posts and push more people to go and watch it. In other words, get more use out of that video you've already created!

In March 2017, Social Media Tips
3 Comments
Fashion Illustration with Tombow TwinTone Markers

Fashion Illustration Using Tombow TwinTone Markers

August 19, 2017

Please note: This blog post contains affiliate links, which help pay for the upkeep of this site. That being said, I will never, ever promote anything I am not 100% in love with!

I saw this gorgeous collection by Novis and just had to illustrate it (although I combined two dresses into one). I used Tombow Dual Brush Pens with water and a paint brush for the base colors and the new Tombow TwinTone Markers for definition and a pop of color once the first layer was dry.  I used colors from both the 'brights' and 'pastel' packs. They are really smooth and don't bleed through the paper which is fantastic!

I'm also posting a BEFORE editing video and what my final product looks like AFTER editing to show you what a difference a couple of minutes worth of editing on my phone can make!

Here is my original video:

Then here is the finished one where I've cropped out kitty trying to steal my pencil, all the times I leaned in front of my phone while it was recording, drying time, and I also lightened the whole video, reduced the vignette and increased the saturation slightly. What do you think?

If you'd like to learn how to make and edit time-lapse videos of your own art (using your phone) check out my online class below:

Learn More
In Fashion Illustration, Ink, March 2017
22 Comments
Make Your Own Watercolor Planner Dashboard with BrownPaperBunny

DIY Planner Dashboard Using Tombow Dual Brush Pens

August 17, 2017

Please note: This blog post contains affiliate links, which help pay for the upkeep of this site. That being said, I will never, ever promote anything I am not 100% in love with!

You can make this watercolor-look planner dashboard in around five minutes, it's super easy! It's a great way to divide up your planner, add a new section, or store your sticky-notes or washi tape!

Supplies

  • Tombow Dual Brush Pens in your favorite colors
  • An image printed onto watercolor paper. You can use this one that I created, or draw your own.
  • A ruler
  • Cutting knife or scissors
  • Corner punch — optional
  • Water spray brush (or you can drip water from a paintbrush or your fingers)
  • Plastic cover for your page — optional (you can use one you already have in your planner, or make one from an transparent overhead projector sheet, or other thin plastic sheet)
  • Plastic freezer or sandwich bag (or the other half of your transparent sheet)
  • Hole punch or some way to insert the dashboard into your planner
  • A planner to put it into! My favorite right now is the MAMBI Mini Happy Planner
DIY Planner Dashboard Supplies by BrownPaperBunny

Steps

Here are the steps I used to make this watercolor-look planner dashboard. Watch the video below to see each step in action!

  1. Print or draw your image onto your watercolor paper. I used Canson paper. And here is the image I used if you'd like to download it for yourself.
  2. Trim your paper and plastic cover (if you aren't using a pre-made one) to the size of your planner.
  3. Draw on your freezer bag or plastic sheet using the Tombow Dual Brush Pens. They're water soluble so you can blend them really nicely with water!
  4. Drip or spray water onto the plastic bag or sheet you just colored on, then carefully turn it over onto your watercolor paper.
  5. Press the plastic down onto the paper to make the colors run together and give you the watercolor effect.
  6. Remove the plastic and wipe it off for future use.
  7. Let your paper air-dry, or speed up the process with a hairdryer on low.
  8. Punch holes in your paper and plastic cover (being careful not to tear it if it's thin) and insert into your planner!
  9. You can now put your sticky-notes and pieces of your favorite washi tape on your plastic cover for easy access.

If you'd like to learn how to make time-lapse videos of your own art, check out my online class.

Learn More

Make Your Own Printable Watercolor Planner Dashboard Insert with BrownPaperBunny
Printable Watercolor Fashion Illustration Planner Dashboard Insert by BrownPaperBunny

Leave me a comment and let me know if you can think of other uses for this watercolor-look technique! And if you make your own planner dashboard, tag @BrownPaperBunny on social media so I can see!

In Fashion Illustration, Illustrations, Ink, March 2017, Tutorial, Watercolor
Comment
How to Partner with Brands

How to Get Brand Sponsorships and Paid Work

August 11, 2017

Please note: This blog post contains affiliate links, which help pay for the upkeep of this site. That being said, I will never, ever promote anything I am not 100% in love with!

I get a lot of questions about how to get paid work with brands, social media sponsorships, and get invited to join ambassador programs. I've worked on both sides of the fence now (putting together influencer campaigns for brands, and now as an artist creating content) so I thought I'd share some tips on how to get the attention of your favorite brands.

1. Create Content for Free

I know, I know, you don't want to make stuff for free when you're trying to earn a living. But, you've got to show people what you can do before you can expect them to hire you. Think of it as building portfolio pieces specifically aimed at them.

Most of the brands I work with reach out to me after seeing my content on social media. And the best way to get their attention is to show them that you can do something unique and awesome with their products.

So far, I've had more brands reach out to me about my time-lapse videos than anything else I've done. You can learn how to create professional time-lapse videos using only your phone, in my new online class here.

A couple of content ideas include: filming an unboxing of their product, creating a tutorial, showing their products being used in a new way, incorporating them into your artwork etc.

2. Tag Brands

Whatever you do, please, please, please don't tag brands (or individuals) in social media posts that aren't relevant to them. There is nothing that will get you blacklisted and blocked faster!

But, if you are doing something awesome using their products and it is something you know they'll want to see, then absolutely give them a shoutout in the caption, and tag them in the image or video where you can.

To give you an example, I was really loving my new Tombow markers a few months ago so I started tagging them in my posts. Most people who use Tombow Dual Brush Pens are hand-lettering artists, so seeing their products used to create fashion illustrations really caught their eye. They asked if they could share some of my content, naturally I said yes (they have significantly more followers on their accounts than I do), then shortly afterwards they invited me to be a senior ambassador for the brand.

Learn how to use @tombowusa markers like watercolor — on the blog today http://bit.ly/watercolormarker That's how I colored Day 11 of #inktoberff (blouse) 🐰

A post shared by Jessica Mack 🎨 Colorado Artist (@brownpaperbunny) on Oct 11, 2016 at 8:18pm PDT

I have a similar story for Starbucks. They saw me creating artwork on their holiday red-cups and paid me to create content for their holiday commercial! And it was the same for a paid campaign I did with Famous Footwear, getting free tickets to multiple fashion shows and events, getting paid for live sketching at stores and so many other opportunities that have come my way! 

3. Make Sure They Can Use Your Work

This doesn't just mean giving them permission to use it, but try to put yourself in the brand's shoes and think about what they are looking for. Don't use other brand's products in your shot (certainly not products from a competitor, and don't show anyone else's logo). You might have created a killer video that they'd love to share, but they won't be able to use it if you had a competitor's product on your desk the whole way through.

Brands have all sorts of legal requirements they have to adhere to, so the easier you make it for them, the more they'll enjoy working with you.

Use the correct product name in your caption. If you aren't sure, look it up on their website. For example, I love using Tombow Fudenosuke Hard Tip Brush Pens, but it's an easy name to misspell, so I look it up often and always double check that I have it correct!

4. Be Professional

This point is two-fold. Answer correspondence quickly and professionally, and if you say you're going to do something for a brand by a certain date, DO IT. They might have a whole campaign that has been planned out for months, and you delivering content late could have very big consequences for them!

And the second part is to know your obligations and requirements as an influencer. There are very strict FTC guidelines on how you share content, and what you need to disclose. You definitely don't want to get fined for doing the wrong thing! And just to be clear, adding #spon to the end of a sponsored post does NOT cover you!

5. Create High-Quality Content

Make sure your photos and videos are top notch. Even if you're taking all of your photos and filming all of your videos on your phone (like I do), there is no excuse for poor lighting, crooked shots, etc. If you'd like to learn how to create and edit professional time-lapse videos on your phone, check out my new class. The video below was completely filmed and edited on an iPhone. 

A post shared by Jessica Mack 🎨 Colorado Artist (@brownpaperbunny) on Feb 28, 2017 at 6:14am PST

So, what sort of brand work can you expect to get?

Here's a list of just some of the partnerships I've done with brands recently, click on the links to see specific examples:

  • Paid work created specifically for a brand's campaign. (Commercials, print ads, social media, etc).

  • Paid to re-use content I had already created.

  • Paid to create artwork live at an event or in-store.

  • Sharing my content to their social media and/or website and providing a shout-out pointing back to my social media accounts or website. 

  • Social Media take-overs (for a day, or sometimes a week)

  • Collaborating on the creation of a new product.

  • Free products for me to use.

  • Free products to give to my followers through a contest or give-away.

  • Discount coupons.

  • Invitation to a brand's affiliate program, where I earn money for promoting their products.

  • Tickets to events, shows, back-stage tours, and conferences.

  • Introductions to other brands, for additional collaborations and projects. 

As I mentioned earlier in this post, my time-lapse art videos attract more attention and have brought me more paid work than anything else I've done. Learn how to make time-lapse videos of your own artwork, using your phone!

Learn More
In March 2017, Social Media Tips, Tutorial
2 Comments
How to Make Time-Lapse Videos of Your Art with BrownPaperBunny

How to Create Time-Lapse Videos of Your Art

August 10, 2017

I've been busy creating some new illustrations this week, and filming time-lapse videos of the process. You see, I get asked all the time how I create and edit my time-lapse art videos, so I created a step-by-step class to show you how to make your own! And the best bit is that you can do it all on your phone, oh, and you can finish the whole class in less than 30 minutes!

I contribute the majority of my growth on Instagram to time-lapse videos. While Instagram rarely promotes my photos to the discover feed, my time-lapse videos end up there all the time. This means that instead of a shelf-life of around 24-hours, my video posts end up bringing in new likes and followers for months after I post them!  

Most recently the super simple video below (which I created in about three minutes while listening to a speaker at a conference) has been viewed over 2.4 Million times and brought me over 5,000 new followers in less than a month!

A post shared by Jessica Mack 🎨 Colorado Artist (@brownpaperbunny) on Jul 2, 2017 at 6:05pm PDT

The editing part is really easy too. Check out the example video below. In about one minute I brightened it, got rid of the dark corners, edited out the shots where I leaned across my work or was using my hairdryer to dry the paint, and added in some side angle footage! AND I did it all on my iPhone! 

If you're interested in checking out the class, click the button below!

Learn More

Leave me a comment and let me know if you ever film videos of your process. 

In Fashion Illustration, Illustrations, Tutorial, Social Media Tips, March 2017
15 Comments
Jessica-Mack-BrownPaperBunny-Watercolor-Art

31 Days of Watercolor Flowers

July 18, 2017

Please note: This blog post contains affiliate links, which help pay for the upkeep of this site. That being said, I will never, ever promote anything I am not 100% in love with!

For World Watercolor Month I'm participating in CreativeBug's 31 Days of Watercolor Flowers Challenge. So far I've painted Craspedia, Lavender, Hyacinth, Tulips, and Astibe. On the opposite side of each sketchbook page I'm creating simple watercolor patterns using one or more colors from the flower of that day. I'm doing the color in watercolor and finishing off with some line work in Mono Drawing Pen.

A post shared by Jessica Mack 🎨 Colorado Artist (@brownpaperbunny) on Jul 7, 2017 at 7:15am PDT

A post shared by Jessica Mack 🎨 Colorado Artist (@brownpaperbunny) on Jul 9, 2017 at 5:58pm PDT

A post shared by Jessica Mack 🎨 Colorado Artist (@brownpaperbunny) on Jul 14, 2017 at 11:58am PDT

A post shared by Jessica Mack 🎨 Colorado Artist (@brownpaperbunny) on Jul 15, 2017 at 8:34pm PDT

A post shared by Jessica Mack 🎨 Colorado Artist (@brownpaperbunny) on Jul 18, 2017 at 4:48am PDT

Leave me a comment and let me know what your favorite flower is! 

In Illustrations, March 2017, Pattern, Sketchbook, Watercolor
28 Comments
FullSizeRender.jpg

World Watercolor Month

July 6, 2017

Please note: This blog post contains affiliate links, which help pay for the upkeep of this site. That being said, I will never, ever promote anything I am not 100% in love with!

July might just be the best month of the year because it's World Watercolor Month! 

FullSizeRender.jpg

I'm spending a little time each day creating simple waterolor illustrations in my sketchbook, using minimal color palettes. 

IMG_7932.JPG

I'm then adding detail using the new Mono Drawing Pens from Tombow.

FullSizeRender.jpg

If you'd like to play along but you're feeling stuck for ideas there is an 'official prompt list' you can draw inspiration from! 

IMG_7731.PNG

Leave me a comment and let me know if you're participating in World Watercolor Month! 

In Ink, Watercolor, Sketchbook, Illustrations, Pattern, March 2017
18 Comments
Brooklyn Art Library

GIVEAWAY! The Sketchbook Project

June 22, 2017

If you've been reading the blog for a while then you'll know I'm obsessed with the Sketchbook Project and have been doing it for almost 10 years (since I lived in Australia)!

The deal is, you get sent a sketchbook, you fill it in over a year then you send it back and it lives in the Brooklyn Art Library where anyone can visit and look at it. On top of that they do a mobile library tour every year (probably to a city or town near you). You can also opt to get yours digitized so it can also be viewed online.

Sketchbook Project Mobile Library Boulder

Here's a sneak-peek into a few of the 2017 sketchbooks:

Ryan Cho: Baltimore, MD
Bonnie Pierce: Stuart, FL
Brendan Sarseield: Tokyo, Japan
Par Bostrom: Umea,Sweden
Brendan Sarseield: Tokyo, Japan
Leila Orienter: Oxford, CT
Ho Chan: Taipei, Taiwan
Juliet Mevi: Berkely, CA
Jia Gao: Baltimore, MD
Ho Chan: Taipei, Taiwan
Leila Orienter: Oxford, CT
Jay Forsythe: Lowell, AE
Ryan Cho: Baltimore, MD Bonnie Pierce: Stuart, FL Brendan Sarseield: Tokyo, Japan Par Bostrom: Umea,Sweden Brendan Sarseield: Tokyo, Japan Leila Orienter: Oxford, CT Ho Chan: Taipei, Taiwan Juliet Mevi: Berkely, CA Jia Gao: Baltimore, MD Ho Chan: Taipei, Taiwan Leila Orienter: Oxford, CT Jay Forsythe: Lowell, AE

You can either choose from one of their fun themes to get you going, or you can create whatever you want. Last year I chose to fill mine with simple, hand-drawn patterns. You can check them all out here. 

Sketchbook Project Book by BrownPaperBunny

So, let's cut to the exciting news! The Sketchbook Project has given me a supply pack to give away! It includes: 

  • A sketchbook (and digitization)
  • A Sketchbook Project pencil case
  • 2 Micron Pens
  • 1 Pencil
  • 1 Eraser
  • 1 Sharpener

So, basically everything you need to get started!

Sketchbook Project Starter Kit

All you have to do to be in the running is:

  1. Check out the Sketchbook Project here
  2. Make sure you're following @TheSketchbookProject and @BrownPaperBunny on Instagram
  3. Leave a comment on my Instagram contest post, tagging a friend, and telling me which theme most interests you!

One lucky winner will be chosen at random on July 1, 2017.

In Illustrations, Ink, March 2017, Sketchbook
16 Comments
Cut and Create Paper Mosaics

Books, Books, Books!

June 21, 2017

Please note: This blog post contains affiliate links, which help pay for the upkeep of this site. That being said, I will never, ever promote anything I am not 100% in love with!

I was recently sent these three books to review, and man have I had fun working through them!

The first one is called The Origami Garden: Perfectly Mindful Origami (by Mark Bolitho) and it comes with pretty papers and all the instructions you need to create your own paper garden! Some of my favorites were the Palm Leaf, Cactus in a Pot, and the Butterfly. Definitely worth a look if you love origami as much as I do!

The Origami Garden

The second one is Drawing Calm: Relax, Refresh, Refocus with 20 drawing, painting, and collage workshops inspired by Klimt, Klee, Monet and more (by Susan Evenson). This book is perfect to get your creative juices flowing if you feel a bit stuck, or to get a group of ladies together for a fun project over a bottle of wine. I think kids would really enjoy the exercises too, so a great play date with your littles.

Drawing Calm

For me, art is my meditation. It is the best way I've found to calm my mind and unwind, so this book is filled with great exercises to help me de-stress. I'm only up to Chapter Three so far, but already I've illustrated my grocery list, played around with tissue paper painting, drawn all different types of trees, and painted a variety of flowers!

The third book is Cut and Create; Paper Mosaics — Craft mosaic-by-number artworks with paper tiles, scissors and glue (by Chiharu Rosenberg). The book comes with beautiful mosaic templates and all the paper you need to complete them.  My favorites are the mermaid, white lilies and fox in the forrest designs. 

Cut and Create Paper Mosaics

Do you have a favorite art exercise book to get you out of a rut, or help you try something new?

In March 2017, Product Reviews
Comment
Image shared with permission from Erin McManness

Image shared with permission from Erin McManness

NEW Mono Drawing Pens from Tombow

June 19, 2017

Please note: This blog post contains affiliate links, which help pay for the upkeep of this site. That being said, I will never, ever promote anything I am not 100% in love with!

OMG, I can't tell you how excited I am to share with you that Tombow have just released a new line of pigment fine-liner drawing pens! I use these sorts of pens for everything — sketching, detailed line work, over (or sometimes under) watercolors, in my bullet journal, my art journal...you get the idea!

The MONO Drawing Pens come in 01, 03, and 05 sizes which coincidently are the three sizes I use the most!

MONO Drawing Pens from Tombow

Do you have a favorite go-to pen? If not, I definitely encourage you to give these a try. Tombow is having a 30% sale on them today! 

MONO Drawing Pens by Tombow
In Illustrations, Ink, March 2017, Product Reviews
Comment
100 Days of BrownPaperBunny Flowers

100 Days of Flowers (Progress)

June 15, 2017

A couple of months ago I decided to participate in the 100 Day Project. It was shortly after my daughter was born and I was going a little stir crazy sitting on the couch and felt like I needed some sort of project to focus on in my free time. Of course I've since found out that life with a newborn doesn't give you any free time, so while everyone else is up to 72/100 I'm still back in the 20s — trying to draw with one hand while holding my sleeping cutie pie with the other. 

Here are some of my recent entries. You can see the earlier ones here. 

View fullsize 100-Day-Project-BrownPaperBunny-23.jpg
View fullsize 100-Day-Project-BrownPaperBunny-22.jpg
View fullsize 100-Day-Project-BrownPaperBunny-21.jpg
View fullsize 100-Day-Project-BrownPaperBunny-20.jpg
View fullsize 100-Day-Project-BrownPaperBunny-19.jpg
View fullsize 100-Day-Project-BrownPaperBunny-18.jpg
View fullsize 100-Day-Project-BrownPaperBunny-17.jpg
View fullsize 100-Day-Project-BrownPaperBunny-16.jpg
View fullsize 100-Day-Project-BrownPaperBunny-15.jpg
View fullsize 100-Day-Project-BrownPaperBunny-14.jpg
In Illustrations, Ink, March 2017, Sketchbook, Watercolor
19 Comments
Tombow Dual Brush Pens as watercolor: with BrownPaperBunny

Timelapse flowers

June 8, 2017

Please note: This blog post contains affiliate links, which help pay for the upkeep of this site. That being said, I will never, ever promote anything I am not 100% in love with!

I'm trying to catch up on my 100 Days of BrownPaperBunny Flowers project...well, as best I can with a newborn at home. Are you doing the 100 Day Project this year? If so, leave me a comment and let me know what your theme is and where I can take a look!

My latest entry is these blossoms I painted using Tombow Dual Brush Pens as watercolor. Check it out:

A post shared by Jessica Mack 🎨 Colorado Artist (@brownpaperbunny) on Jun 5, 2017 at 6:25pm PDT

If you'd like to check out some of my other flowers as part of the 100 Day Project, click here. 

In Illustrations, Ink, March 2017, Sketchbook, Watercolor
15 Comments
IMG_5921.JPG

MerMay

May 27, 2017

It's MerMay, so how could I not create a fashion illustration of this beautiful mermaid dress Blake Lively wore to the Met Gala a couple of weeks ago. 

I haven't had a lot of time in my studio since Baby Amélie came along, but I've been getting some time on my iPad Pro while she naps — so I created this illustration using Adobe Draw (I like it for drawing vector art) and added a watercolor splash as a background. 

Do you have a favorite app for digital drawing? 

In Portraits, Illustrations, March 2017, Fashion Illustration
15 Comments
National Scrapbook Day by BrownPaperBunny

National Scrapbook Day: Part 1

May 1, 2017

Hi guys! National Scrapbook Day is coming up on May 6, and Tombow (this is an affiliate link, because I love their products, and proudly rep them) sent me this amazing pack of goodies to play with!

I've never done much scrapbooking before, which is odd given how much I love pretty paper, so I decided to make a mini scrapbook of baby Amélie's first month. Here's part one, the cover — stay tuned for my next post showing you how I put the pages together, and bound the whole book together!

First, I started by making the covers, using pretty pink polka-dot paper (try saying that five times fast). 

National Scrapbook Day by BrownPaperBunny

Then I cut a square out of the front cover, and glued in a picture of baby Amélie. Then I played around writing her name a few different ways until I got one I was happy with, and cut it out. 

National Scrapbook Day by BrownPaperBunny

Next I cut out some strips of cute arrow paper with gold foil and made a frame around her photo, and stuck everything down using the Tombow glue (which is acid free and photo safe). I found a cute black and white polka-dot paper that complemented the cover and I used that on the reverse side.

National Scrapbook Day by BrownPaperBunny

Here's a video of the steps I used to create the cover. Next post I'll show you the inside pages!

Are you planning any projects for National Scrapbook Day? Leave me a comment and let me know!

Here's a list of all the vendors all these fun goodies came from. (Please note, that while I didn't get paid to write this post I did get these delicious goodies for free — lucky me!)

  • Diecuts with a View
  • Paper House
  • Kelly Klapstein for Emerald Creek craft Supplies
  • Graphic 45
  • Amy Tangerine
  • Papercakes by Serena Bee
In March 2017, Tutorial
9 Comments
Be the Shoe Interview with BrownPaperBunny

Be the Shoe

April 23, 2017

Happy National Book Day!

I was recently given a copy of Be the Shoe and a chance to interview Kathy Kelada, author of the book.

Kathy is a personal stylist, turned life coach, living in LA. She’s spent years helping women achieve their goals, and look good while doing it!

In her new book she helps you discover what sort of shoe you are now, and what shoe you are ultimately meant to be, and helps you realize that if you want a change, you can shift your habits and identity. And what woman can’t relate to a good shoe metaphor!

Once you’ve identified what type of shoe you are, Kathy gives you exercises to do (with your real-life shoes) to help you assess your next steps. 

The book itself is absolutely gorgeous. It was illustrated by the talented Bridget Davies, is covered in silky material, and has fold out pages for each of the different shoe types.

Be the Shoe Interview with BrownPaperBunny

I interviewed Kathy to find out more about the book, her advice, and also the illustration process. 

1.    You mention in the book that you’re a Strappy Sandal, has that changed over the years?

I’ve worn a lot of different shoes through my life, as do we all. But when it gets right down to it, I have always been a Strappy Sandal. I find my decision-making is mostly yes, before no, I’m usually open to possibilities, and I am a collector of beautiful things.

Be the Shoe Interview with BrownPaperBunny

2.    If you had to pick just one, which pair of shoes in your closet is your favorite? Tell us why.

I’d have to go with a pair of leopard strappy sandals that I found when I was living in Vermont. They were a constant reminder to me that even though I was living in a cold environment where they were almost never appropriate footwear, they were the essence of me!!

3.    Apart from finding the perfect pair of shoes to help you get there, what would you say is the next most important step to take in achieving a personal goal? 

I always tell my clients that awareness is 80% of change. It’s so important to KNOW: what you want, what’s stopping you, what steps need to be taken, what we feel about our goal, and most importantly, what we’re WILLING to do to get there.

4.    What three things can we all do to really embrace our shoe characteristics?

First, own your shoe – be comfortable with who you really are.

Second, step into it – make choices from your strengths.

Third, be open – life is always changing so we must be flexible and use all our shoe traits to our best advantage!

5.    Do you often find yourself thinking about the lives and personality traits of women you see walking by, based on the shoes they are wearing?

Yes, I have to admit I am always watching how different women behave in their shoes. It’s become a fun pastime! I am getting really good at naming their shoe now based on behavior and little clues I pick up.

6.    Having moved away and then ultimately returned to LA, what advice can you give those ladies who love where they live, but realize it may not suit who they are inside?  

One thing I promised myself when I returned to LA was that I was going to make time and put effort into the things I had missed the most while I was living in Vermont. I make time to drive to the beach for the sunset, eat outside whenever possible, talk to strangers and share a moment, etc.  There’s positives and negatives in every location but we can bring those into focus with a little awareness! If you don’t like things the way they are, change them. I’m not saying to make a huge move to another city, but rather to seek out the things you need and want in the city you’re in.

7.    Can you tell us about the process of choosing an illustrator for your book? Did you already have a particular style and/or Bridget Davies in mind while you were writing it? 

When I was writing the book, I wanted illustrations that enhanced the emotional connection I hoped the book would convey. I saw Bridget’s illustration of blue shoes on a blog I follow and knew immediately that she was the ONE. I never pursued anyone else from that moment on.

8.    With Bridget based in the UK and you living in LA, how did you work together to bring the book to life? Did you meet in person at all, or did you work exclusively via email, Skype etc.? 

I contacted her via email and made arrangements to meet her for the first time at a London Airport while I was traveling in Europe. We sat and exchanged ideas and the deal was sealed. From then on, we worked via Skype and email with only one other meeting (over tea) in London throughout the entire process. She is an amazing artist and she just kept inspiring me.

9.    Did the illustrations and the book overall come out as you initially envisioned or did it change along the way?

The illustrations were Bridget’s artistic style from start to finish and while we changed a specific shoe shape here and there, her artistry is what I relied on and trusted throughout the process. She provided me with so many beautiful images that the hardest part was deciding which ones NOT to use! I am so fortunate to have had her working alongside me in this creative project.

Be the Shoe would make a great Mother's Day gift, and is available here.

Be the Shoe Interview with BrownPaperBunny

What do your shoes say about you?

In Fashion Illustration, Illustrations, March 2017, Watercolor
Comment
100-Day-Project-BrownPaperBunny-2-web.jpg

100 Days of Flowers

April 20, 2017

This year I'm participating in The 100 Day Project, which is designed to encourage you to be creative for 100 days, and build it into your everyday life as a solid habit. It's a little ambitious seeing as we have a newborn at home, but I needed some 'me time' every day, even if it is just five minutes between feeding, burping, doing laundry, and then starting all over again. 

I picked the fairly general theme of 'flowers' to give myself plenty of room to experiment with different styles and mediums, and knowing that often I won't have more than a few minutes each day to dedicate to the project. 

Here are a few of my daily creations so far. 

View fullsize 100 Days of Flowers by BrownPaperBunny

I'd love to know if you're doing The 100 Day Project this year, or if you've ever done anything similar. Leave me a comment and let me know what you thought of it.

In Illustrations, Fashion Illustration, March 2017, Sketchbook, Watercolor
12 Comments
#StepForward with Famous Footwear and BrownPaperBunny

#StepForward

March 23, 2017

Thank you to Famous Footwear for kindly sponsoring this post. This post also contains affiliate links, which help pay for the upkeep of this site. That being said, I will never, ever promote anything I am not 100% in love with!

I've never told my story publicly. It's hard for me to talk about things this personal. But when Famous Footwear asked me to be part of their #StepForward campaign I decided it was time. I hope that my story will show other women that there is always opportunity to change your path, no matter how old you are, how broke, or how scared.

Growing up with a single mom, and very little money, I watched her struggle to give my sister and I every opportunity — even if it meant paying for ballet class with handfuls of change, or hitchhiking to get into town when the car was broken down. Of course she never let us know how tight money was or how often she went without to provide for us. 

I am so incredibly thankful for her, and the childhood I had. I was loved, and it made me independent, ambitious, and determined to make my own way in the world and always have enough money to support myself comfortably. 

So I got myself to college, paying my way by working 40+ hours a week at a local supermarket while studying full-time, got good grades, took internships, and found myself a corporate job before I'd even graduated. I wasn't taking any chances. 

For almost 17 years I worked my way up through corporate life at big defense contractors, management consulting and legal firms, then moved into consumer electronics and the tech industry. I saved, I went back to school and got my Masters while working full time, then another degree, then another. I never stopped learning, working, saving. There were jobs where I traveled for seven months of the year, jobs where I worked over 100 hours a week for months on end, and certainly times where I slept in the office when there were deadlines to be met. I shared houses with lots of other (sometimes horrible) people to keep my rent low so I could pay off all my school debts, I never bought anything I couldn't pay for in cash, and I started side hustles along the way. I did wedding photography on weekends, joined dance troupes and performed at events, and worked the 9pm to 4am shift at cocktail bars so I could still get up in time for my day job.

In my mid thirties I'd consider myself pretty successful, and say 'I'd made it'. I was running a department for a billion dollar consumer brand, and killing it. I was married to the love of my life, living in a big house, driving a BMW, and had no debt. But something had started to change, and I wasn't really very happy.

I'd only begun exploring my creativity a couple of years before, and I was finding more and more joy not only in painting and illustrating but in being a part of the creative community. I found myself getting an almost physical itch if I hadn't had time to make anything in a few days, and the achievements in my corporate life seemed less and less important to me. I daydreamed about being an artist and illustrator full time, but something inside screamed at me that I had to earn lots of money or I'd find myself back in my childhood, scrounging for change in the back of the sofa. I was too scared to take my dream seriously. 

Then our lives changed overnight. The company that both my husband and I worked for (and had just been promoted at) downsized in a big, and very unexpected way. The whole executive team was gone in one hit, almost everyone at a Director level and above was marched out without any notice, hand-over, or chance to say good-bye. Our whole world was turned upside down in a day. We went from having VERY good salaries to being a zero-income family.

My husband, who was on a work visa, sponsored by the company, had to go back to Australia immediately, while I stayed behind wondering how to sell everything we owned, the house we'd just bought, our cars, to pack up our lives and go back to Australia. We'd moved countries for this company, we'd given up our lives, friends, family, and worked tirelessly for them for years. I just kept thinking, how could they do this to us?

To top it off we'd just found out I was eight weeks pregnant with our first baby. I'll never know if it was biology or all the stress and heartbreak from that time, but I miscarried. It completely devastated me. 

Since the day we met, my husband and I had never been apart for more than a week or two, so the months that we had to spend on other sides of the world was horrible. We were having trouble seeing a way forward, but we never stopped trying, brainstorming, coming up with alternate plans and ideas. Then a close friend here in the US stepped in and sponsored my husband's visa to come and work for his company. It was a fraction of the money we had been used to, and I still wasn't working, but it was something. I was getting my husband back. 

For the next few months I worked hard to build up my own consulting business from home, while my husband commuted from Colorado to San Diego every second week for work. I was just so done with working in the corporate world and having to report to short-sighted people with no vision, who didn't share my drive, or appreciated how much work their teams put in to make them look good. I started crafting the life I wanted. Fewer clients, cutting our living experiences so I could work less hours and have more opportunities to work with people I really wanted to help ... other creatives. I wanted to use my years of experience to help other people like me make a living being creative, on their own terms.  

Miraculously we got pregnant again. But instead of feeling joy, we were scared. Would we miscarry again? How would we support our family on our reduced income? But we made the conscious decision to just keep stepping forward and figuring it out as we go. Because despite our life being at its 'messiest' we're moving in a much more positive direction, and taking more control of our lives rather than letting our bosses, corporate aspirations, or outside forces dictate where we go next. 

These days I'm working from home as a Social Media Consultant and Artist, and loving the freedom it affords me. Without all the distractions of an office, I get a whole day's worth of work done before lunch, and have more time to create, and help others. Our baby girl is due within the next two weeks, and we're working on getting my husband residency. As hard as this time has been it has really opened my eyes to new possibilities, and somewhere along the way I've given myself permission to be me, without any apologies. It has been freeing, and I've never been happier.

So to me, Stepping Forward means never giving up. Some days they're only small steps, some days huge, but you've got to keep moving in the direction that will help you create the life you want. Everyone's journey is different and you've got to find the pace and direction that works for you. Don't be afraid to make a change, or to pursue your dreams even if they feel unattainable right now. Just start moving towards them. 

As part as the #StepForward campaign I've done a lot of thinking about my journey and just how grateful I am. If I can even inspire one other woman to take a step towards her own dreams, I'll be supremely happy.

So here's how I customized the Converse All-Stars that Famous Footwear sent me, and made them my own. A year ago I might have painted them in black and white, but now they are full of color and gold and whimsy!


Tutorial: How to Customize Your Own Converse All-Stars

I started with white Converse All-Star Low-Top Sneakers, and removed the laces.

How to Paint Converse All Star Sneakers by BrownPaperBunny

I used a combination of Tulip Soft Fabric Paint and Sharpie Fabric Markers to customize my kicks. I let each color dry for 15-20 minutes before starting on the next, and once I was done painting the shoes I let them dry overnight before touching them too much. 

How to Paint Converse All Star Sneakers by BrownPaperBunny
How to Paint Your own Sneakers by BrownPaperBunny

I painted the shoelaces as well, one in gold and one multicolored and hung them up using bulldog clips and string overnight to let them dry. 

How to Paint Your own Sneakers by BrownPaperBunny

After about 24 hours I re-laced them and I was good to go!

How to Paint Converse All Star Sneakers by BrownPaperBunny

Do you ever customize your shoes, clothes, jewelry to be more 'you'?

In Fashion Illustration, March 2017, Tutorial
26 Comments
Jessica Mack from BrownPaperBunny Art Studio

March Meet the Maker

March 16, 2017

This month there are a lot of artists and makers participating in a monthly challenge to 'Meet the Maker' by sharing different aspects about themselves and their work. It's really fun and I'm learning so much about my lovely online friends!

I've been crazy busy trying to wrap up a lot of work and projects before Baby arrives, so I'm picking just a handful of prompts to post about, but here they are so far. 

1. You 

I'm an Aussie Artist, Illustrator and Social Media Coach living in Colorado. I'm addicted to watercolors, fashion illustration, and bright colors. Things you may not know about me...I used to drive tanks for a living, I've owned more motorcycles than cars, and I only started drawing when I was 31. I'm also really passionate about teaching other creatives how to use social media and online marketing and branding to their advantage.
You can read more about me here.

Jessica Mack from BrownPaperBunny Studio

2. Favorite to Make 

My favorite thing to make? Fashion and lifestyle illustrations with watercolor, ink and mixed media! Leave me a comment and tell me what your favorite thing to make is!

Fashion Illustration by BrownPaperBunny

3. Workspace

I'm lucky enough that in our new-ish house my husband and I each get our own workspace rather than having to share like we have in the past. Mine is all color and light, and his space is filled with black leather chairs, dark wood, concrete planters, and black screen-printed art and posters. Even though I have my own studio I still end up working on the kitchen table quite often because the back of our house looks over the foothills of the rocky mountains in Colorado and I love to take breaks and just look out at the sky, the mountains, people fishing in our little lake, and the sunsets have been magical lately!

BrownPaperBunny Art Studio

4. Tools 

Most often I use watercolors, Tombow markers (affiliate link to the specific ones I like best) and liquid ink, gouache, and acrylic paints. What tools of the trade do you use? 

Art Tools BrownPaperBunny

7. How It's Made

I love posting time-lapse videos of my art so people can see how I put it all together. I also love seeing other people's processes, sketchbooks, and works in progress! Here's one of my recent illustrations from start to finish.

9. Work In Progress

Here's a little video of my sketching some repeating patterns in my Sketchbook Project. You can see the finished book here. 

A post shared by Jessica Mack 🎨 Colorado Artist (@brownpaperbunny) on Feb 1, 2017 at 7:16am PST

10. Recommend a Maker

I'm recommending my lovely online friend Anika from @AisforAnika. She makes the most wonderful hand-drawn (and now digital) patterns and artwork. 

A post shared by Anika Starmer: Patternthusiast (@aisforanika) on Mar 4, 2017 at 8:41pm PST

11. Post / Mail

I am a BIG fan of both sending and receiving mail. With most of our family and friends living overseas we send quite a bit of it. And I love sending mail so much that I was a scriptist for Punkpost (but am on break now until after the Baby arrives). 

Punkpost Scripting with BrownPaperBunny

12. Brand Image 

Here's a visual representation of the @BrownPaperBunny brand. Pinks, teals, and golds with lots of watercolor, ink, and a good dose of peonies. I wanted my brand colors to be 'rainbow' but my designer husband made me pair the colors back a little. ;)

BrownPaperBunny Brand

13. Photography

As well as painting and illustration I count photography as one of my creative passions. My husband and I love to travel and I've been fortunate enough to go all over the world for both business and fun. You can join my travel adventures over at @SweetDivergence if you're interested. This photo was from a trip we took up to Aspen in the fall two years ago. 

Maroon Bells Aspen by Jessica Mack of @SweetDivergence

14. Creative Friends

I count myself super lucky to have found so many creative friends 'in real life' as well as many more online. I cherish them all dearly.

Creative Friends

If you'd like to participate, you can jump in at any time, and here is the list of daily prompts. 

March Meet the Maker

You might also like these posts:

Featured
CRL-Horizontal-Laptop-Beige-Floral-Painting.jpg
Creative Retreat Live
Rainbow-Watercolor-Wreath-Using-Markers.JPG
Rainbow Wreath Tutorial
15 Ways to Journal by Jessica on BrownPaperBunny
15 Ways to Journal
JessicaMack-Mothers-Day-Art-8.jpg
Make Your Own Mother's Day Art
Galaxy-Butterfly-1.jpg
Watercolor Galaxy Butterfly
IMG_1209.jpeg
How to paint a watercolor cactus
In Fashion Illustration, March 2017, My Studio
33 Comments

Subscribe

Sign up to receive social media tips, freebies, special promotions, and art tutorials!

Thank you!

Please click confirm in the email you were just sent!

Directory of Illustration Jessica Mack

Shop my work on Society6

Watercolor World Map by Jessica Mack of BrownPaperBunny

Follow on Instagram

For the 100 Days Project this year I’m keeping it super low pressure. I’ve got a very busy couple of months coming up and want to set myself up to be able to stick with it, while still making sure I do something creative every day. You ca

See my classes on Skillshare

Skillshare Classes by Jessica Mack

Popular Posts

Popular Posts
CRL-Horizontal-Laptop-Beige-Floral-Painting.jpg
Creative Retreat Live
Rainbow-Watercolor-Wreath-Using-Markers.JPG
Rainbow Wreath Tutorial
15 Ways to Journal by Jessica on BrownPaperBunny
15 Ways to Journal
Tombow Brush Pen Markers and Colored Pencils
Brown Paper Bunny

Privacy + Terms of Use

Shop

Watercolor with Markers Book

Classes

Art Tutorials

Art & Illustration Portfolio

About

Contact

Custom Book Print

Custom Book Mug

How to Paint Watercolor Flowers Using Markers

Free Fashion Croquis

Start an Art Journal

6 Easy Flowers to Draw with Tombow Markers

Make Your Own Watercolor Bookmarks